Hi guys and welcome to 123myIT. In this video, we will show you how to setup Windows Hello Fingerprint.
If you do not know what Windows Hello Fingerprint is, it’s the little button on your Windows computer that allows you to log in to your computer without typing a password. So your fingerprint becomes the password. Let get started.
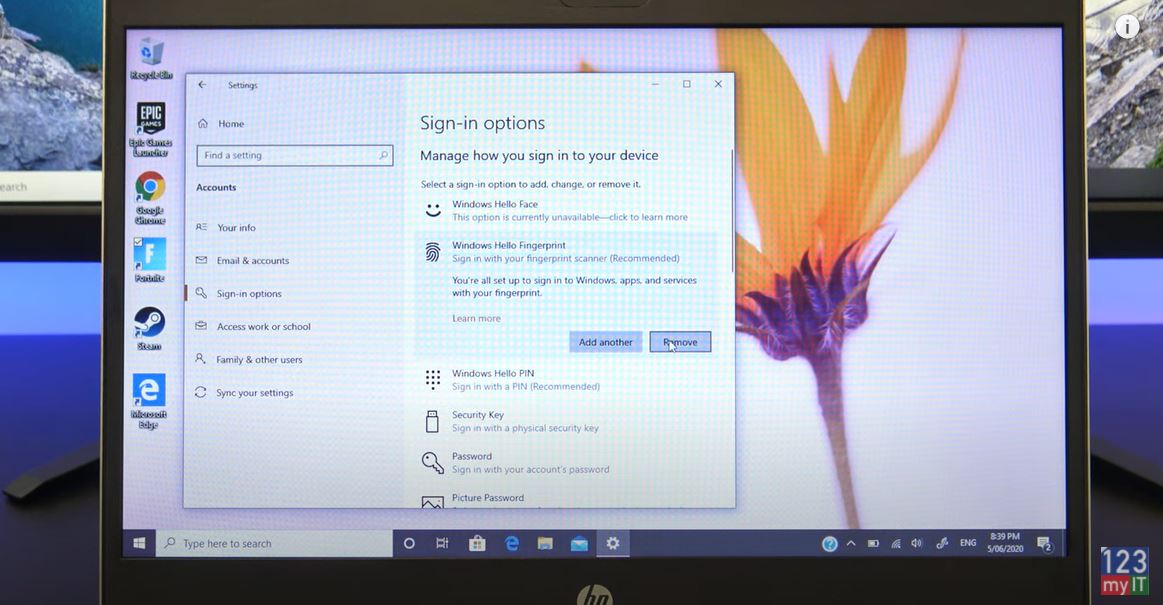
If you click on Start then go to Settings. In addition, click on accounts and go to sign in options.
Sign-In Options and Setup Windows hello
Then go to where it says windows hello fingerprint. Now I have already setup my fingerprint. So I am going to click remove and then click setup to create a new one. Next you click on Get started. Now it may ask you to setup a PIN. Go ahead and type one in. Otherwise, if you do not know your PIN you can click Forgot my PIN.
Ok go ahead and start tapping your finger on the fingerprint sensor. Remember to move it around a little bit, so it picks up your finger at any angle. Click next and then tap your finger again a second time. Awesome you are all set now time to test it to make sure it works.
Lock your computer and then unlock it with your fingerprint. Sweet its working!
Guys don’t forget to check out my other videos such as HP ProBook 430 G7 in three minutes. And do me a favour if you know anyone who might need this video please share it will them, hit the subscribe button and smash the bell icon.
I get allot people asking me. Why would you want to install Windows 10 on a Mac? Moreover, my reply is always. You have nice Apple hardware; why not put the best OS software on that hardware? People, if you disagree leave a comment in the comments section below.
Get Windows 10 for FREE
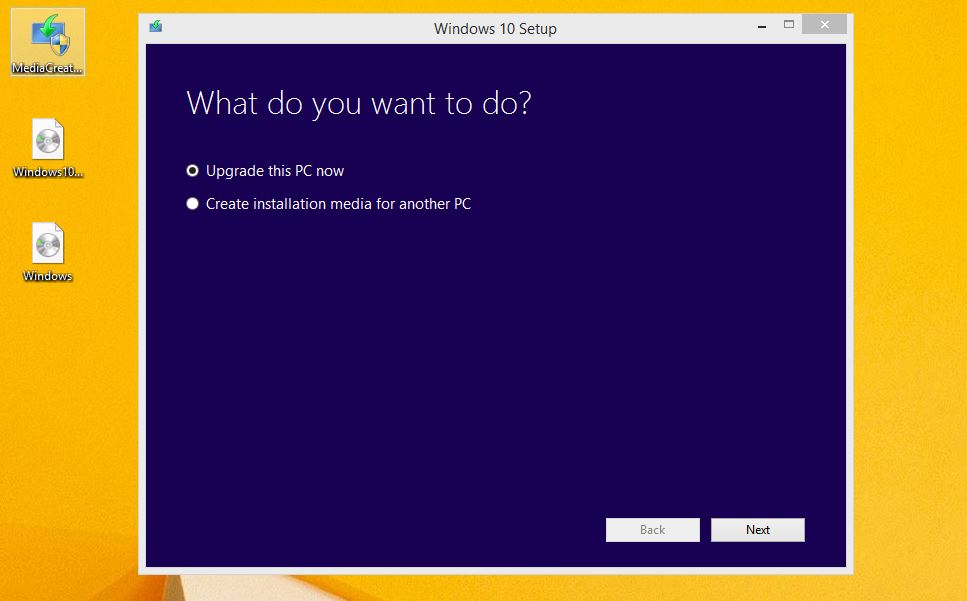
Ok let us get started. You will need a Mac a USB stick and a copy of Windows 10. To get a FREE copy of Windows 10 you can get it from the 123myit.com website under downloads. However, you will need a Windows computer to download that copy onto your USB drive. In the Downloads section scroll down to where it says Windows 10 Media Creator tool and run that. Select create installation media for another Pc. For language, I select English US, Edition Windows 10 Pro and Architecture 64 bit.
Next we want to select ISO file. This is the Windows 10 file that we will copy to the USB and then from that USB we will copy it to your Macs Desktop.
SanDisk USB C and USB 3
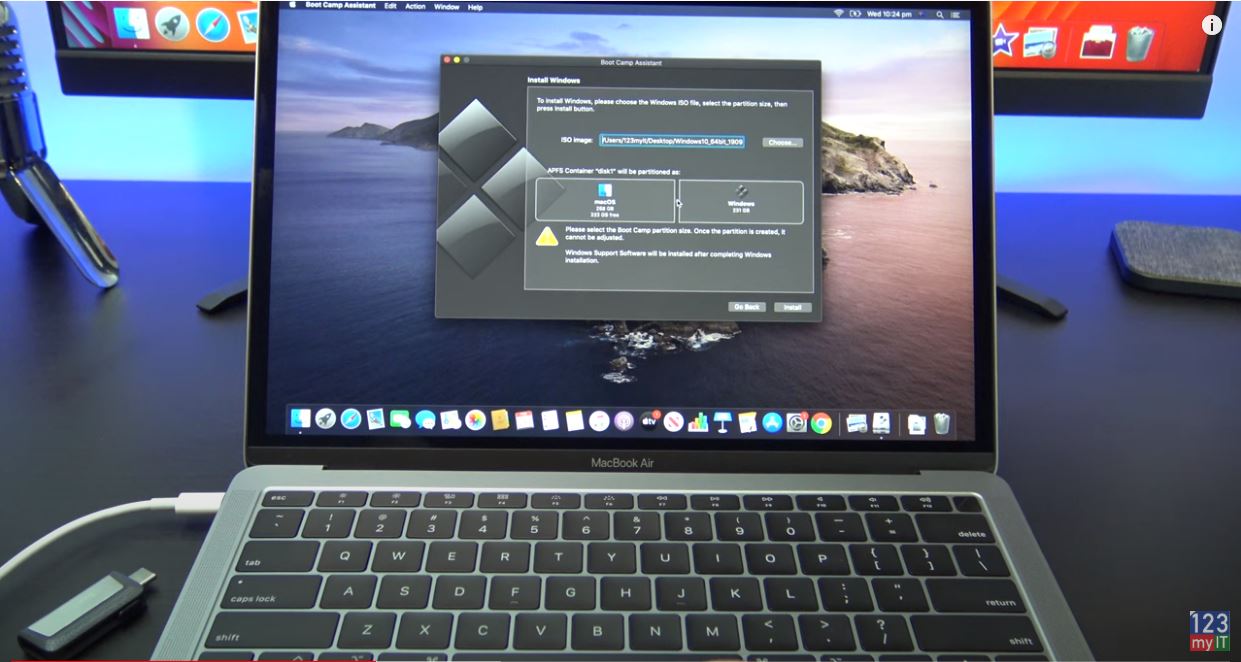
Ok so I have already copied the Windows 10 ISO file to my Macs Desktop from the USB stick. The USB stick I am using is a SanDisk Dual drive USB. It has both USB C and the older USB 3 so I don’t get stuck when using USBs on my new MACs. They are helpful I will leave a link here. Once the Windows 10 ISO file is copied to your Macs desktop. Go ahead an open Boot Camp assistant. Just click on finder and search Boot Camp.
Ok if Boot camp does not select your Windows 10 ISO file Automatically go ahead and select it manually. Mine has detected so all is ok.
Partition the Macintosh hard drive to keep both Mac and Windows.
Partition your Macintosh HD
The next step is to Partition your drive so that you can fit Windows 10 onto you Mac. If you are unsure about this just move your slider to halfway. Click install and then your Mac will download the Windows support software. This may take a while so let the Mac do its thing. Next, it will partition the disk and just follow the prompts it will restart.
If everything has gone ok you should see the Windows 10 setup screen. Just go ahead and select the options for Language and Click do not activate Windows now.
Ok select your country and follow the prompts to setup Windows 10.
So setup for personal use, click that and I always just use offline account. However, feel free to setup Windows whatever way you want. Click limited experience and then type in your user name. I just create 123myIT as a user. Add in a password and click next. I always click no and decline. Up to you, what you want to select for Privacy settings I just click no.
Installed Windows 10!
Awesome you have just installed Windows 10 on a Mac. The last step here is to make sure the Boot Camp drivers are installed. It is an important step so do not skip this. Otherwise, things like your sound buttons on your Mac will not work properly.
You should see a Boot Camp Window on your screen just click next and follow the prompts. If you didn’t get this screen go back into your Boot Camp folder on your hard disk and run the boot camp setup.exe file again. If you want to check your drivers are installing properly go into device manager and you should see all the devices install properly.
Sweet that is finished now check your devices and you can do a restart and test if your Sound and Volume buttons work ok.
People do not forget to check out my other videos such as Copy Music from Android to iPhone, iPad and iPod. Please feel free to ask questions in the comments felid below. In addition, can you do me a favour hit the subscribe button and smash the bell icon.
If you did not know already, The Witcher is Netflix series, which is due to be released on the 20th of December. Before that, it was a series of books written by Andrzej Sapkowski. In 2015, The Witcher 3 game was released and it won numerous Game of the year awards. This was one game that I felt like I missed out on playing, so when I found out that the Witcher 3 supports XBOX controller on the PC. I decided to build a media pc complete with an XBOX controller.
In this build, I repurpose an OLD HP Z800 which featured in a Cryptocurrency CPU build I did. And I will be reusing an RX 570 card which I used in the Kraken mining rig build. I will put a link to that video as well.
All right let get started.
If we take, a look at the specs needed to run the Witcher in the z800 we have 12 GB of ram and duel Xeon X5660s which is more than enough and adding the rx570 should give us a great result for a media pc build.
AMD RX 570 GPU install.
First up let’s remove the Nvidia Quadro 4000 card. Remove
the 6 pin power plug first. You might have noticed I did not use the GPU clip,
which unlocks the card from the motherboard. That is because I’ve modified the
clip and when I say modified I really mean I broke it. I did this because I
found the clip annoying when adding and removing cards.
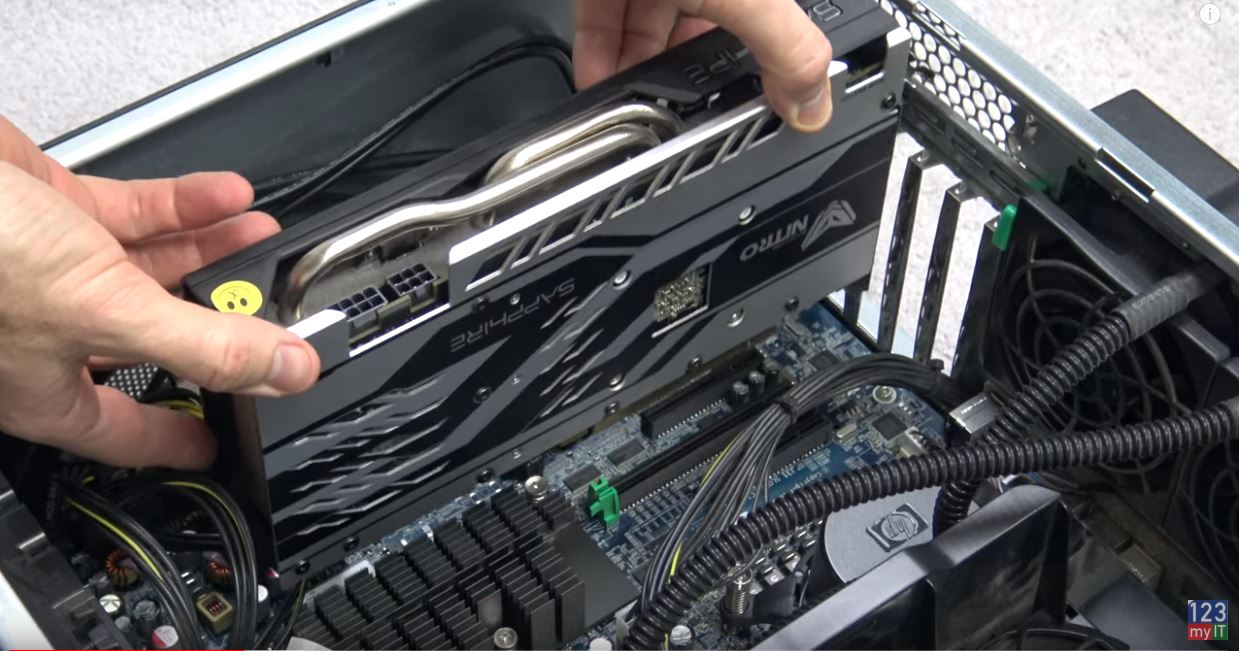
Install the GPU RX 570
Let’s remove the Sapphire RX 570 from the Kraken mining rig
by removing the 8 pin power cable. As well as removing the PCIE connector from
the bottom. The Sapphire RX 570 cards are great for mining and gaming and heres
why. They have a dual bios switch, which means you can have one bios for Mining
and one bios for Gaming. So I just switch the bios switch over and start gaming
with it. I do not have to flash the bios or anything messy like that.
As you can see she’s a bit dirty, so let’s give her a quick
clean up before we move her into the case.
Alright let’s add the GPU to the case. Pretty straight
forward. Just add the card in the same spot we removed the Quadro 4000 card
from.
The Z800 only comes with 6 pin power connectors. So we need
to add a 6 pin to 8 pin power connector. You can get these cheap online.
Make it power efficient as possible.
I am going to remove the SATA hard drives and replace them
with a faster SSD. You could keep these in if you wanted extra storage for games
or movies, but I do not need it and they will just waste power being plugged
in.
The SSD I am going with is a Kingston brand and I could slot
it into the same spot as the SATA hard drive, however it will not have any
support there so I am going to gerry rig it inside the case.
Add in a new SATA cable and give it some power. And then I
just find a spot to wedge it in the drive bay area and it’s good to go. Plug
the SSD into the motherboard on bay 0. Remove the power from the DVD drive
since I am not going to be using that.
Close the case and hopefully we are done on the inside of the build. Next up plug in power keyboard and mouse into the media pc build.
Install Windows 10
To install Windows 10 I’ve got an installer copy on this Seagate
USB hard drive. Newer USBs do not seem to detect properly on this older
computer. Do not forget our HDMI cable for our monitor. To boot into bios or
boot menu. On your keyboard you might have tap F2 Delete or in this case of the
Z800 you press F9. Once you are in the boot menu select the USB device. Then go
ahead and install Windows. When windows finishes installing remove your USB hard
drive.
Check that your RX 570 card is correctly installed. This is
important if they were used for Cryptocurrency as they will show up with a
yellow exclamation mark next to them and your game will be slow or not even
load. Make sure your driver date is on the money as you can see here mine is
recent so we are good to go. This next addition is what will really make the build
shine. We are going to add in the XBOX controller. The Beauty of the XBOX
controller is when family or friends come over to your house and they are a bit
bored, you throw them an XBOX controller and they are instantly entertained.
XBOX Controller working?
All right plug in your XBOX USB and let it detect in Windows. Go ahead and pair your controller it, the USB should flash when successful.
The Witcher build going live!
Ok so I have connected the Z800 to my LG TV and I’ve got my XBOX controller ready to go for the media pc build. But I feel like there is something missing. I still feel like there is something missing. How about LEDS? That is better!
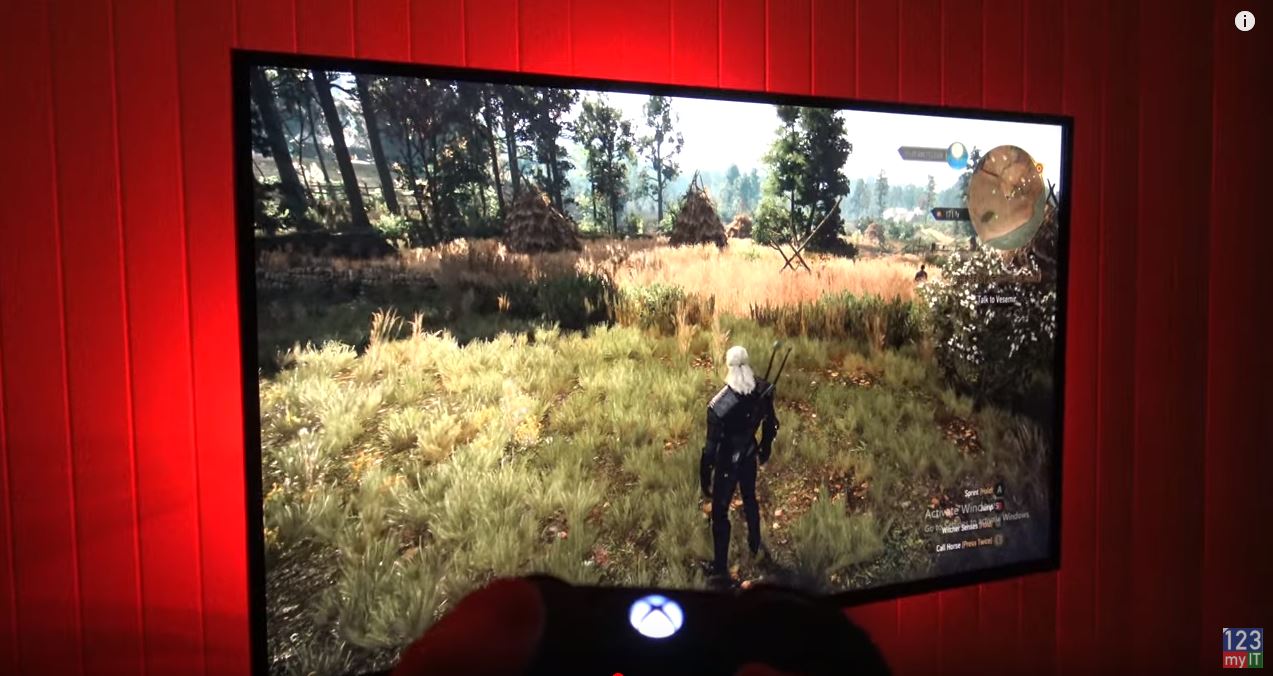
Cool, let’s fix up the TV settings. On the LG TV I have this
button called Q menu and it allows me to choose a few different TV options such
as Gaming and Cinema. What I noticed is the picture on Cinema was far superior
to Gaming. Because I am not playing the game competitively, I am just going for
the best picture and man it really made a difference. Take a look.
I decided to leave it on Cinema. A quick check to see how
many frames the RX 570 is giving me and as you can see here, it is a solid 60
frames. Its a great result. I tested this on my 120 hertz monitor. I set the
game to unlimited so I am sure it is higher than this but maybe it is a limitation
of the TV.
Hi Guys and welcome to 123, in this video I will show you how to turn off Turbo Boost in the bios.Ok guys about 2 years ago I made a video on how I fixed CPU Game Lag by turning off Turbo boost on a laptop with software. And you can find that video here.
A few of you guys are still having issues, mostly on laptops where your CPU heats up and it start to throttle down to stop itself from over heating.
What you can do is turn off Turbo Boost and this will reduce heat of your CPU, stop the CPU from throtling back and then this should stop your Game from lagging.
On my ASUS laptop the software helped me and allot, but some users couldnt use the software because their CPU wasnt supported. This video should help resolve that issue. Lets get started.
CPU Check – turn off turbo boost
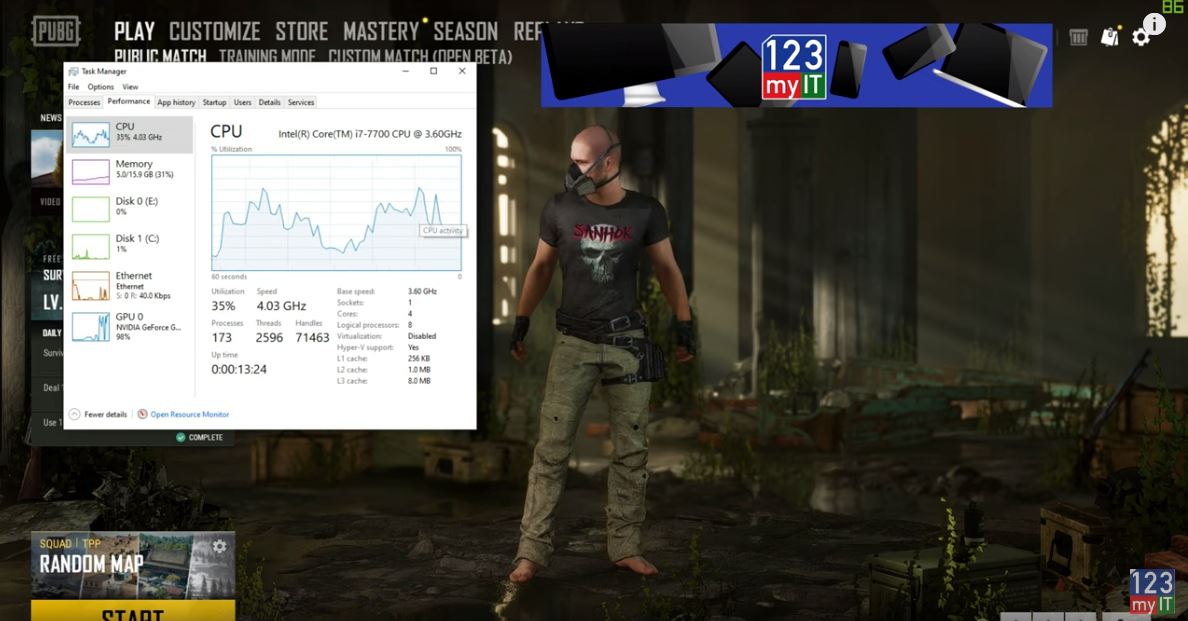
Ok so the first thing to do is check your CPU. We can do this by right clicking the Taskbar and going to Task manager. Once in there if you click on More Details and click the performance tab. Click and highlight CPU and take note of your CPU speed and base speed. As you can see my base speed is 3.6GHz and my actual speed is 4.00GHz. This means I am getting Turbo Boosted from 3.6GHz to 4GHz. So turning this off should drop my speed back to 3.6GHz.
Check your CPU performance first so you can check the bios change.
I know what you are thinking, hey but wont that reduce the computer speed. Kind of yes, but it will reduce heat and may fix your lag. Plus you can turn this back on at anytime. Before I show you how to turn it off, let start up your game that you are having problems with and check what your CPU is doing. In my case its PUBG.
Alright start your game up and press Alt Tab to show your Task Manager and you should see some more activity on your CPU now. For me you can see that it doesnt really go past halfway and actually most of the work is being done by the NVidia GPU which is sitting on 98%. This is a good sign that Turning off Turbo Boost shouldnt effect the game play.
Enter Bios
Ok Restart your PC and tap your bios key to get into bios. For my ASUS mother board the bios button is Delete. However on different brands it could be Escape, F1 or F2 or something different. On some motherboards its F10 if you cant work it out check the manufactures website.
Once you are in your bios it should look something like this. You will need to find your CPU menu. For me its in advanced mode.
Click the Advanced tab and then click the CPU Configuration menu.
Scroll down to and find CPU power management control. You can see that Turbo Mode is Enabled. Just set this to disabled and press F10 to save changes. These steps should be simular for other brands of motherboards.
Test your settings change
Awesome you have made it this far restart windows and go back into Task Manager. Excellent you can see that the CPU speed has dropped down from 4GHz to 3.4GHz. This means that the bios change worked. Start your game back up and test and see if you are still getting the throttling game lag. If this doesnt help you can just go back into the bios and turn Speed boost back on.
Also guys don’t forget to check out my other Gaming PC Setup videos like Nvidia Control Panel. And do me a favor hit the Subscribe button and smash the bell icon.
Use the Nvidia control panel to increase performance of your games.
Nvidia Control Panel – What can it fix?
If you are having issues with your Gaming Pc such as Low Frame rates Game lag or Game Stuttering, then this video should help. By following this video and optimizing the Nvidia control panel you can do the following.
As mentioned this video is for Nvidia GPU, If you have an AMD GPU I plan to do video for AMD as well so make sure you hit the subscribe button.
Nvidia Control Panel – Config
Alright first step is to open your Nvidia control panel. You can do this by right clicking the Desktop and selecting Nvidia control panel. If you cant find it there try looking in the bottom right hand corner of your screen near the time. If you still cant find it, check what GPU you have installed by right clicking the start button and selecting Device Manager. Under Display adapters you can check what Nvidia GPU you have and download the driver for it.
Download your GPU drivers – Nvidia.com
Head over to nvidia.com and download your driver or you can download the GeForce Experience software and I will leave links to those pages in the description below.
In the Nvidia control panel go to Adjust image settings with preview. Click on use 3D image settings and click Apply. Next up click on Manage 3D settings and make sure you are on the Global Settings Tab. These settings will apply globally you can change these at any time or click restore if you want to set settings back to defaults.
Set Ambient Occlusion to Off
Anisotropic filtering to Off
Antialiasing to Off
Leave Gamma correction On
Antialiasing – Mode Off
Antialiasing on or off?
Don’t worry you can still turn Antialiasing on in Game. Also if the options aren’t the same as this video just change the options that are the same.
CUDA -GPUS Should be set to all.
DSR Factors should be off.
With Maximum pre rendered frames set this to 1, if you have an older pc you can try setting this to 2 or 3. But if you have a newer PC set this to 1.Multi-Frame Sampled AA set to Off. Open GL set to Auto.
Power Management Mode set this to Prefer Maximum Performance.
Preferred Refresh rate set it to Highest Available.
Shader Cache set to On.
Turn on – Texture Filtering – Anisotropic
Texture Filtering – Negative LOD Bias set to Allow
Texture Filtering – Quality set to High Performance
Threaded Optimisation you can set to Auto, however if you play games like PUBG, FORTNIGHT and Battlefield which are quite demanding. You can set this to On.
Triple buffering set to Off
Vertical sync to Off
Last setting Virtual Reality pre-rendered frames set this to the same value as Maximum pre rendered frames.
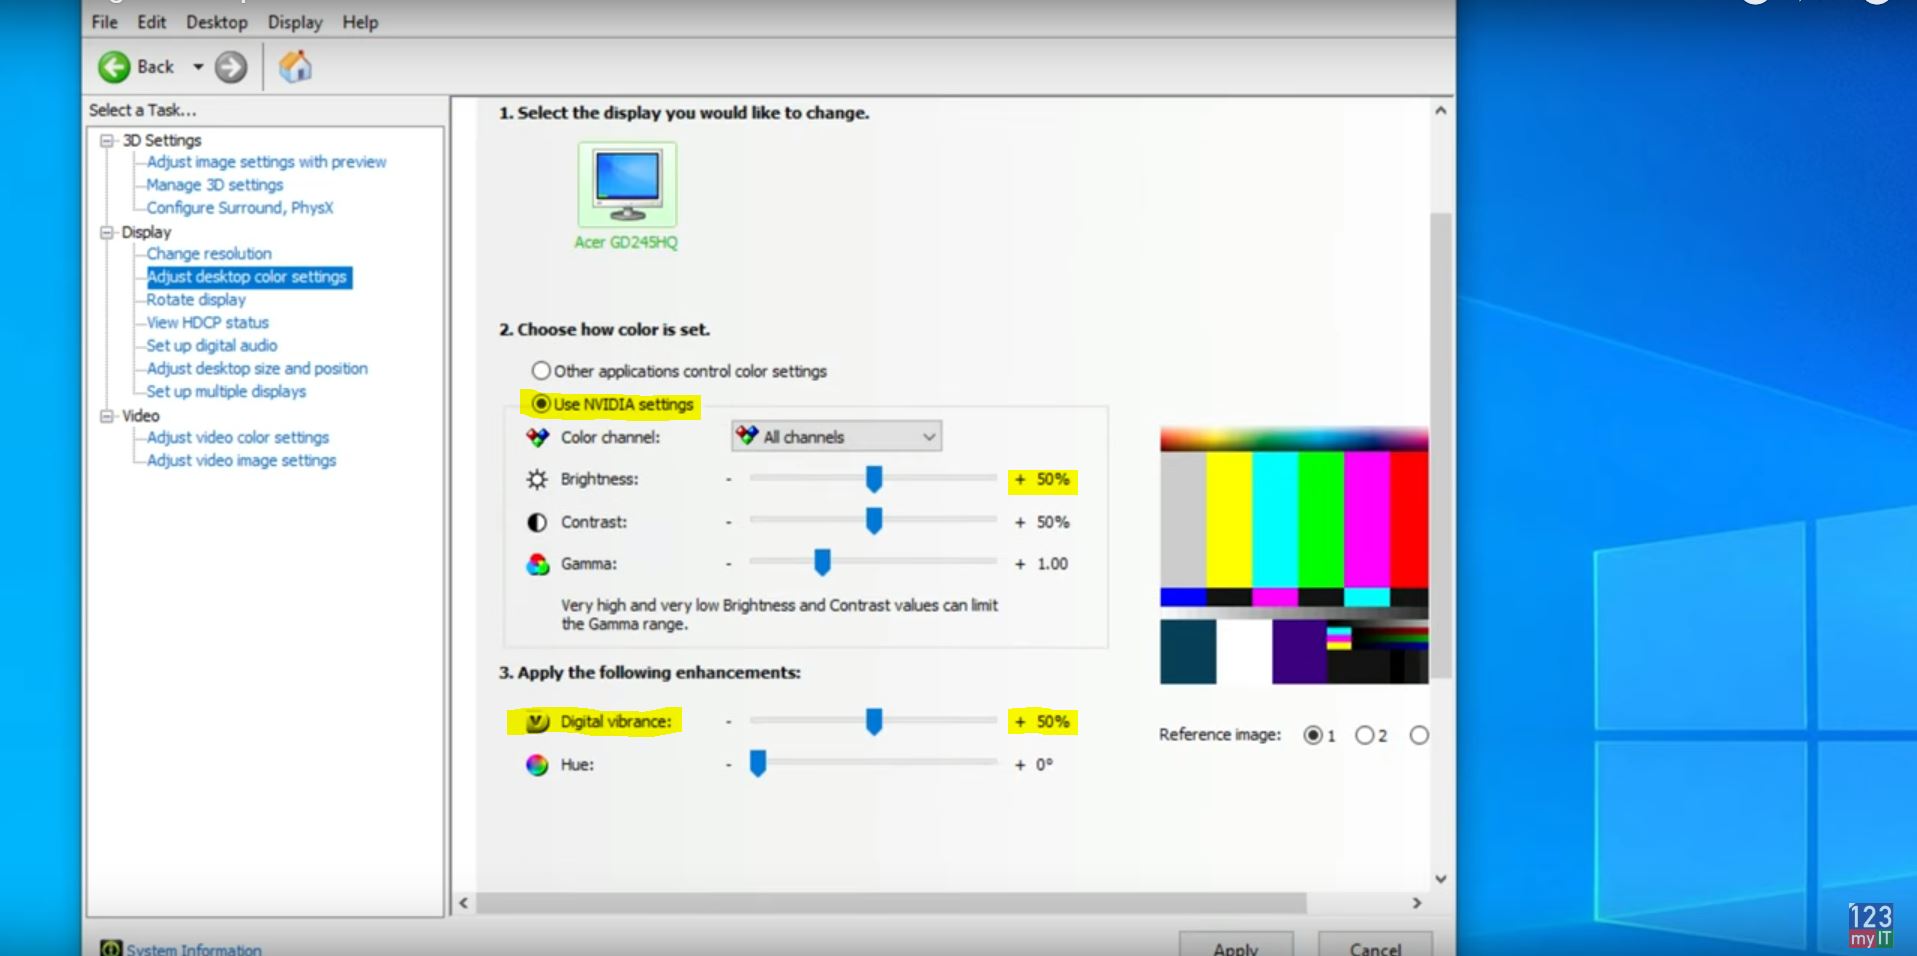
Once you are done make sure you click Apply. Once you have set this go ahead and click Apply. Next up go back to the left hand side and click on Adjust desktop colour settings. Select the Use Nvidia Settings on the right. Click Apply then click Yes.
PRO TIP!
Heres a little secret. If you play first person shooters you have just made the colours much better than the default ones by selecting Use Nvidia settings. Also if you scroll down to the Digital vibrance slider its default settings is 50%. If you slide this upto 80% suddenly the dark areas of your game will become much brighter. This will allow you to see your emimenes in game before they see you. This really helped me allot in PUBG.
PRO TIP: Use Nvidia settings to control brightness and colour – this helps when spotting enemies.
Best image and colour settings
Click Apply and then go to the Adjust video colour settings.
Next up select the with the Nvidia settings. Click onthe Advanced tab.
In the Dynamic range drop down menu select Full. Next click Apply this should allow you to see better colours when watching videos.
Next go to the Adjust video image settings.
In here you can also use the Nvidia settings and change these however you like. These last two settings only change video and image settings outside of Games and they wont effect Gaming performance.
Another point to mention is, if you update your Nvidia driver, make sure you come back to this video and check that the driver update hasnt reset your Nvidia control panel settings back to defaults. And lastly I get asked allot of questions about customising Windows 10 and AMD settings I will do a few more videos on this topic so do me a favor. Hit the subscribe button and smash the bell icon.
This video will show you how to Turn Spying off on Windows 10.
I get allot of tips from 123myIT subscribers on the 123myIT YouTube channel. The latest one was that Windows 10 has Spying and data capturing built in so, this user said he wouldn’t be upgrading to Windows 10. Since so many users of 123myIT have upgraded to Windows 10, I thought it wise to put some information up about this so called spying on Windows 10.
So whats it all about I hear you ask? Well, despite what you may have heard Windows 10 is not spying on you. So don’t worry to much about that.
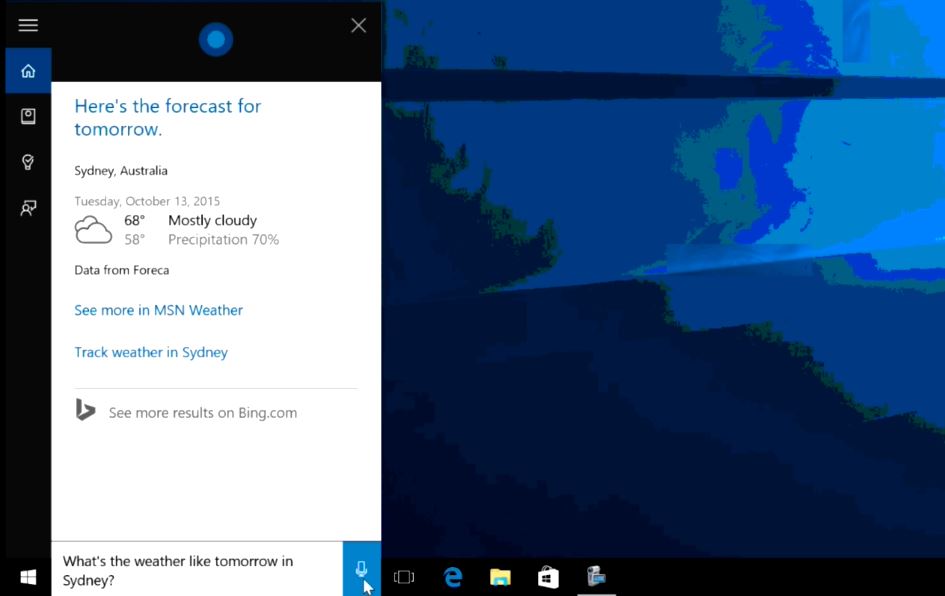
What is does do though is collect allot of data about you and that’s due mostly to Cortana. Cortana is a personal assistant that is built into Windows 10.
Read the below official company statement of Windows 10 privacy.
“Windows does not collect personal information without your consent. To effectively provide Windows as a service, Microsoft gathers some performance, diagnostic and usage information that helps keep Windows and apps running properly. Microsoft uses this information to identify problems and develop fixes. More information on the Microsoft Services Agreement and Privacy Statement for consumers is available on our blogs.microsoft.com website.”
Cortana can help you manage your PC by helping you find files, manage your calendar and answer any questions you might have. While using this myself I didn’t find it that great, however this is where it gets interesting.
The more you use Cortana the better it gets because its stores your previous history of questions etc. And this is where Microsoft is collecting data about you. Ok so I am not going to get into Cortana right now I will leave that for another video. I will talk about how to turn spying off on windows 10 if you are concerned about this.
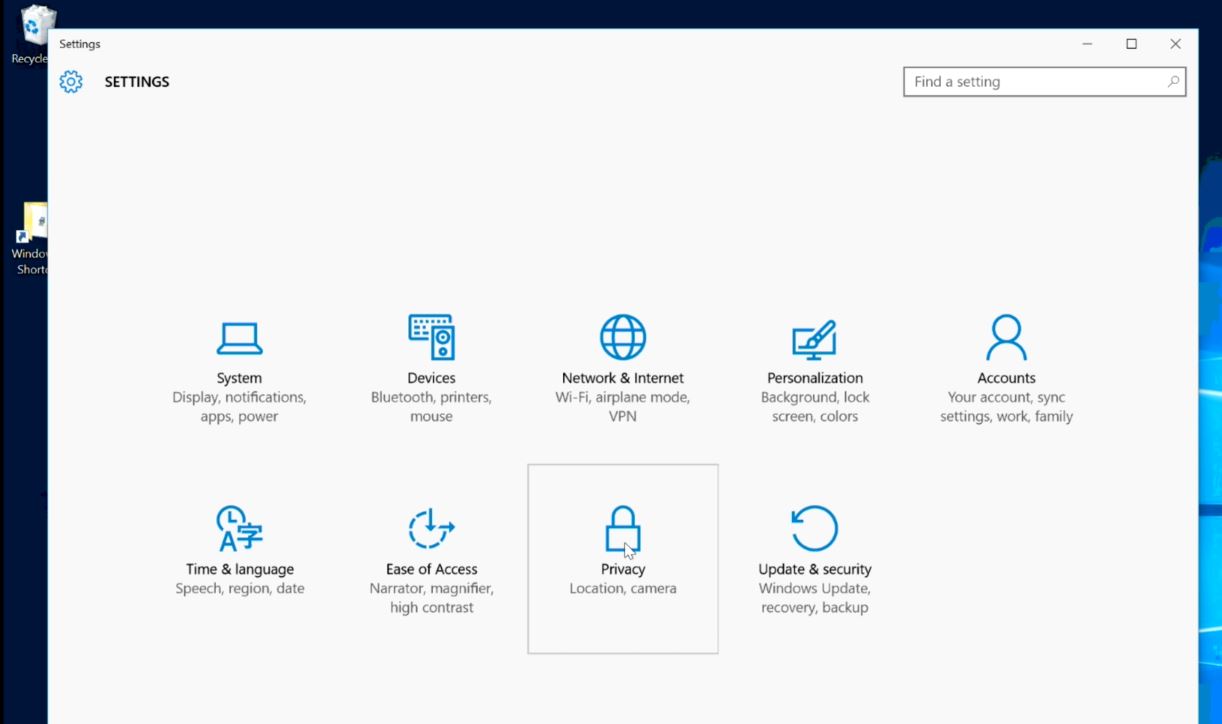
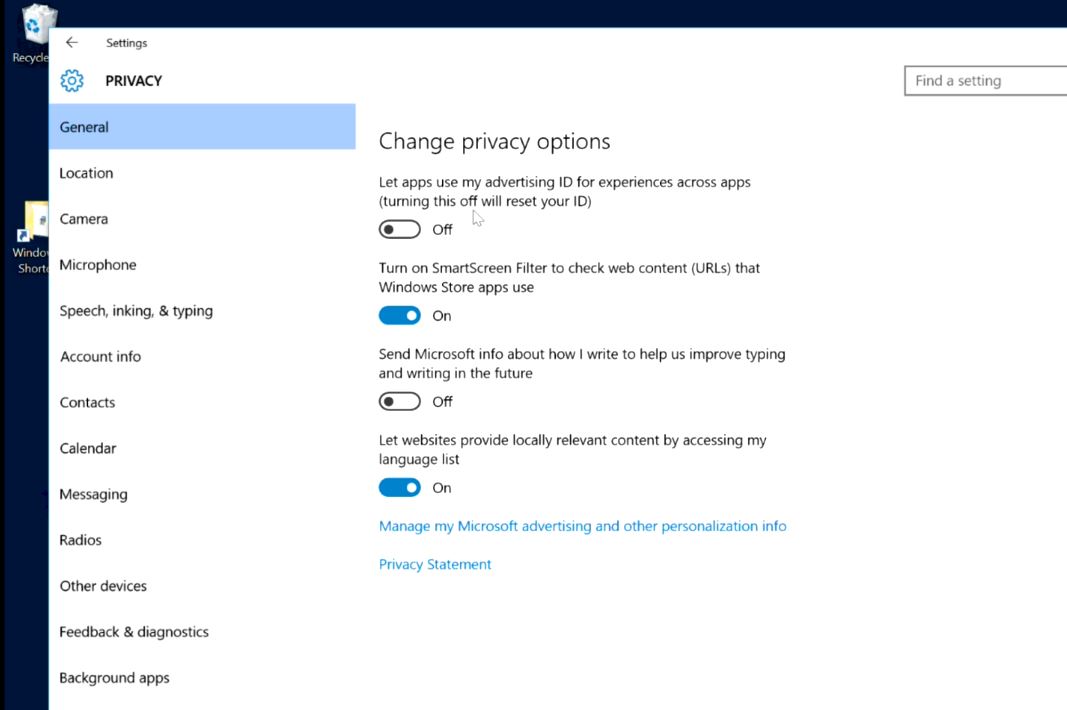
Go to Start > Settings > Privacy
Privacy > General
Pretty much all of the settings in this area have a toggle switch which allows you to turn the function on or off.
If you make your way down the list. Location, Camera, Microphone etc you will be able to toggle off any options that you are not comfortable with.
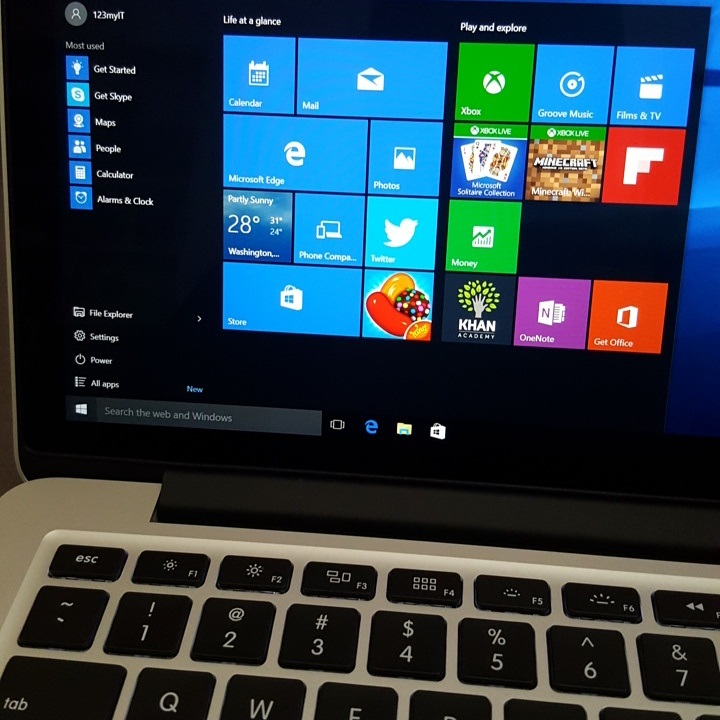
This video will show you how to install Windows 10 on MacBook Pro 2015.
Well here it is guys, the video you guys have all been waiting for. I have had quite a few people ask me about installing Windows 10 on MacBook Pro 2015 and 2014 models and have been a bit slow to get this video out as the hardware is not cheap as you all can imagine. So if the above video helps you out, please help 123myIT out by clicking on the donate button on the left hand side of the page. All donations will help purchasing new hardware.
Some of you will be upset to know that I didn’t get any errors when going through the video. To be honest I kind of expected maybe 1 or 2 problems. But the setup went very smoothly. Even the Boot Camp drivers at the end of the video applied correctly.
You will need 2 things to complete the setup.
1. USB drive 8GB or larger
2. Windows 10 or 8 ISO file which you
In the Windows 10 on MacBook Pro 2015 video I link to another video called Windows 10 Media Creation Tool. This will help you get the Windows 8 or 10 ISO file which allows you to then create the USB which you use to install Windows 8 or 10.
I was able to get a copy of the Boot Camp Drivers from the WININSTALL USB that I can confirm work with Windows 10.
I have labelled it Windows 10 64-bit Captured by 123myIT.com BCD and you will find under the MacBook Pro page here.
All up the install took about 1.5 hours, with the downloading of the boot camp drivers seeming to take forever. The file being around 1.2GB in size meaning if you are on a slow internet connection it could take hours for just that part to complete. So be prepared to wait.
Overall Windows 10 on MacBook Pro 2015 seems to run very well and I will take a closer look at how Windows 10 works in future videos. So stay tuned. 🙂
Want to know more about Windows 10? Click here for the Official Microsoft website.
Hi All,
I have added this video about the Windows 10 Media Creation Tool to help others get their hands on the Windows 10 software.
If you have a copy of Windows 7 installed on your computer then you should be able to upgrade without to much bother as the product key will be registered with Microsoft and validates from your hardware.
There are 3 different types of Media Creation Tools available.
Windows 8 Media Creator Tool link here. Create Media
Windows 10 Media Creator Tool 32 bit link here. Create Media Tool 32 Bit
Windows 10 Media Creator Tool 64 bit link here. Create Media Tool 64 Bit
This tool allows you to download the Windows 8 or 10 ISO file or create a Windows 8, 10 USB drive which allows you to install Windows as you please.
In my next video about installing Windows 10 on a MacBook Pro 2015, I will do a step by step install guide and will refer back to this video to show 123myIT.com users how to get the ISO file.