This video will show you how to disable UAC or User Access Control on Windows 8.
Tag Archives: tutorial
How to open and backup your registry on Windows 8.
This video will show you how to open and backup your registry on Windows 8.
How to activate Windows 8 with command prompt a step by step guide.
This video has been removed for the time being. Check back later for an update.
This video will show you how to activate Windows 8 with command prompt a step by step guide.
How to customize win+X menu in Windows 8 Tip 3.
This video will show you how to add a Windows 8 Start Menu.
Step 1.Press the Windows key on your keyboard + the X key.
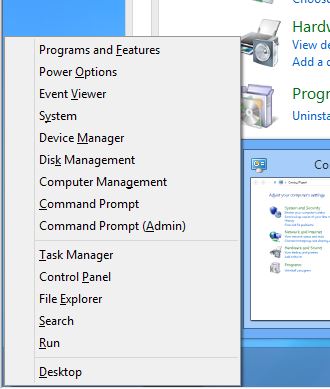
In Windows 8, Microsoft it took away the Start menu, however it also provided a very useful new tool the Power User menu. You can bring up the Power User menu by Right-clicking the lower-left hand corner of the Desktop or by pressing the Windows key + X. When you do this a text-based menu pops up that gives you access to 16 tools, including a Run box, a command prompt, an administrative command prompt, the Device Manager and many other useful power tools.
The Power Users menus has the following sub-menus.
Programs and Features.
Mobility Center
Power Options
Event Viewer
System
Device manager
Disk Manager
Computer Manager
Task Manager
Control Panel
File Explorer
Search
Run
You can actually hack the Power User menu. You can remove and change the menu items that are displayed. You might want to add in programs you use frequently or even individual files that you use all the time.
To start hacking the menu with the items you want to use make sure that you can view hidden files in the Windows File Explorer. Then browse to
C:\Users\username\AppData\Local\Microsoft\Windows\WinX
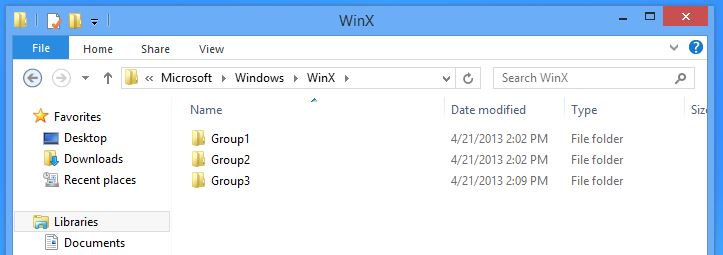
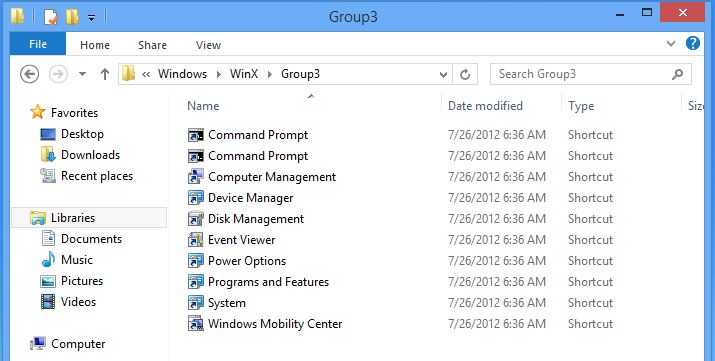
Change the username to the account name of the user you are logged on as. Once you do this you should see three folders there: Group1, Group2 and Group3. Each group has shortcuts to the apps that appear on the Power Menu.
The three Group folders represent the three menus on the Power User menu. You can add and delete the shortcuts within folders Group1, Group2 and Group3 and they will be added or removed from the Power User menu.
If you want to add a shortcut, open the group folder where you want to add the shortcut and right-click, select New then Shortcut.
Once you’ve finished making the changes the Groups folders, you will need to log out or restart your machine to apply the changes to the menu.
How to connect to file servers, computer shares or Windows shares on a Mac.
This video is a step by step guide on how to connect to file servers or Windows server shares on a Mac.
Step 1: Click on go.
Step 2: Connect to a server.
Step 3: Type in the Ip address of the server or PC you want to connect to.
If you are connecting to another Mac use this format.
afp://IPaddress
If you are trying to connect to a Windows PC or Windows server use this format.
smb://DNSname/sharename
smb://IPaddress/sharename
To browse available shares that are on the same network as you. Do the following steps.
Step 1: Click on go.
Step 2: Go to Connect to a server.
Step 3: Click Browse
This will allow you to browse other PCs on the network that have enabled file sharing.
How to remove a bootcamp partition and install Windows support software from Apple.
This video is a step by step guide on how to remove a bootcamp partition and install Windows support software from Apple.
1. Log into your Macbook Pro.
2. Open up finder and in the spotlight bar type: bootcamp.
3. Select bootcamp from the menu.
4. On the introduction screen click continue.
5. You will have two options, Uninstall Windows 7 and download Windows support software.
6. Choose either of these two options and you can download Windows support software and remove the partition as needed.
7. When you boot back into Windows 7, go into the usb where you have downloaded the Windows support software and run the setup file.
This will install all the Windows drivers for her laptop.
How to upgrade memory and hard drive on a Macbook Pro.
This video is a step by step guide on how to upgrade memory and hard drive on a Macbook Pro.
1. Turn your Macbook over so the bottom is facing up.
2. Remove the screws from the bottom of the Macbook Pro.
3. Remove the bottom of the Macbook from the rest of the shell.
4. Slide the two plastic leavers away from the memory.
5. Slide the memory back in and push it into place.
6. Put the lid back in place and screw all the screws back into place.
And then you are done.
How to install Windows 7 on an Apple Mac running bootcamp.
This video is a step by step guide on how to install Windows 7 on an Apple Mac Book Pro running OSX and bootcamp.
1. Log into your Macbook Pro.
2. Open up finder and in the spotlight bar type: bootcamp.
3. Select bootcamp from the menu.
4. On the introduction screen click continue.
5. Make sure that the download the latest support software from Apple option is ticked. If you already have a Windows partition installed you will have an option called Remove Windows 7. If you dont already have Windows installed you will have an option called Install Windows 7. Make sure you tick install Windows 7.
6. Have your 1GB USB key handy to download the Windows Support Software from Apple.
7. Now you can choose to save a copy of the Windows support software to DVD or USB. I prefer USB.
8. Select save a copy to an external drive. You can run this software after Windows have been installed.
9. The Windows support software will download to the USB.
10. At the create a partition for Windows screen you can make the partition as big as you want. However press divide equally so you will have a shared amount of space on both drives.
11. In-cert your Windows 7 DVD and click install.
12. Boot camp will start to Partition the drive.
13. Your Macbook will restart.
14. Windows is loading files screen.
15. At the Windows 7 install screen select your Language, time and currency format and Keyboard and input methods. Click next.
16. Click install now.
17. Accept the licence terms and agreements and click next.
18. Click on custom menu.
19. Select your bootcamp partition and click drive options. Hit Delete then click Ok.
20. Select the partition again and click on New, Apply and Next. And Vista will start to install.
21. The Mac will restart.
22. Setup your new Windows 7 profile and you are done.


