How to upgrade Android 4.4 KitKat on Samsung Galaxy S

This video will show you how to upgrade Android 4.4 KitKat on a Samsung Galaxy S GT-I9000.

NOTE: This upgrade is for the Samsung Galaxy S GT-I9000 only. Trying this on other model may brick them. You will need to have a rooted you phone first. If you want to know how to do this you can watch the tutorial here.

Step 1. After you have rooted your phone. Go into applications and tap the CWM ClockWorkMod app to install it.

Step 2. You will need to download two files. The first one is the KitKat rom file “cm-10.2.0-galaxysmtd.zip“and the second is Google Apps “gapps-jb-20130813-signed.zip“. Both can be found on the 123 my IT downloads page here.

You can choose which versions you like from the links below. The process for installing them are the same.
For the latest build click here.
Google Apps page click here.

KitKat 4.4.2

Step 3. Transfer the two files you just downloaded to your phone Backup all your data, contacts, messages and SD card data.

Step 4. Power off your phone and wait until it vibrates. Once the phone is turned off, press and hold the Home, Volume up and Power buttons. The phone will then boot into recovery mode.

Step 5. Once in recovery mode, go down to the menu Wipe data / Factory Reset. Press the Power button and this step will take some time. Next Wipe cashe partition and after that go into Advanced and click wipe delvik cache.

Step 6. Time to flash the rom firmware. Go to the option install zip from SD card. Now scroll down to where you placed the two files above, cm-10.2.0-galaxysmtd.zip and gapps-kk-20140105-signed.zip.

Step 7. After KitKat installs, you will get a blue colour recovery. Then navigate to the location where you have placed the gapps-kk-20140105-signed.zip file and install it. Once its installed go back to the main menu and reboot the phone.

Step 8. The phone will now reboot. It should take around 5 to 10 mins as this is the first time Kitkat has booted so it need to setup everything.

Good luck 🙂

For more info see xda-developers here.
For the latest build click here.
Google Apps page click here.

Upgrade Android from 2.3.6 to 4.0.3 (Gingerbread to Ice Cream Sandwich) Samsung Galaxy S

This video will show you how to Upgrade Android from 2.3.6 to 4.0.3 (Gingerbread to Ice Cream Sandwich) Samsung Galaxy S.

Microsoft Store

Android Icecream Sandwich

This video will show you how to Root your Firmware
https://www.123myit.com/2013/05/how-to-root-a-samsung-galaxy-s-phone/
This firmware will show you to Upgrade Firmware on your Samsung device.
https://www.123myit.com/2013/05/how-to-upgrade-the-firmware-2-3-6-on-a-samsung-galaxy-s/

Step 1. Make sure your Samsung device is rooted. Link above.
Step 2. Download the Samsung Galaxy S Upgrade Ice Cream Sandwich Firmware from the downloads page here.
Step 3. Plug in your device and make sure that the device driver is working ok. You can do this in Device Manager.
Step 4. Open the Samsung device and view the files and go into the Android folder and copy the file you just downloaded into the Android folder.
Step 5. Power off your Samsung device and put the phone in recovery mode by holding down the UP volume button + Power button + Home button.
Step 6. In the menu select Wipe Data / factory reset, this will Wipe any data on your Samsung device so make sure you do a back up first.
Step 7. Wipe cache partition and go into the advance and Wipe Dalvik cache.
Step 8. Go back to the main menu then to go install zip from SD card. And choose zip from SD card.
Choose the Zip folder from the Android folder that copied to earlier and you are done.

The Android upgrade can take anywhere from 5 to 15 mins to complete. The Samsung Galaxy S model that I recorded the video on was a fair bit slower after the upgrade, but for some people they probably wont notice the difference and the upgrade Android has the benefit of the newer OS.

If you would like to see the Samsung Galaxy S specs you can find them here on the Samsung site.

Good luck.

How to Change Your Default Browser on an Android Device

This video will show you how to change the default browser on your Android Device.
If you don’t like the stock standard default Android browser, you can change if for Free in the Google Apps Store.
Once you download the free browser, make sure you set it to the default browser so that you can use it every time you use the internet.

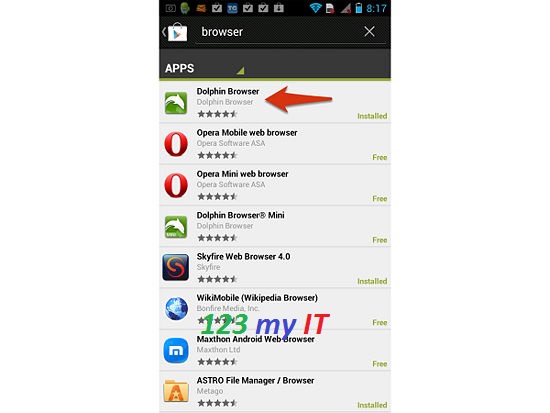
Step 1. Open up the Google Play Store and do a search for Browsers.

Android Browser Search on Google Play

Step 2. Select the browser you want to install and press Install.

Install Android Browser

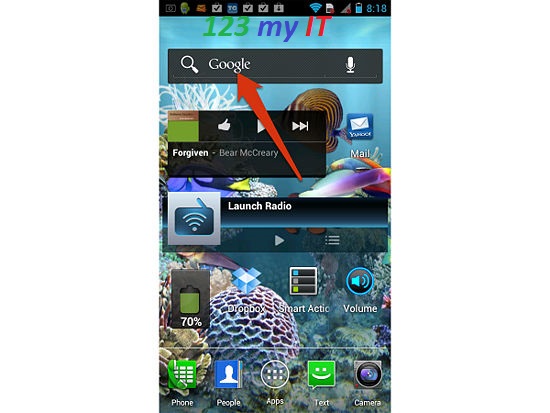
Step 3. Go back to your Home screen and tap into the Google search bar.

Android Browser Google Search

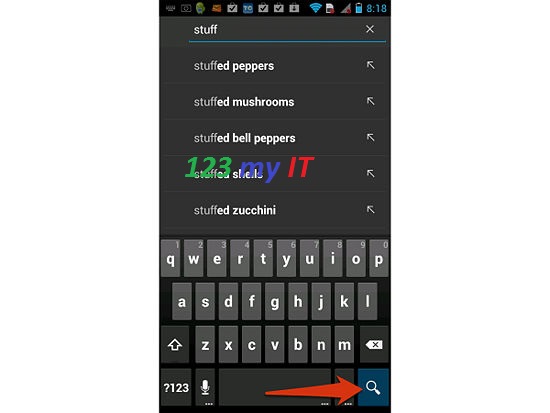
Step 4. Search for anything in the search bar and then press the Search Button in the bottom right hand corner of the screen.

Android Google Search Bar Results

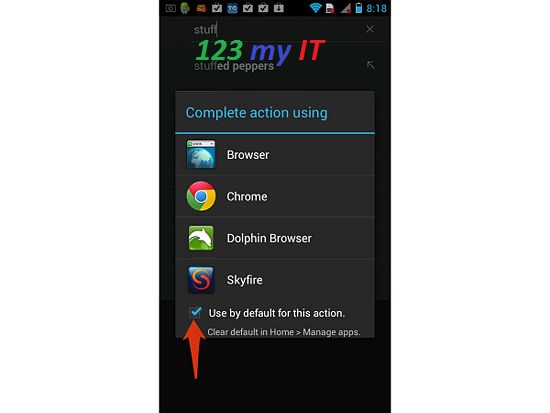
Step 5. Put a tick in the checkbox that says “Use by default for this action.” And then press the Browser that you want to be the Default Browser.

Android Browser Set Default Button

And that’s all you need to do. Changing the default web browser will give you greater functionality like being able to create new tabs more easily.

Related 123 my IT Videos
How to Save Battery Power on an Android Device
How to change the Screen Timeout on Android
How to unbrick Samsung Galaxy Nexus, GT-I9250, GT-I9100G, GT-I9300 and S3 GT-I9300
How to get a Samsung Galaxy S phone out of black screen of death

3G Speed Comparison iPhone3G, iPhone4S and Samsung Galaxy S

Hi All
This video will show you a 3G Speed Comparison iPhone3G, iPhone4S and Samsung Galaxy S.
One of the 123 my IT readers asked me what the performance is like for the iPhone 3G running the Whited00r 6 firmware. So I did a quick test on 3 phones iPhone3G, iPhone4S and Samsung Galaxy S.
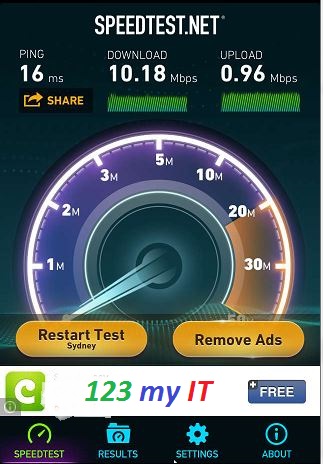
I used the Speedtest.net app from ookla.

SpeedTest App

The Speedtest app doesn’t work for the out dated iPhone 3G phone, however I was able to get it working by installing the Whited00r firmware. You can see the video on how to install Whited00r here.
The Speedtest app was available in Time Machine.
Time Machine App Market

Results
iPhone 3G Ping 369ms, Download 0.63 Mbps, Upload 0.01 Mbps. So performance on the old iPhone 3G was sluggish to say the least. The performance might because the phone is quite old or that the latency of the phone slows the 3G performance down. While the signal might not be strong in the place where I am testing the phones the iPhone 4S fairs much better.

Samsung Galaxy S Ping 70ms, Download 1.651 Mbps, Upload 1.12 Mbps. As you can see there is a marked improvement on the speed of both the download and uploads on between the old iPhone 3G and the Samsung Galaxy.

iPhone 4S Ping 54ms, Download 2.16 Mbps, Upload 1.03 Mbps. The iPhone 4S has a faster Ping as well as a bit quicker on the downloads compared to the Samsung Galaxy S.

The performance seems pretty normal given the age between the phones. I guess you can tell from this guide that the iPhone 3G would be next to useless when trying to browse the internet via 3G.

How to unbrick Samsung Galaxy Nexus, GT-I9250, GT-I9100G, GT-I9300 and S3 GT-I9300

HI Guys
In my travels I came across a great website which allows you to unbrick or get out of the dreaded black screen of death on your Samsung Nexus or Galaxy S3 phone. This will work for the following models.

GT-i9250, GT-I9100G, GT-I9300 and the S3 GT-i9300. So I thought I would share it with my website users to help them out if they have a broken their Samsung phone.

I will quote the comments

For galaxy S3 GT-i9300, please carefully read this:
* Euro/Asian models are based on 4 core Samsung Exynos 4412 CPU
* JTAG access in all i9300 phones is DISABLED (password protected)and password is not available (yet).
* Repair procedure for bricked phones is performed via SD card

I have also added the direct download links below.

GT-I9250:
Just execute *.bat file from this package.
Installing drivers first would be pretty smart idea too.

Flash_Tuna.zip

i9100G phones which have ID 0xFFFFFFFE, download this archive, unpack and run *.bat file from root folder:

OMAPFlash-1229-2ndlastt.rar

For more details on what to do with the files check the link below.
gsmhosting

How to root a Samsung Galaxy S phone.

This video will show you how to root a Samsung Galaxy S phone.

Step 1.Download and install the XXJVU firmware, the check what type of firmware you already have on your phone go to Settings and About Phone. If you want to know how to do this you can see the 123 my IT tutorial here.

Step 2.Download the CF-Root-XX_OXA_JVU_2.3.6-v4.3-CWM3RFS.zip from our downloads section here.

Step 3.Extract the CF-Root-XX_OXA_JVU_2.3.6-v4.3-CWM3RFS.zip and you will have the CF-Root-XX_OXA_JVU_2.3.6-v4.3-CWM3RFS.tar file.

Step 4.Download and run Odin software you can download it from our download page here.

Step 5. Turn off your mobile phone and wait 5 seconds for it to vibrate to make sure it is completely off.

Step 6.Put the Galaxy S in download mode by holding down the Volume Down plus Home Plus Power buttons all at the same time.

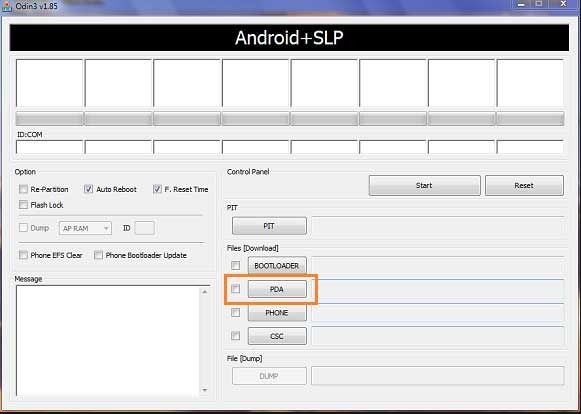
Step 7.In the Odin software select the PDA tab and then select the extracted CF-Root-XX_OXA_JVU_2.3.6-v4.3-CWM3RFS.tar file.

Odin Android Software

Step 8. Make sure you do not select the “Re-Partition” checkbox as this will brick your phone. Make sure that the “Auto Reboot” and “F. Reset Time” checkboxes are ticked.

Step 9.Click the start button in Odin to start the flash of the CF Root File.

Step 10.The phone should restart automatically when the CF Root file is installed. When Odin displays the Pass in green you can unplug the phone from the USB cable.

Step 11.Your phone should now be rooted ad you should see the CWM app and clockworkmod based recovery is installed.

Once this is done your Samsung Galaxy S should be rooted ! 🙂

Good Luck

How to upgrade the firmware 2.3.6 on a Samsung Galaxy S.

This video will show you how to upgrade the firmware 2.3.6 on a Samsung Galaxy S.

WARNING: Make sure you back up your Phone before proceeding!!!!
All the data on your phone will be deleted when you do this upgrade so please make sure you take the time to backup your data.
* Backup any photos and images that you have on the phone.
* Backup your contacts list, SMS and emails.
* Backup your music and video.
* Backup your APPS and phone settings
* Backup your bookmarks and stored pages.
* Backup all your data on your SD card.

Prepare your PC and Phone for the upgrade.
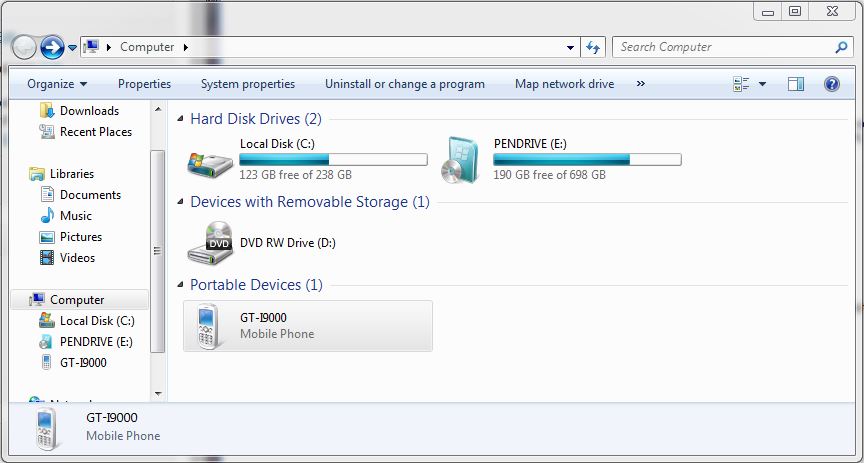
* Plug your Samsung phone into your Pc and make sure that the phone drivers install correctly. You should be able to browse to the phone in explorer.

Samsung Galaxy S in Windows Explorer

Step 1. Download the firmware and pit file from our download site here.
The firmware filename is sam_GTI9000_firmware.zip
Its quite a large file the size is 225.9 MB, so be prepared to take some time to download.
The file password is: 123myit.com

Step 2. Extract the downloaded sam_GTI9000_firmware.zip.
You should extract the following files.
* CODE_I9000XXJVU_CL851880_REV03_user_low_ship.tar.md5
* GT-I9000-CSC-MULTI-OXAJVU.tar.md5
* MODEM_I9000XXJVU_REV_00_CL1059471.tar.md5
* s1_odin_20100512.pit

Step 3. Download and extract the Odin3 v1.7.exe file from our downloads section here.

Step 4. Put your phone into “Download Mode” by holding down the Volume down button + the Home button + the Power button.

Step 5. Start the Odin3 v1.7.exe and connect your phone to the PC. The Odin application should say the message “Added!” If it doesn’t say added then you will have an issue with the drivers and your should reboot your PC with the phone still plugged in and repeat this step.

Step 6.Once Odin has started and you have your phone Added. Select the files that you extracted in step 2.
They should all be loaded in the following order.
* Select the “PDA Tab”, and select “CODE_I9000XXJVU_CL851880_REV03_user_low_ship.tar.md5”
* Select the “Phone Tab”, and select “MODEM_I9000XXJVU_REV_00_CL1092175.tar.md5”
* Select the “CSC Tab”, and select “GT-I9000-CSC-MULTI-OXAJVU.tar.md5”
* Select the “PIT Tab”, and select “s1_odin_20100512.pit”

Step 7.Make sure that you select the Re-Partition, Auto Reboot and F.Reset Time checkbox within Odin.
Step 8.Click the start button to kick off the flashing process.The phone will reboot when it finishes and Odin should give a green PASS message.
When the phone restarts you should be running the new Android, v2.3.6 XXJVU firmware.