Boot Camp Drivers

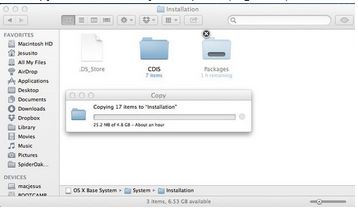
This video will show where to find your the correct boot camp drivers for your Mac.

Boot Camp Drivers

Which Boot Camp supports your model of Mac?
Click the links below to see which version of Boot Camp you need for your Model of Mac.
MacBook Pro
MacBook Air
MacBook
iMac
Mac mini
Mac Pro

Running Windows on your Mac with Boot Camp
Want to run Windows application on your Mac every now and then? No problem.
You can run Windows on your Mac at native speeds with a built-in utility called Boot Camp.
The setup is easy as 123 and its safe for your Mac OS X files.
Once the setup is complete you can boot into Mac OS X or Windows.

Windows running at native speed
Windows can run on your Mac at native speed without comprising performance, that would happen if you were to run a “virtual machines” or software emulation.
All you Windows applications will have full access to multiple cores and processors, 3D graphics and all your Mac hardware ports such as FireWire, Wi-Fi, AirPort, and Gigabit Ethernet.

Once installed you can change between OS X and Windows by holding the (Alt) or Option key when restarting your Mac.
Of if you want to set the Start Up disk permanently you can watch the following video on how to do this.
https://www.123myit.com/2014/06/boot-camp-set-default-startup-disk-windows/
or
https://www.123myit.com/2014/06/boot-camp-set-default-startup-disk-os-x/

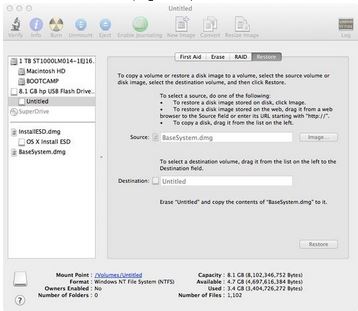
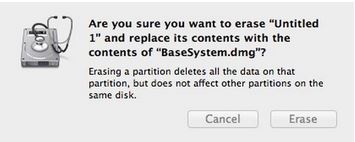
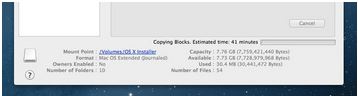
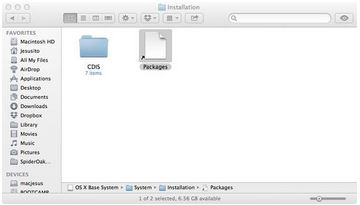
Boot Camp Requirements
What do you need to run Boot Camp?
* You will need an Intel-based Mac.
* OS X v10.5 or later.
* Update the firmware on your Mac.
* The Boot Camp Assistant, which should be located under your Applications, Utilities.
* ISO or DVD which you can find on the 123myIT.com downloads section here.
* Need more info? check out General Boot Camp questions about installing Windows 8 on a Mac

If you would like to read more on Boot Camp click here for the official Apple website.

How to install Windows 8.1 on a Mac running OS X Mavericks

This video will show you how to install Windows 8.1 on a Mac running OS X Mavericks.

What you will need.
* A blank DVD to burn Windows 8.1
* 1GB USB Drive to store the Windows Support Software

Step 1. Go to Go and Utilities and click on Bootcamp assistant. Run the Bootcamp assistant and click continue. Put a tick in Download Windows Support Software and tick Install Windows 7. On later versions of Mac it will have Install Windows 8.

Step 2. Make sure you have your USB drive plugged into your Mac. This will be formatted with the MS Dos FAT file system. Once this is formatted you will be adding the boot camp drivers for your Mac hardware to the USB drive. To find out more info on the boot camp drivers needed for your model of Mac click your model below.
MacBook Pro
MacBook Air
MacBook
iMac
Mac mini
Mac Pro

Step 3. After clicking continue you will need to select the USB drive that you just formatted with FAT. Then the next screen should display as “Downloading Windows support software . . .” and then “Saving Windows support software”.

Step 4. You can install Windows 8.1 via DVD or ISO file depending on the age of your Mac. For this video we use a DVD and if you don’t have a copy of Windows 8.1 handy you can actually download and use the Windows 8.1 preview version from the 123myIT.com website here. This preview version will ask you to buy a copy of Windows after one month.
Don’t know how to burn the Windows 8.1 ISO file to DVD? The two videos below will show you how.
How to Burn an ISO to DVD Windows Bootable
or
How to Burn an ISO or DMG file to DVD on a Mac

Step 5. Click Add helper. Boot Camp will ask you to put in the DVD you just burnt. You will need to go into Utilities and then Disk Utility, select your hard drive and partition your hard drive.
This will create some disk space on your Hard disk to install Windows 8.1. Click the plus button and make the hard drive size equal in size. Click on the second partition and change the name to Windows so you can identify the different drives. Change the format to exFAT. Then click apply and partition.

Step 6. Make sure your Windows DVD is in the DVD drive. Hold down the ALT option Key on your keyboard and restart your Mac. Once your Mac restarts you should see a that has the OS X and Windows drives and DVDs. Like the picture below.
Mac Pre Boot

Use your arrows keys and move across until the Windows DVD is selected.

Step 7. You should then see the Windows install screen come up. Select your country and click Next. Enter you serial key. If you are using the Windows Blue Preview version then you can get the serial Key from the Downloads page mentioned earlier. Click here.

Step 8. From here on in you should just be able to follow the prompts. If you find that your mouse track pad or keyboard buttons don’t work, look for your model of the boot camp drivers link above and make sure they are installed.

More info on installing Windows on a Mac, you can check out the official Windows and Apple sites.

How to do a clean install of OS X Mavericks from USB

This video and article will show you how to do a clean install of OS X Mavericks from USB.

Step 1. Create a OS X Mavericks USB drive. You can do that by following the 123myIT video guide here.

Step 2. Once installed, plug the USB into the side of your computer restart the Mac and hold down the ALT or Option key on the keyboard of your Mac.

Step 3. Use the arrow keys on your Mac keyboard to navigate to the USB drive that you have plugged into your computer. Once highlighted press Enter or Return.

Mac Preboot Menu

Step 4. That will bring up the OS X Utilities menu. At this stage you can opt to format the hard drive with Disk Utilities. Make sure you backup your data before you do this as you will lose any data on the drive when you format it. If you want to know how to do a backup with Time Machine click here.

Step 5. Go back to Install OS X and follow the prompts. You will be asked to agree to Apple terms and conditions and you will also need to select the hard drive you want to do a clean install of OS X Mavericks on.

Step 6. This process should take around 30 mins depending on the speed of your Mac. The Mac will reboot a few times while this is happening.

Once the Mac restarts one last time and then you are done you will have to setup your Mac as if it was brand new from the Mac store. You will need to setup the country location, Wifi and there is also an option to transfer some files between your Mac and other computers. Then setup your Computer account.

For more information on OS X Mavericks you can check out the Apple official website here.

How to create a bootable OS X Mavericks usb drive

This guide will show you how to create a USB installer of Apples OS X 10.9 Mavericks.

Have you ever wanted to do a clean install of OS X from but your new MacBook Air doesn’t come with a DVD drive?
Well this guide will step you through how to create a bootable OS X Mavericks 10.9 USB drive.

To complete the process you will need the following items:
* 8GB USB drive or SD Card
* OS X Mavericks.app (this can be downloaded from the App Store)
* An Apple computer with the Mac App Store
* A user account with administrator rights

OS X Mavericks USB drive

Step 1. Download Mavericks from the App store.
Apple direct link here.
Step 2. Insert your USB into the Mac and run the Disk Utility.
Step 3. Select the USB drive that appears in the left-hand menu and select the Partition tab across the top.
Step 4. Select the drop down menu and click on 1 partition.
Step 5. In the format type menu make sure you have Mac OS Extended (Journaled) selected.
Disc Utility

Step 6. Select the Options button and make sure the GUID Partition Table radio button is selected.
Disc Utility - GUID Partition Table

Step 7. Open up the Terminal.app you can find it under the Applications Utilities folder or search for it in Finder.
In the terminal window type the following command.

defaults write com.apple.Finder AppleShowAllFiles TRUE;\killall Finder;\say Files Revealed

Terminal Window

Step 8. When the USB completes the formatting, go into the Launchpad and copy the Install Mac OS X Mavericks.app to your desktop then Right-click and click on Show Package Contents.

Mavericks App
Step 9. Go into the Contents > Shared Support folder and double click the InstallESD.dmg file.

Install ESD

Step 10. Click on the mounted.dmg file and find the hidden BaseSystem.dmg file.

null

Step 11. Go into Disk Utility and open the newly formatted USB and click on the Restore tab.
Step 12.Drag and drop the BaseSystem.dmg into the Source field. And drag and drop the partition that you recently created on the USB drive, into the Destination field.

OS X Restore

Step 13. Click the restore button and click Erase. You might get prompted for the Administrator password.

Untitled Message

Step 14. It may take some time to copy all the data to the USB drive.

Copy Time OS X Mavericks

Step 15. When the files have finished copying, the USB drive should mount automatically. Go into the System > Installation folder and delete the Packages directory.

OS X Packages Directory

Step 16. Go back into the mounted Install ESD.dmg file and find the directory called Packages. Copy this to the Installation folder.

Installation Folder

And now you are done. You have just created a bootable copy of OS X Mavericks on a USB drive.

Good Luck.

How to create an OSX USB Recovery Disk.

OSX has a Recovery function built in which allows you to repair disks or reinstall OS X without a DVD/ CD Rom. Some
of the new models such as the Macbook Air don’t have a DVD player. So how can you reinstall OS X without a DVD drive???

With the OS X Recovery Disk Assistant on a USB or external drive you can format the Macs hard drive and reinstall Lion or Mountain Lion. You can also repair the disk using Disk Utility, restore a backup from Time Machine or simply browse the internet with Safari.