This video will show you how to install Windows 8.1 on a Mac running OS X Mavericks.
What you will need.
* A blank DVD to burn Windows 8.1
* 1GB USB Drive to store the Windows Support Software
Step 1. Go to Go and Utilities and click on Bootcamp assistant. Run the Bootcamp assistant and click continue. Put a tick in Download Windows Support Software and tick Install Windows 7. On later versions of Mac it will have Install Windows 8.
Step 2. Make sure you have your USB drive plugged into your Mac. This will be formatted with the MS Dos FAT file system. Once this is formatted you will be adding the boot camp drivers for your Mac hardware to the USB drive. To find out more info on the boot camp drivers needed for your model of Mac click your model below.
MacBook Pro
MacBook Air
MacBook
iMac
Mac mini
Mac Pro
Step 3. After clicking continue you will need to select the USB drive that you just formatted with FAT. Then the next screen should display as “Downloading Windows support software . . .” and then “Saving Windows support software”.
Step 4. You can install Windows 8.1 via DVD or ISO file depending on the age of your Mac. For this video we use a DVD and if you don’t have a copy of Windows 8.1 handy you can actually download and use the Windows 8.1 preview version from the 123myIT.com website here. This preview version will ask you to buy a copy of Windows after one month.
Don’t know how to burn the Windows 8.1 ISO file to DVD? The two videos below will show you how.
How to Burn an ISO to DVD Windows Bootable
or
How to Burn an ISO or DMG file to DVD on a Mac
Step 5. Click Add helper. Boot Camp will ask you to put in the DVD you just burnt. You will need to go into Utilities and then Disk Utility, select your hard drive and partition your hard drive.
This will create some disk space on your Hard disk to install Windows 8.1. Click the plus button and make the hard drive size equal in size. Click on the second partition and change the name to Windows so you can identify the different drives. Change the format to exFAT. Then click apply and partition.
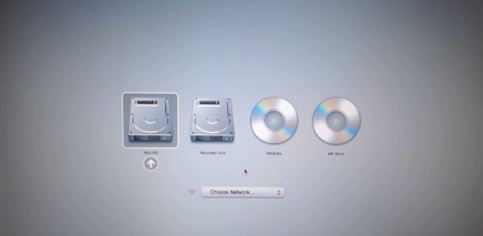
Step 6. Make sure your Windows DVD is in the DVD drive. Hold down the ALT option Key on your keyboard and restart your Mac. Once your Mac restarts you should see a that has the OS X and Windows drives and DVDs. Like the picture below.
Use your arrows keys and move across until the Windows DVD is selected.
Step 7. You should then see the Windows install screen come up. Select your country and click Next. Enter you serial key. If you are using the Windows Blue Preview version then you can get the serial Key from the Downloads page mentioned earlier. Click here.
Step 8. From here on in you should just be able to follow the prompts. If you find that your mouse track pad or keyboard buttons don’t work, look for your model of the boot camp drivers link above and make sure they are installed.
More info on installing Windows on a Mac, you can check out the official Windows and Apple sites.


