Using Focus on iPhone iPad and iPod touch

Hi Guys and Matt from 123myit here. In this video I will show you how to use focus on iPhone or iPad. Focus allows you to filter notifications based on what you are doing. You will find focus in control centre by swiping down from the top right and tapping on focus.

Do not disturb – Focus on iPhone

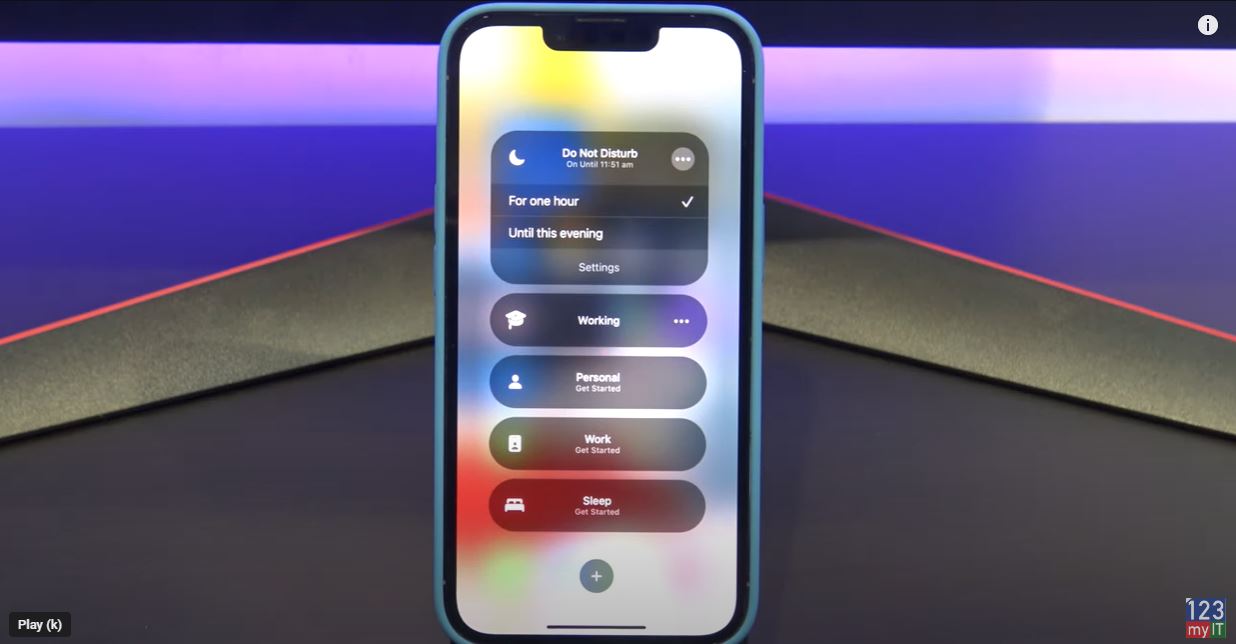
In here you will find the default focus which is do not disturb. Do not disturb silences all notifications by default. So, if you are really busy and don’t want to be interrupted you could set this and your phone won’t send any notifications. You can also tap the three dots and turn it on for 1 hour or until this evening. Alright if you close it and just go back out I will show you where it displays that Do Not Disturb is turned on.
focus on iphone ipad

Ok if you look in the top left corner you should see the do not disturb icon which tells you that the do not disturb is not turned on. Cool ok, let go back in an setup our own personalised do not disturb.

If you want to find the focus menu if is located under Settings and Focus. Focus on iPhone.

Focuses

To setup your own focus tap the plus icon down the bottom. Then you will have a list of pre set focuses. Up the top you have driving and fitness. Driving silences notifications, but will turn on automatically when connected to carplay or Bluetooth. Also if you have friends on iPhones, it will send them a reply that you are driving. Which is handy.  Gaming is a good one too. So if you want playing games on your iPhone and don’t want notifications interrupting the game then you can turn this on. And the last two down the bottom are mindfulness and Reading. Lets go a head and setup our own custom Focus.

Study Focus

Iam going to call mine Study. Because I want my phone to be quite when I study. Next you can select a colour and an icon for study. Tap Next. Now choose the people you want notifications from while you are studying. Notifications from other people wont appear until you turn the focus off.

That’s for notifications what about phone calls? If we tap on Calls From and then can choose calls from Everyone, No one Favourites or all contacts. When you are finished tap allow. If you don’t want to hear from anyone tap Allow none.

Allow notifications on Apps

Next you can select which Apps you want to allow notifications from so tap the plus and I am going to select Find My, Books and Messages. You can also turn on Time sensitive apps to send you notifications. Tap allow and your Focus is setup tap done to continue.

Alright before we personalised the focus I will show you what it looks like if you turn it on. Ok to personalise your Focus under the Options menu you have Focus Status. When Focus Status is turned on Apps like Messages will let people know that you have your Focus turned on.

Hide notifications on home screen

If you want to hide notification badges you can tap Home Screen. And in custom pages you can select which home screen page you want to show while in the focus. Under the lock screen menu you can dim lock screen in your focus and or show silenced notifications there.

One of the cool features is the Add Schedule or Automation. This allows you to choose to start your focus as a specific time, in a specific location or when you launch an app. So lets say I want to turn on the Study focus when I go to the Library. I would tap Smart activation to turn it on and then tap on Add Schedule or Automation. You want to tap on location and then type Library at the top. This will show you a list of Libraries near you. If this does not come up check under Settings, Privacy, Location Services and System Services.

Library Focus – focus on iPhone

Cool I found the library I am after. So what this will do is Whenever I go to the Library it will turn on my Study Focus automatically. You can use the little slider bar to make the circle bigger or smaller. Lets say I go to a nearby café afterwards. Really cool. So this would be useful if you had a work or school focus setup or a church or mosque something like that. If you scroll down you can also delete the Focus if you no longer need it.

Awesome so our Study focus is setup and ready to use. Guys don’t forget to check out my other videos such as how to find Purchase History on iPhone and iPad. And do me a favour if you know anyone who might like this video, please share it will them, hit the subscribe button and smash the bell icon.

Take Control of Your Notifications iPhone iPad iOS

How to use Apple Reality Composer on your iPhone or iPad

Hi Guys and welcome to 123myit, in this video we will show you, how to use Apple’s Reality Composer. Apple’s Reality Composer allows you to create and interact with Augmented Reality on your iPhone and iPad. This allows you to blend virtual content with the world around you.

In this video, we will show you how to download Reality composer.

  • Create a project
  • Select an Object
  • Add Looks and Behaviors
  • Place your Object in AR
  • Before you start make sure that the iOS version of your iPhone or iPad is 13.2 or later.
  • Lets get started.

To download Reality Composer go into the App store and search for Reality Composer. Download and open it to get started. Once you have it open tap the plus start a new Project. Next, you need to choose and Anchor.

Reality composer
Choosing and Anchor

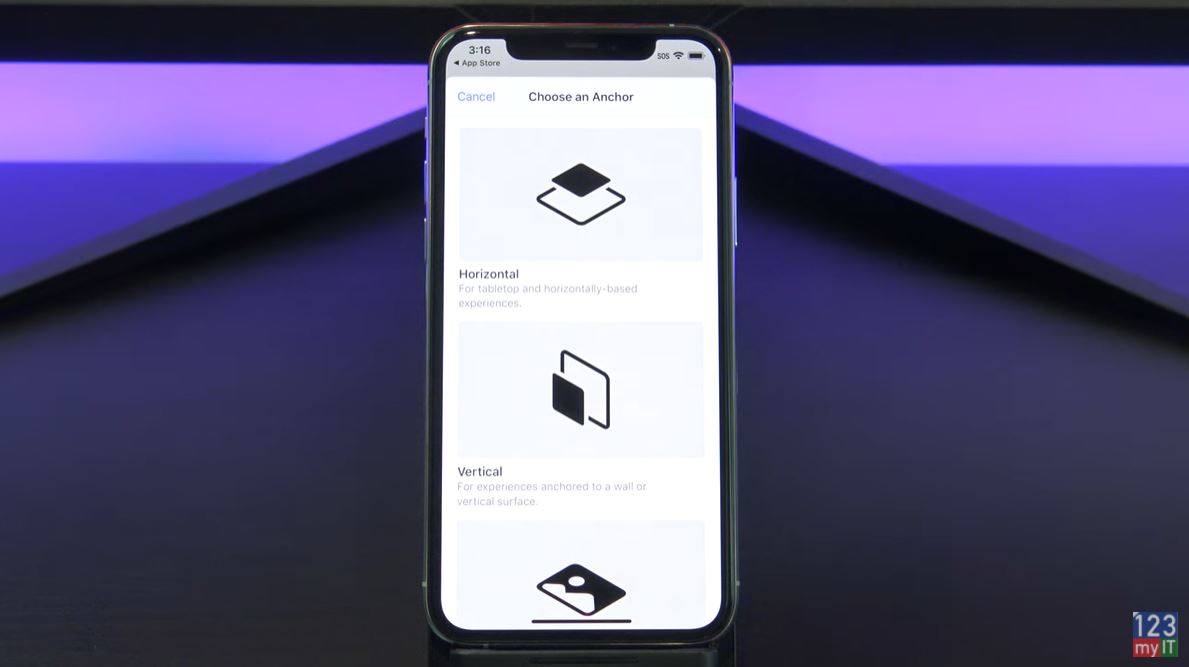
You use an Anchor to place an Object in the real world. There are a few anchors to choose from. Want your Object to be placed on a table or floor choose Horizontal. If you want to place it on a wall use Vertical. Are using a movie poster, book, brochure or packaging choose image anchor. If you want a selfie effects such as virtual hats and glasses use the face anchor.

Content Library

I am going to choose Horizontal. A square is the default Object lets delete it an add something more exciting. To delete tap and hold and then select delete. Cool, once that’s gone tap the Plus to open the Content library. Now you can select anything in here, but I am going to choose the rocket.

Adding Objects

If you want to change the look of your Object. Tap your Object and select the Cog. You have heaps of options in here, go ahead and select whatever you like. I am going to go with the realistic version. To close it press the cog again.

Lets add some action to the Object. Tap the Object and then tap the more icon. Then select Behaviours. To create a new behaviour tap the plus icon. 

Add Behaviours

A behaviour allows you to move, scale or add emphasis to your Objects. You can also create proximity triggers and other cool stuff. To make our rocket shoot upwards lets scroll down to custom. Make sure you select the Object first and then select the Trigger called Tap. Next select move rotate scale by to move the rocket upwards.

Launch Speed

Now if you want to set the Rockets launch speed move the Duration slider to the left or right. Next select the ease type. Selecting this will make the rocket go faster as it lifts off. Select Ease in. Under Position tap clear and type in how high you want the rocket to go. I am going to type 500 as its in centimetres. Make sure you press Return. To give your Behaviour a new name tap more and name your Behaviour.

Ok let place our Rocket in the real world. I want to launch it off my wireless charger. Tap the AR button and move your iPhone or iPad side to side. If its too big pinch it to make it smaller and tap and drag to move it to the right spot. Sweet now hit the play icon to set it. And tap the Rocket to launch it!  Houston we have lift off!

If you get stuck and your Rocket doesn’t fly. Go back into Behaviours and make sure you select your rocket and then choose Tap.

Also guys don’t forget to check out my other videos such schedule do not disturb on your iPhone, iPad and iPod touch. And do me a favour hit the subscribe button and smash the bell icon.
iPhone 11 Pro vs Samsung S20+ Battery Test

Optimize Windows 10 for Gaming & Performance 2020

Copy Music from Android to iPhone, iPad & iPod

Hi Guys welcome to 123myIT! In this video, we will show you how to copy music from Android to iPhone, iPad and even iPod touch.

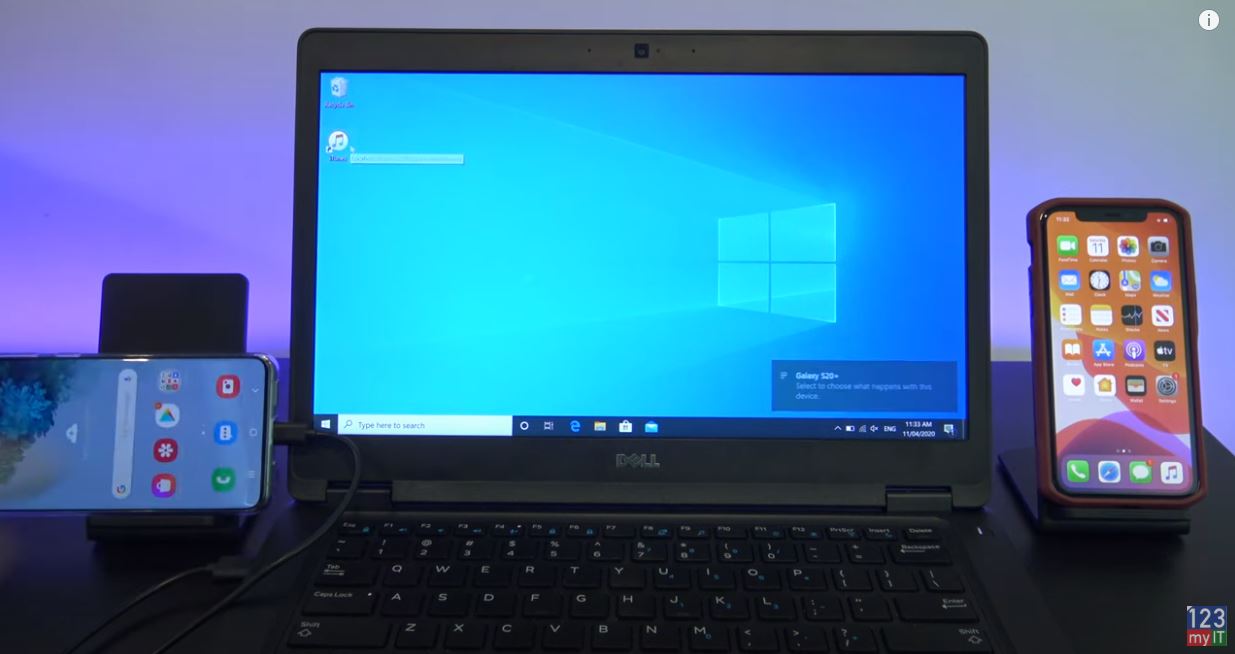
Guys this is the official way that Apple recommends to transfer you Music from Android to iPhone. However, you will need a computer to copy the music to first. Therefore, it can be a PC or a Mac.

If you need to transfer all your other files such as Contacts, Photos, Videos and Messages. I have already done a video for this and will put a link here.

Getting Started

The first step is to connect your Android device to your computer and find your music. On most devices, you can find these files in Music. On a Mac, you will need to install Android File Transfer, you can find the link on the 123myit.com website under downloads. Once you are on the Downloads page just scroll down to where it says, Android File Transfer. Then click on Download now and install the Android File Transfer software. Drag it across into your Applications folder. Once installed. Click on Go and Applications and open the Android File Transfer software. You might need to tap Allow on your Android device to give the computer access to your music folder. Close your windows and tap on the Android Transfer Software at the bottom of the screen.

Awesome you should now see the complete list of folders on your Android device. Find your music folder and drag it to the Computer desktop.

Unplug your Android

Once your music is copied, you can unplug your Android device you are finished with it now. Next, Plug in your iPhone iPad or iPod. Open up your Apple Music or iTunes. Then drag your Music folder from the Desktop into your Music or iTunes. Once that is done minimise your Music or iTunes app and the click on Go and Computer. Click on your iPhone and click on Pair if you have not done this already. Next click on the Music tab and put a tick in Sync music, then you can select Entire music library or you can do selected Albums. Once you are finished just click Apply, then go back into your iPhone and click Sync.

Cool, unplug your iPhone and check if your music copied across.

This video & article will show you how to copy music from Anrdoit to iPhone, iPad & iPod. This is helpful if you want to move data from Android to iPhone.
Using a PC to store and copy the Music.

Copying the Music on PC

The process is the same on PC but you will need to download iTunes. Open up the Android device in Windows explorer and copy the music folder to your Computer Desktop. To download iTunes you can Google it or I have put a direct link on the 123myit.com website under Downloads. Just scroll down to where is says iTunes download.

Once installed you can open it up and remove your Android device. Plug in your iPhone and tap Trust. Drag your Music folder from the Desktop into your iTunes app. In iTunes click on your iPhone then select Music and again you will have the options to choose Entire music library or Selected Playlists. Once done click Apply then click Sync. Go ahead, remove your iPhone now, and check the Music has copied across.

Guys don’t forget to check out my other videos such as how to clean and disinfect your iPhone. In addition, if you liked this video can you do me a favour and share it with someone who might need to know how to transfer his or her music. Don’t forget to hit the subscribe button and smash the bell icon.

Transfer data Android to iPhone 2020

Samsung S20 + Unboxing Firstlook Zooming Awesome!

How to Clean & Disinfect your iPhone & Case

Hi Guys Welcome to 123myIT.

Let me ask you this, when was the last time you cleaned and disinfect your iPhone? If your answer is never or rarely then now is probably a good time to start.

Apple has just recently updated their website on  what you can do to clean or disinfect your device. So I wanted to show you guys how to do that.

Disinfect your iPhone

To disinfect your device Apple says you can use a 70 percent isopropyl alcohol wipe or Clorox Disinfectant Wipes. They also recommend warm soapy water and apply these with a soft lint free micro fibre cloth.

Disinfect your iPhone

I would recommend warm soapy water over the a disinfectant alcohol for three reasons. The first reason is you don’t know what chemicals are in the wipes so do you research especially if you have Asthma. Seriously, it only takes a Google search to find out. Second, those chemicals could burn certain parts of your phone and the last reason wipes are just not good for the environment.

If you don’t have soap then warm clean water is the next best option and if you don’t have a microfiber cloth any lint free soft cloth will do.

Don’t press hard on your phone when cleaning

Now to clean your phone if you have a case just remove it. Here I have an iPhone case from Element I will put a product link in the description below. I will show you how to disinfect and clean your case as well.

When cleaning your device what you don’t want to do is wipe to hard or excessively. Use a soft lint free cloth. Don’t use paper towels. Make sure your device is unplugged from any cables and don’t use sprays or anything that can get into the ports.

Alright so just take your disinfectant wipe an gently wipe the device over. You just need to apply enough so its moist not wet. And you should be able to see that moisture that I have applied on the screen and cameras. Make sure you lightly do the sides of the device as well. If I turn the screen off you should be able to see the disinfectant on the screen.

Ok once you’re finished just sit your device down for 4 to 5 mins. This will give the disinfectant some time to dry and kill any Viruses or Bacteria on your phone.

Soapy warm water – Disinfect your iPhone

If you have soapy warm water and a cloth the process is the same again just apply some soapy warm water to your cloth and start wiping your device over. Again you should see that the phone is moist not wet and you should make sure you do the back and sides as well.

If you have lint or dust in the power, speaker, camera or ear piece ports you can very gently try to clean these with the SIM eject tool or a paper clip. Just be very careful not to touch or put any force on the inside of the ports. Very gently dislodge the lint or dust and then you can use a moist cotton tip to help remove the dust from the port.

The process is the same for your case. However, be careful when use alcohol wipes on your case, as some cases might not like the Alcohol wipes. I suggest just spot testing the alcohol wipes first in a part of the case you won’t see. If it works fine just wipe your case over the same way you did with your phone. With soapy warm water you should be fine to use it on your case. No issues there. Don’t forget you can use the SIM eject tool and cotton tips to get into the harder places. Once disinfected put your case down for 4 mins to dry.

Cover your phone with plastic sleve

The last idea I had might seem extreme. However, if you are working in an extreme environment like a health care worker, it might be helpful. If you are going into an area where you know there might be the potential for infection you could also try putting your phone in an airtight zip lock back. So disinfect your phone first. Once its dry pop it inside a zip lock back and seal it up. You can still use the device from inside the bag. Then when you leave the hospital or infected zone you can remove it from the bag. If you are in this situation, it might be a good idea to disinfect the device again after you remove the bag.

Guys don’t forget to check out my other videos such as Transfer data from Android to iPhone in 2020. And if you have any other tips on phone cleaning leave them in the comments section below. Also can you do me a favour hit the subscribe button and smash the bell icon.
Samsung S20 + Unboxing Firstlook Zooming Awesome!

Fix MacBook Air T2 Chip by resetting SMC

Stop Pop Up Ads on iPhone, iPad, or iPod touch

Hi Guys welcome to 123myIT! In this video, we will show you how to Stop Pop-Up Ads on your iPhone, iPad and iPod touch.

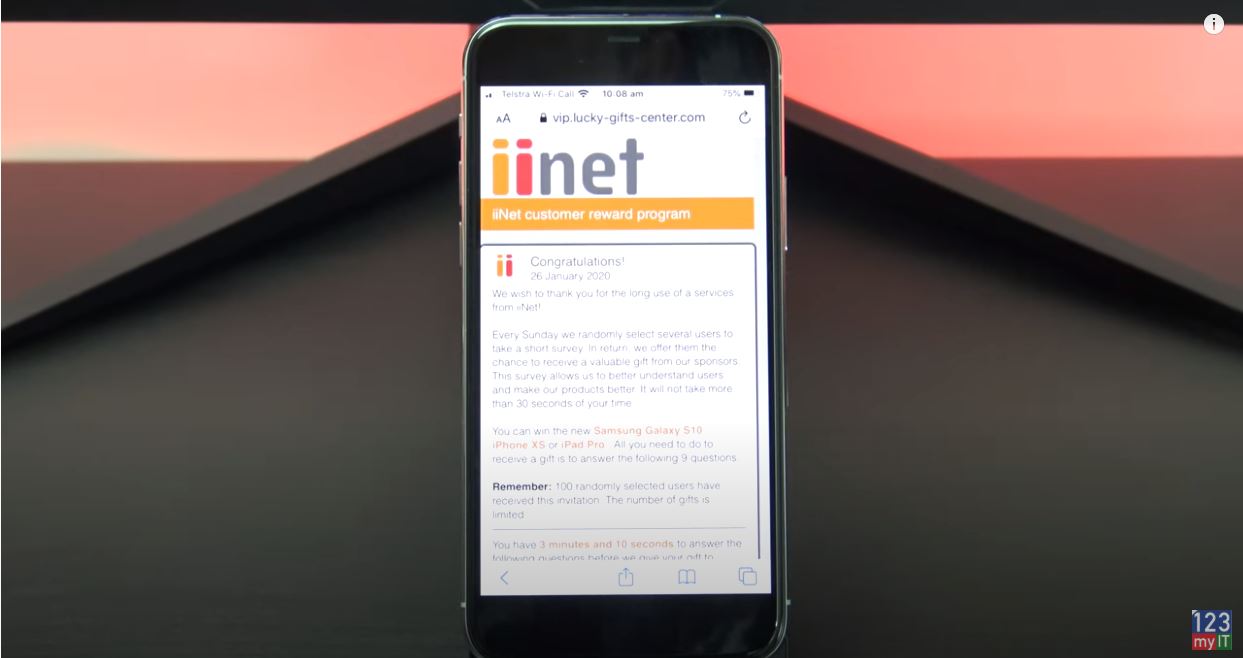
Ok people so you have been browsing the web on your Apple device and suddenly for no reason you are getting Pop-up Ads. I started getting the Congratulations ads popping up on my iPhone. Therefore, I thought I would make a quick video on how to get rid of it.

The ad I was getting was offering a smart phone in return for your details. Do not fall for it. This one has my ISPs logo on it, but you pop up might have an Amazon or Apple logo.

Scams – Don’t fall for it!

Doing a quick web search will also show you that it is a scam. When we search for the web address, it takes us to a spyware removal website.

Stop Pop Up Ads on iPhone
This is the pop up Ad I was getting on my iPhone

All right let’s get rid of it. To close out of the popup tap on the rightmost icon at the bottom in the Safari browser. Then swipe the page left to close it or tap the X.

Alternatively swipe from the bottom to close the Safari browser itself. Then just swipe upwards to close it.

To Stop Pop Up Ads on iPhone

Ok Let’s check your phone settings. To disable ALL sounds, badges, and pop-up alerts. You can do this under Settings > Notifications > Show Previews > and finally select ‘Never’.

Remember, You can turn the settings back on if you want at any time. If that ends up being to strict you can turn it back on and only turn the alerts on for the Apps you want. So if I want to get alerts for App Store, go into the app and tap allow notifications.

Ok Let check your Safari settings. So go back to Settings > Safari and check that the ‘Block Pop-Ups’ button is toggled on and is green.

Next, up you can clear your Safari History so scroll down to where it says Clear History and Website Data. However, before you hit clear hit cancel and scroll down to Advanced and then tap Website data.

Delete Browsing History

This option will delete browsing history, websites data, and cookies from individual websites only it might also show you the dodgy website that has been causing the pop ups. Let us say I do not like the look of this doubleclick.net website I can tap Edit and tap the red minus sign to clear it. If I want to clear all the website data, I can go back out and just use the Clear History and Website Data button I showed you earlier. In addition, if you go back in you will see the entire website are gone now.

Next up we can reset Advertiser Identifier, to do this go into settings and privacy. The scroll down to Advertising. Make sure your limit Ad Tracking is green and then tap Reset Advertising Identifier. This will opt you out of targeted ads. Once this is done do a restart of your device for good measure.

Turn Pop-Up blocker on

If you use Google Chrome instead of Safari. Open Chrome, tap the three dots, and go into settings.

Scroll down to content settings and make sure your pop up blocked is turned on.

Next step, if you have added any new Apps. Remove it and see if the Pop ups stop. To remove the App just tap and hold and tap delete App. Pretty straight forward.

Another good tip is to install an App called Malware Bytes. So go to Malwarebytes.com Its an App that can scan for Malware. Unfortunately it is not available in Australia now, But it is meant to be available in the US and Canada. Use it to scan your phone.

If you cannot install Malware Bytes but you can look on the App Store for other simular app that can scan and remove Malware. In the App store do a search for Malware and try installing one of the other Apps there.

Last step if all else, fails do a back up to iCloud and reset your device back to factory defaults. To do this go to Settings, iCloud.

In addition, to do the reset go back to settings > General and then scroll down to reset. Then tap on Erase All Content and Settings.

Also guys don’t forget to check out my other videos such as Transfer data from Android to Pixel 4. And do me a favour hit the subscribe button and smash the bell icon.
10 iPhone settings that you should turn off straight away

10 iPhone settings that you don’t need. Time to turn them off.

Hi guys and welcome to 123, this video I will show you ten iPhone settings that you should turn off straight away. Ok guys these settings I am about to show you will do two things save battery life and save you mobile data. So let us get started.

iPhone Analytics

  1. The first one you should turn off is iPhone analytics. IPhone Analytics sends data to Apple and could be a privacy issue as well. They use these analytics to see how you use your phone so they can improve their services. It also drains your battery life. So to turn it off go into Settings > Privacy > Analytics. Just toggle the button at the top. If you have an Apple watch, it will also turn off the analytics for your Apple watch. Again, this will give you more battery life on your Apple watch as well.

iCloud Analytics

  1. In addition, while you are in there turn off iCloud analytics, which is the same thing as iPhone Analytics accept for iCloud.
  2. Turn off Improve Siri & Dictation. This setting allows Apple to store and review the Audio from your Siri interactions. For me no thanks I want to keep that private.

Significant Locations

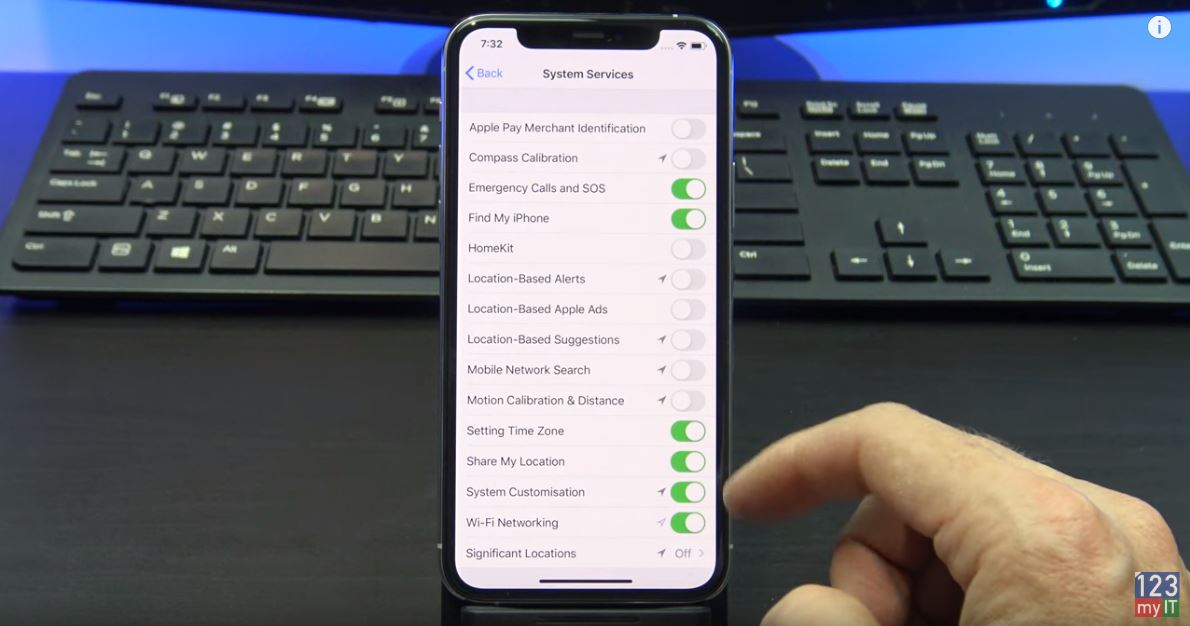
  • Next up turn off Significant Locations. Significant location tracks everywhere you go this also means it uses your GPS everywhere you go. This allows Apple to deliver targeted advertising to your phone.  To turn this off go to Settings > Privacy> Location services > you can toggle it off at the top. Otherwise if you want to see where you have been go to System Services > Significant Locations. You can turn it off in here plus see where you have been and clear history.
iPhone settings
System Services – Turn off services that you are not using.

System Services

  • Turn off everything in System services that are unnecessary. Turn off everything apart from Emergency calls and SOS, find my iPhone and share my location if you use that feature. If suddenly, something does not work come back in here and double check. Otherwise, turn them off. It will save you battery life and data.
  • While you are in there turn off everything in Product improvement. This allows Apple to use your location to improve maps. Just turn it off.

Limit Ad Tracking

  • Next, up you want turn on Limit Ad Tracking. This is one where the naming might be confusing. If you do not have this on then you are being tracked when you go to websites so that advertisers can advertise to you.  Turn this on under Privacy and Advertising. If you want to see information that is being used by Apple, tap the View Ad Information menu. Hit the Reset Advertising Identifier button and then toggle Limit Ad Tracking on.

Email accounts

  • Set your email accounts to fetch instead of Push. What this does is it only goes and gets your email when you open your email to look. Rather than wasting battery, life constantly checking for new email. You can also select how often you want to fetch your mail. Every 15 minutes might be suitable. Just remember the longer you leave this the better your battery life will be.
  • Turn off background app refresh. You can find this under iPhone Settings, General. This allows apps to download data in the background even where you are not using them. Turn these off for anything you are not using.
  • Raise to wake. Turn off save battery life. What this does is when your iPhone screen is blank it turns on when you raise it.

Also guys don’t forget to check out my other video such as Forgotten Passcode on iPad, iPhone and iPod. And do me a favour hit the subscribe button and smash the bell icon.
Gaming PC Setup – Turn Off Turbo Boost to Fix Lag

Transfer Data Old iPhone to New iPhone

Apple Watch Series 5 Unboxing First Look

Forgotten Passcode on iPad, iPhone, or iPod Touch 2019

Forgotten your passcode on your iOS device? This video will help.

Forgotten Passcode on iPad?

Hi guys and welcome to 123, in this video I will show you how to remove the passcode from iPad, iPhone and iPod touch. This is helpful if you have Forgotten Passcode on iPad, iPhone or iPod.

Ok guys so have completely forgotten your passcode and you need to remove it from your device. How painful it can be to have Forgotten Passcode on iPad, iPhone or iPod? Apple recommends two ways to remove your passcode. However, this will erase any data on your iPad, iPhone or iPod so I recommend trying to remember you passcode first. Because If you have backed up your device via iCloud or iTunes then you will be able to restore your data and settings after restoring your device.

Check iCloud first

Alright the first way to remove the passcode is if you have added your iPad, iPhone or iPod to iCloud backup and find my iPhone. Once you are on the iCloud.com page login with your Apple ID.

And then click on find iPhone. Click on All devices at the top and you should see your iPad, iPhone or iPod that you want to restore. If you don’t see your device there then you will have to fast forward the video to the second option of restoring your device.

Forgotten Passcode on iPad
Erase your device with iCloud if you have it added to iCloud.

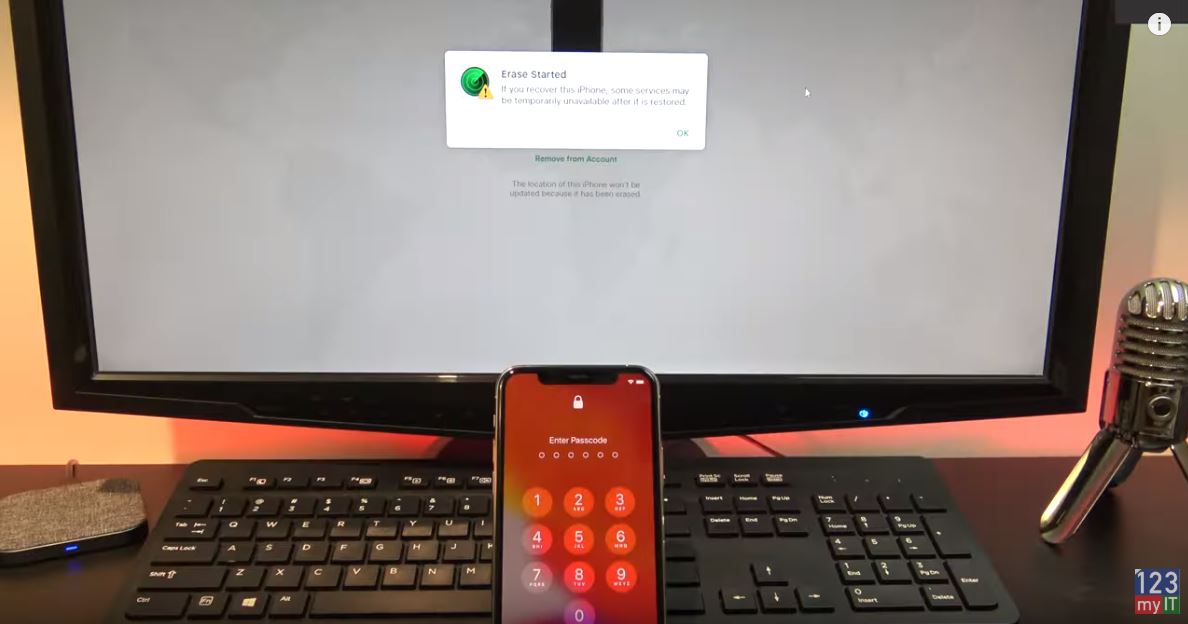
Here I have my iPhone 11 Pro and I will click Erase iPhone. This will restore your iPad, iPhone or IPod back to factory defaults. But remember that this will also erase any data on the device so be sure you want to do this. Next up enter your Apple ID and password and enter your secret questions. On the Erase iPhone menu click Next and then Done. And you will a message that states your erase has started.

Setup your device as new

Ok go a head now and start setting up your device again from scratch. Your passcode will be gone now. If your get activation lock you can enter your Apple ID or click the remove from account button in iCloud then go back on your device and the activation lock won’t come up once you have removed the account from iCloud. If you cant get past activation lock. You will need to take your device to Apple with proof of purchase. Follow the prompts to setup your iPad, iPhone or iPod. Your Passcode is now gone.

And there you have it you have removed you passcode.

If you haven’t Added your iPad, iPhone or iPod to iCloud then you will need to restore your device via iTunes. So you will need a computer with iTunes.

Recovery Mode

You will need to put your device into recovery mode and here’s how to do it for the different models. So for my iPhone 11 I just hold down the side button and plug it into my computer. Once done correctly you should see the restore screen.

But on your computer you iTunes should come up with a restore option. Click Restore and then Restore and update. Click next on software update.

In the top right hand corner of iTunes you should see the software start to download the new iOS for your iPad, iPhone or iPod. If you are using Mac OS Catalina the process is the same.  Click on Go and then computer.  Find your iPad, iPhone or iPod. Click ok and then hit restore. Again click restore and update. Click Next and Agree and your software will start to download.

Slow Internet?

If you are on a slow internet connection, your device might restart itself and you will have to put it back in Restore mode again. So once the download has finished it will extract and start to restore your iPad, iPhone or iPod.

You should now see a message that your device has been restored. However your device will restart itself and your passcode will be gone. Just go ahead and setup your device again. Congratulations you now have removed your passcode.

So guys don’t forget to check out my other videos such as Turn off Turbo Boost to Fix game lag. And do me a favour hit the subscribe button and smash the bell icon.
Transfer Data Old iPhone to New iPhone

Apple Watch Series 5 Unboxing First Look

Apple iPhone 11 Pro Silver Unboxing First Look

iPhone Battery Drain – Is your iPhone letting you down?

If you having issues with yor iPhone it could caused by problems with your Battery.
iPhone battery drain Issues you might experience are:

  • Apps are slow to launch
  • Slow frame rates while scrolling
  • Backlight dimming
  • Lower speaker volume
  • Gradual frame rate reductions in some apps
  • Camera flash disabled
  • Apps refreshing in background may require reloading upon launch

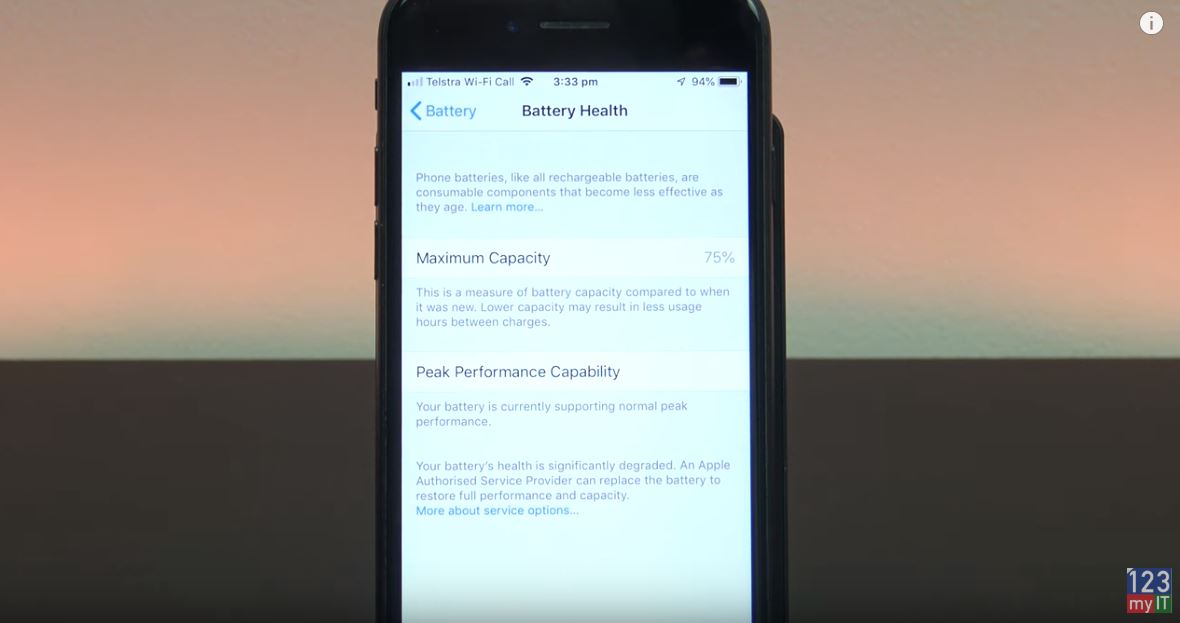
If you are having these issues mentioned the next step is to check your battery health and you can do that by going into Settings, Battery, Battery Health.

iPhone battery drain
iPhone Battery Drain – Battery Health

The first thing you need to look at is the Maximum Capacity %. As you can see here on my older iPhone 7 the Maximum Capacity 75%. Well what does that mean?If you compare that with my iPhone 8 which has Maximum Capacity of 100%. It means that every time I charge my iPhone 7 I am only getting a 75% charge of the battery.

iPhone Battery Drain – Check your Maximum Capacity.

So guys go ahead and check what the Maximum Capacity % is on your iPhone right now what number is it set too? I would be interested in knowing. So if my brand new iPhone use to give me 10 hours of battery life on a full charge and I am missing 25% I only get 7.5 hours now instead of 10 hours I use to get.

What do the other messages mean?

Under Peak Performance you will get a series of other messages and they mean different things. The first one is Performance is normal which means just that its normal. Nothing to worry about. The second one is Performance management applied. This means your iPhone shutdown because it couldn’t handle the power needed to perform a function. This management should stop the iPhone from crashing in the future.

The Battery Health unknown message – means that the iPhone can’t talk to the battery for some reason. Could be due to a hardware fault. If you get this take your iPhone into Apple.

Performance management turned off – if you get this message you have turned the Performance management off and your iPhone has crashed. The iPhone will turn this feature back on to stop future shutdowns.

Battery health degraded – This is the error I was getting on my iPhone 7. This means the battery is not as good as it was and it will need replacing to improve the performance and battery life.

Important Battery Message –
This error only Applies to the iPhone X series. It means that the iPhone can’t verify if the battery is genuine. This might be helpful to check if you are buying the iPhone second hand. Otherwise you can take the iPhone to a Apple Authorized service provider.

Also guys don’t forget to check out my other videos like Low Power Mode on iPhone. Do me a favor and hit the subscribe button and smash the bell icon.

Setup Bedtime on iPhone

Apple Shutting Down iTunes