Transfer Data iPhone to Pixel 4 – 2020

Hi Guys and welcome to 123myit, in this video I will show you how to Transfer your data from iPhone to Pixel 4. Ok guys in this video we will show you the official way to transfer all your data from iPhone to Pixel 4. This is helpful if you just got your Pixel 4 phone and you want to move all your Texts ,Messages,  contacts, calendars, photos, videos, free apps and music to your Pixel 4.

Ok guys lets get started. If you have a new pixel 4 then you will see this start screen. However if you have already setup your phone then you will need to reset the Pixel 4 back to factory defaults.

System and Advanced

We can do this under settings > System and Advanced. Just remember if already have data on your Pixel phone this will wipe that data. So make sure you backup that data before doing the factory reset. Under reset options now and we want to tap on Erase all data. Go ahead and Erase all data again and confirm it.

Alright that will set your Pixel 4 back to factory defaults and you will be able to start the Transfer from iPhone. Also guys I get asked this question all the time will it transfer App Data. The answer is No unless it’s a cloud based App that stores your data for you. Will it transfer Paid apps. Again the answer is no. iPhone and Android are two different platforms. Having said that I am sure there is 3rd party apps out there that might do it, however that’s not part of this video.

Alright so we are back at the Start screen so just hit Start. Now if you have your sim you can put it In now. Otherwise you can hit skip. You don’t need a sim to Transfer data. Next connect your WIFI. This is important because the Pixel 4 will download the updated Transfer software.

Once connected the Pixel will check for that software I mentioned. Ok just tap next. And tap next again and then it will ask you for your old phone. Make sure you remove your passcode or any security features on your iPhone. You will also need your old phone cable.

Using the USB to USB C Adapter
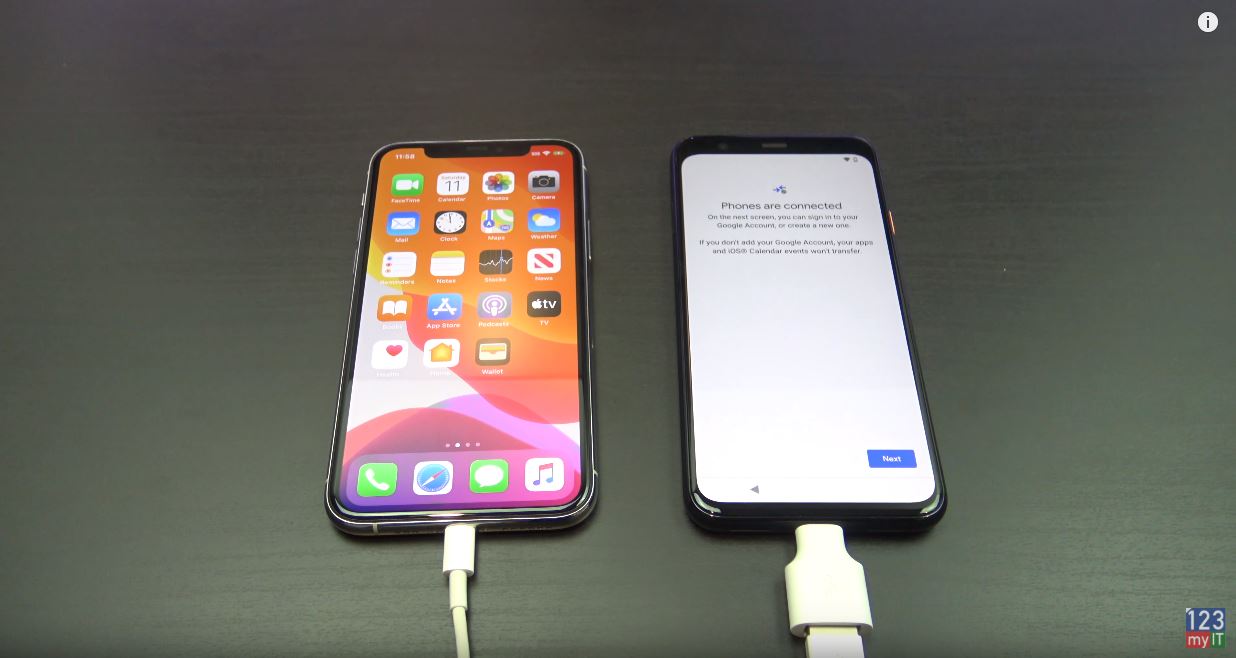
iPhone to pixel 4
Use the USB to USB C cable to connect the two phones.

The Pixel 4 should have a USB to USB C adapter plug the other end into your old phone USB cable and then plug the adapter end into your Pixel 4. Now go ahead and plug both phones into each other to start the transfer. You can sign into google if you want or just skip it. And just tap Trust of your iPhone if it prompts on your screen. Alright phones are connected tap Next. You can enter your Google account or just hit skip. Ok right now the Pixel 4 will check what data you have on your iPhone that it can transfer. Ok cool, the Pixel 4 will give you a summary of what you can transfer. Just untick any data that you don’t want to transfer and tap copy. Also if you copying fails, try this method again but maybe try a small transfer first like contacts. Double check you don’t have any security options like passcodes that could block the transfer. Congratulations you just copied your data tap on next and unplug your phones. Follow the prompts of your phone.

Your Pixel 4 should show you a confirmation of the data you have copied. Alright you all done. Check your data and you are good to go. Also guys don’t forget to check out my other videos such as Pixel 4 unboxing and first look. And do me a favour hit the subscribe button and smash the bell icon.

Google Pixel 4 Unboxing Firstlook

Turn Caller ID off iPhone

Turn Caller ID off iPhone

Hi guys and welcome to 123, in this video I will show you how to turn caller id off on iPhone.

Ok guys so if you want to call someone but don’t want to display you caller id on the phone of the person you are calling then you can turn it off in the iPhone settings.

This is helpful if you have a crazy person in your life that you need to call but don’t want to pass on your phone number details to them.

Test your call to another phone first!

I also suggest testing the caller id with another phone just to make sure you have turned if off and it is working correctly. Let get started.

To turn the caller id off or on go into settings and scroll down to phone. Tap on show my caller ID. And you should have a toggle button which will turn your called id off or on. Again test this with another phone first.

Caller ID off iPhone
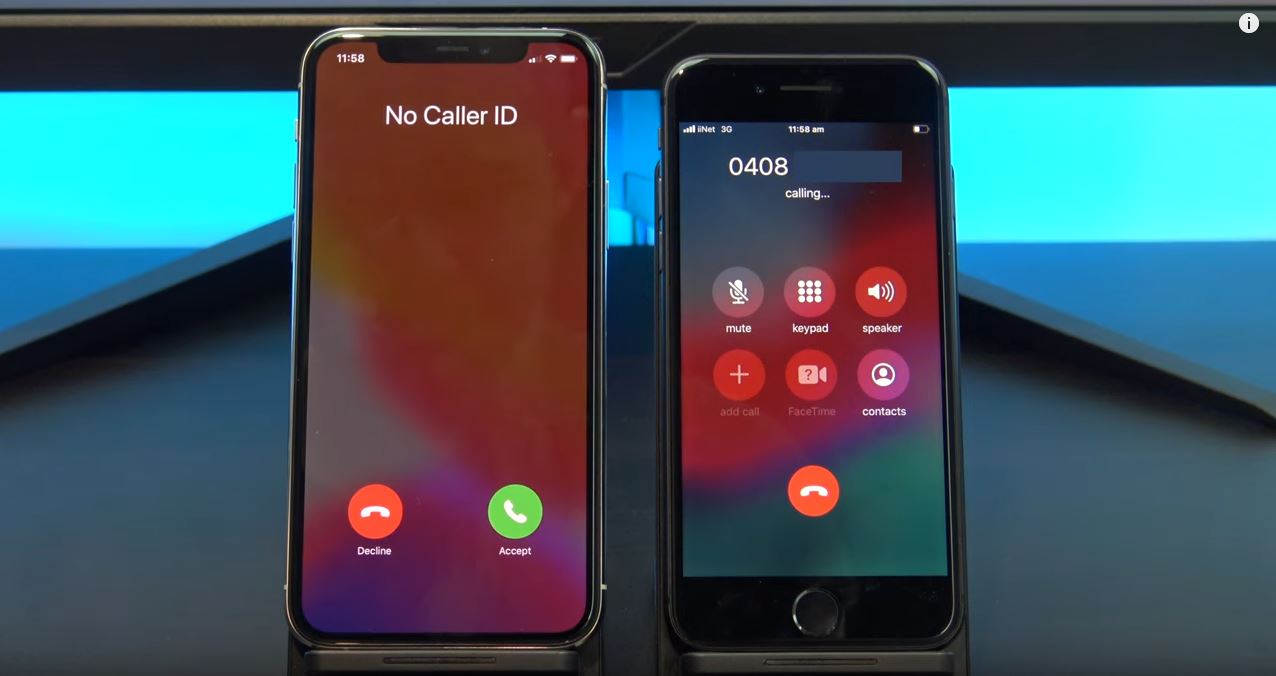
Turn Caller ID off iPhone – This is what it should look like when your number is hidden.

If you have the called id turn on this it what it will look like when you call another phone. And if you have called id turned off this is what it will look like.

Caller ID on Android.

So it should show your call as no Caller ID or private number for android phones. If you want to know how to turn Called ID off or on on Android you can take a look at my Android video here: How to make your Phone Number private on Samsung

Also guys don’t forget to check out my other videos such as Backup & restore WhatsApp messages on Android. And do me a favour hit the subscribe button and smash the bell icon.
Backup & Restore WhatsApp Messages on iPhone

Aorus KD25F Gaming Monitor – Cheating Stream Snipers Paradise

Backup & Restore WhatsApp Messages on iPhone

Ok guys so you have a new iPhone or you want to reset your iPhone and don’t want to lose your WhatsApp messages you will need to do a backup and restore. In this video I will show you how to do a backup and restore via iCloud. Lets get started.

iCloud Login

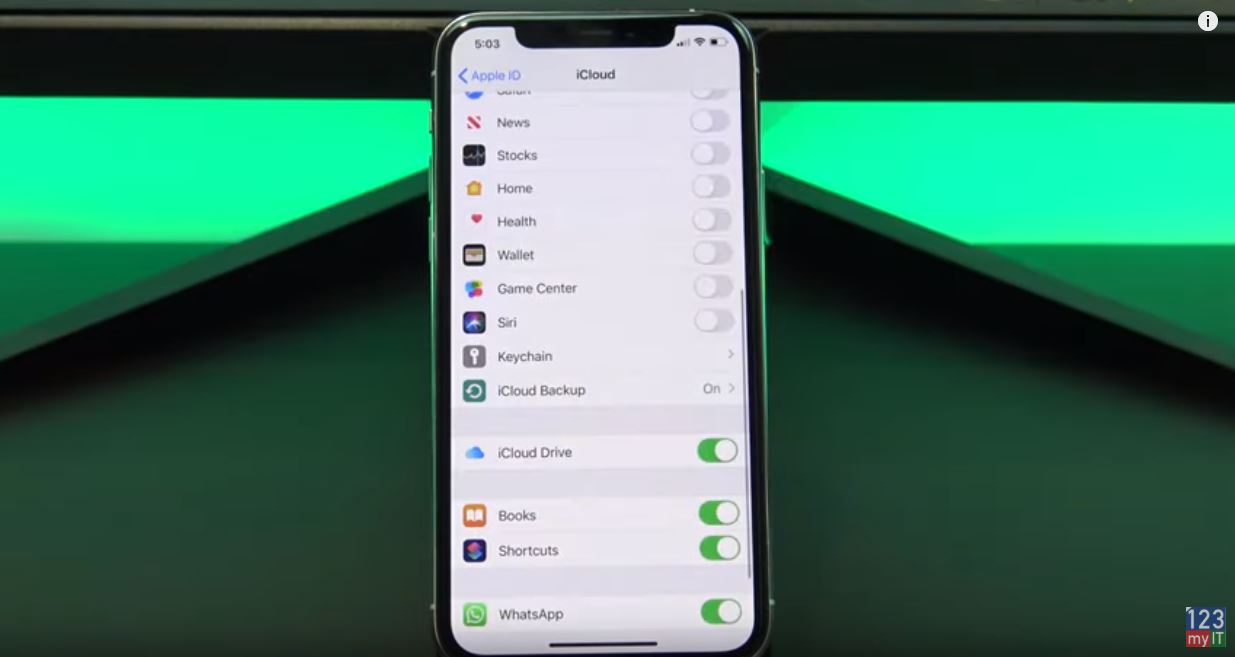
The first step is to log onto your iCloud account with your Apple ID and turn on a service called iCloud drive. So go into Settings and iCloud. Scroll to the bottom and you should see your WhatsApp toggle switch. If its off turn it on. And then also make sure your iCloud drive button is turned on.

Backup & restore Whatsapp messages.
Use iCloud to backup your messages first.

If you go into your iCloud backup it should be on as well and feel free to turn off anything you don’t need like Book and Shortcuts.

How to Backup & Restore WhatsApp Messages?

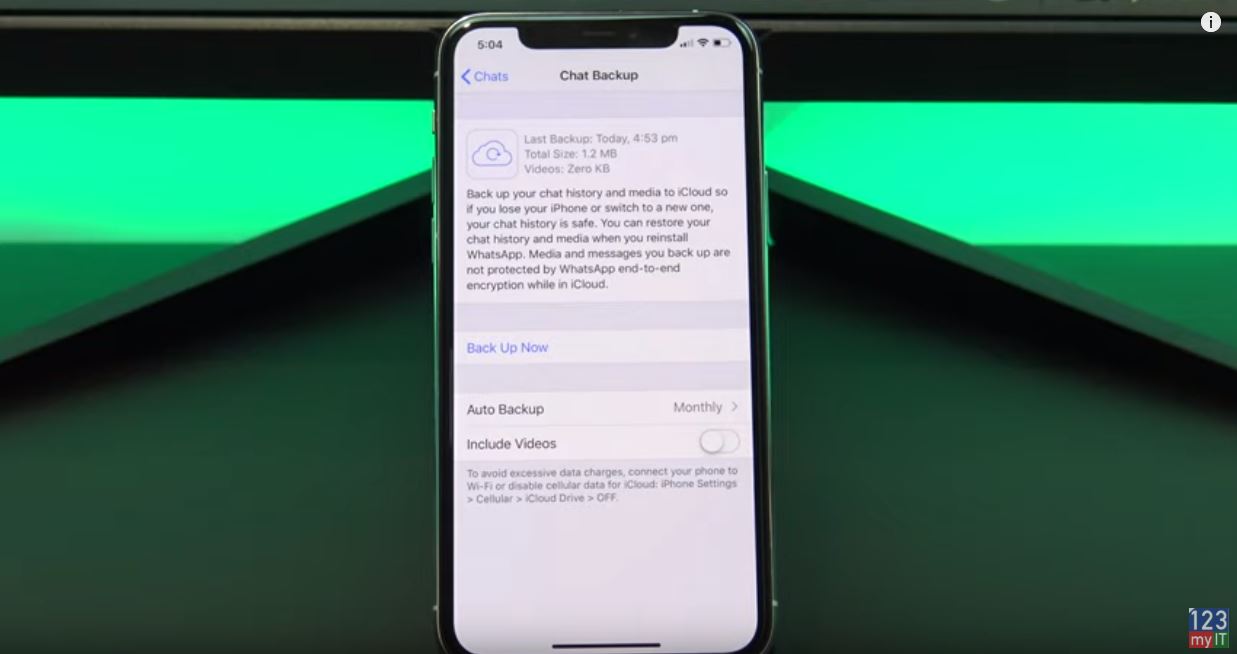
Ok we have now turned on iCloud backup for WhatsApp, let go ahead and do a backup of the messages in WhatsApp. Go into WhatsApp and tap the settings tab down the bottom. Next go into Chats and then Chat backup.

Chat Backup
Chat Backup

Under Chat Backup you will have a few options. The first one is auto backup. This allows you to set an auto backup of the chats to iCloud drive. Maybe set this to once a month. The second option is include videos, remember that if you only have 5GB of backup space on your iCloud drive than maybe leave this option turned off. Tap backup now and it should start saving your messages to iCloud Drive. Press backup now and this should start to backup your WhatsApp messages. Make sure you do this when your on WIFI, otherwise it might eat up your cellular data.

Restore Backup

Ok now you have done a Backup. Lets see how you do a restore. So I will delete the WhatsApp app and reinstall it. Enter in your phone number and setup WhatsApp. After you enter your phone number it will ask you if you want to Restore from iCloud. It should then go ahead and download all your chat history messages videos pictures etc.

You can see here it says it has Restored 10 messages. Enter in your display name.

Once this is done you should be able to go in an check your chats. Also guys don’t forget to check out my other video such as unboxing of the Aorus KD25F Gaming Monitor. And do me a favour hit the subscribe button and smash the bell icon.
Media PC Build – The Witcher

Setup XBOX controller on Apple TV, iPad or iPhone + Games

Setup XBOX controller on Apple TV, iPad or iPhone + Games

Setting up the XBOX Controller on Apple TV

Hi Guys and welcome to 123myIT, in this video we will show you how to Setup XBOX wireless controller on Apple TV, iPad or iPhone.

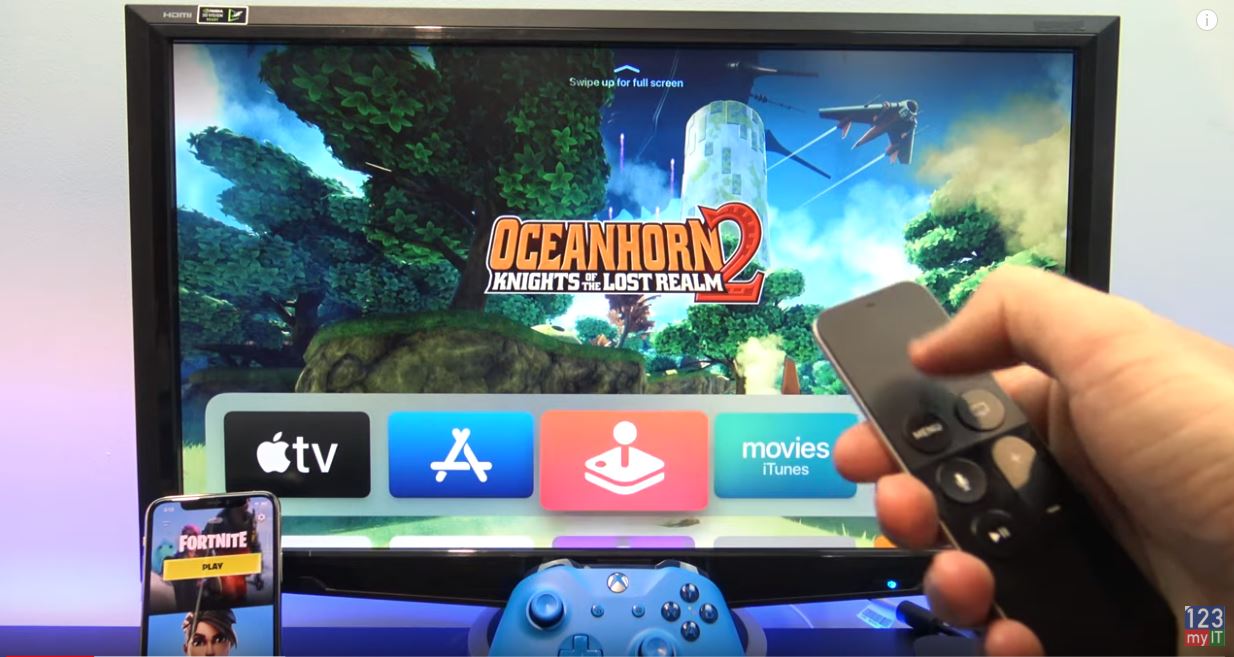
One of the new features with iOS 13 is that you can pair XBOX controllers with Apple TV, iPad and iPhone. This means you can use the XBOX controller to play games on Apple Arcade as well as iOS supported games.

All right let’s get started its pretty simple on your Apple TV go to Settings > Remotes and Devices.

setup xbox controller
Getting started, use the Apple TV remote to setup the Xbox controller.

Scroll down to Bluetooth. And under BlueTooth you will see other devices.

Next up grab your XBOX controller and put it in pairing mode. To do this Press the XBOX button to turn it on. Then press the connect button for 3 seconds or until the XBOX button starts to flash. The XBOX controller should show up under other devices select it with your AppleTV remote. Once you see the Controller Connected popup you should be good to go.

Connect the XBOX to your

Let’s connect the XBOX controller to your iPad or iPhone. Go into Settings > BlueTooth. And just toggle on the BlueTooth switch. Again put your controller in Pairing mode. And tap your controller to connect it.

Awesome lets go test out some games. On Apple TV just go into Apple Arcade and sign in with your Apple ID. Its free for the first month. The game I have played most is one called OceanHorn2. The games on Apple Arcade are pretty basic at the moment so don’t expect to the blown away. But they are ok for a bit of fun. OceanHorn2 is a Adventure Role Play game.

Lets check out some games on the iPad or iPhone. Not all iOS games will work with the XBOX controller. But when you load a game that does it should tell you at the bottom of the screen.

The game I am playing now is called real racing 3. In real racing 3 you can change your views in the car and also look behind you. This iPhone 11 pro does a good job with the sound and games can be quite fun on a bigger iPad screen. If racing is not your thing there is loads of other games like fortnight and actually having a controller will give you some advantage over other mobile players as the controller is much easier to use. Sonic Racing game on Apple TV is also a bit of fun.

Also guys don’t forget to check out my other videos such as How to setup DUALSHOCK controller on Apple TV, iPad and iPhone. And do me a favour hit the subscribe button and smash the bell icon.
Turn on Voice control on iPhone or iPad

10 iPhone settings that you should turn off straight away

Setup DUALSHOCK 4 controller on Apple TV, iPad or iPhone

Making the DUALSHOCK 4 work with Apple TV

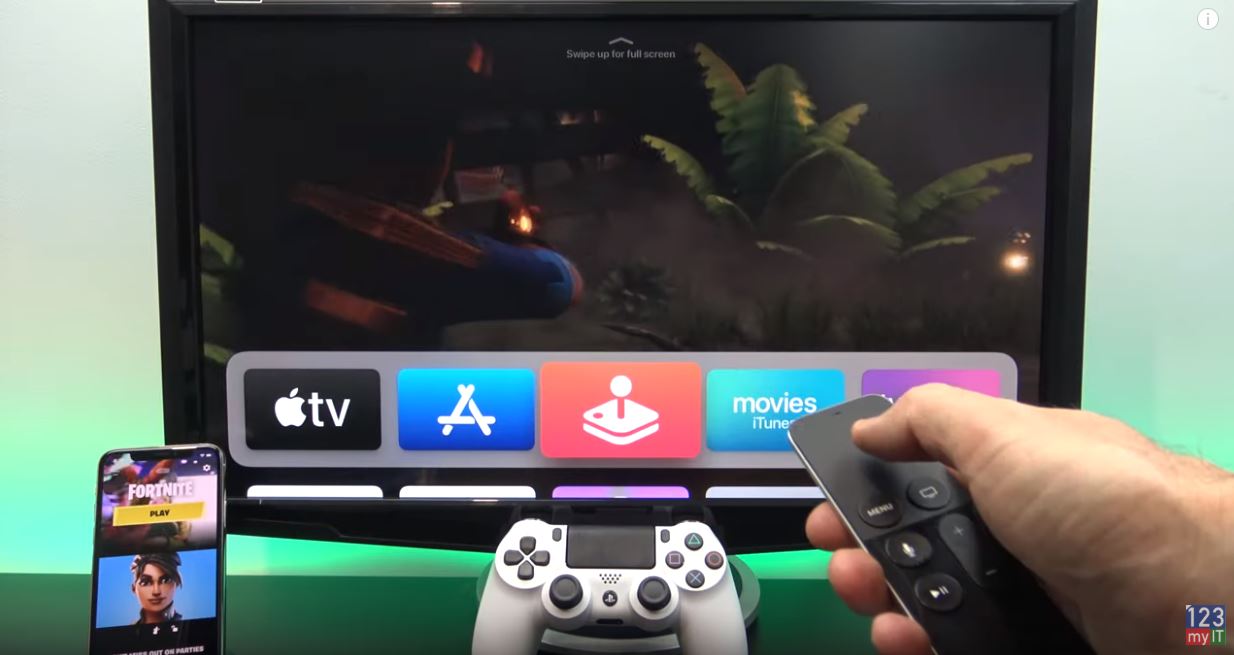
Hi Guys and welcome to 123myIT, in this video we will show you how to Setup Dualshock 4 controller on Apple TV, iPad or iPhone.One of the new features with iOS 13 is that you can pair Dualshock 4 controllers with Apple TV, iPad and iPhone. This means you can use the Dualshock 4 controller to play game on Apple Arcade and iOS supported games.

All right let’s get started its pretty simple on your Apple TV go to Settings > Remotes and Devices.

setup dualshock 4 controller
Use the Apple TV remote to setup DualShock 4 controller.

Scroll down to Bluetooth. And under BlueTooth you will see other devices.

Next up grab your DualShock controller and put it in pairing mode. To do this hold down the PS and sharing buttons for 3 seconds or until the light starts flashing on the top. The DualShock controller should show up under other devices select it with your AppleTV remote. Once you see your Controller Connected popup you should be good to go.

Lets connect the DualShock to your iPad or iPhone. Go into Settings > BlueTooth. And just toggle on the BlueTooth switch. Again put your controller in Pairing mode. And tap your controller to connect it.

Apple TV Games

Awesome lets go test out some games. On Apple TV just go into Apple Arcade and sign in with your Apple ID. Its free for the first month. The game I have played most is one called OceanHorn2. The games on Apple Arcade are pretty basic at the moment so don’t expect to the blown away. But they are ok for a bit of fun. OceanHorn2 is a Adventure Role Play game.

Lets check out some games on the iPad or iPhone. Not all iOS games will work with the DualShock controller. But when you load a game that does it should tell you at the bottom of the screen.

The game I am playing now is called real racing 3. In real racing 3 you can change your views in the car and also look behind you. This iPhone 11 pro does a good job with the sound and games can be quite fun on a bigger iPad screen. If racing is not your thing there is loads of other games like fortnight and actually having a controller will give you some advantage over other mobile players as the controller is much easier to use. Sonic Racing game on Apple TV is also a bit of fun.

Also guys don’t forget to check out my other videos such as Turn on Voice control on iPhone or iPad. And do me a favour hit the subscribe button and smash the bell icon.
10 iPhone settings that you should turn off straight away

Forgotten Passcode on iPad, iPhone, or iPod Touch 2019

Turn on Voice Control on iPhone, iPad and iPod Touch

Voice Control the most over looked feature of the iPhone.

Hi Guys and welcome to 123, in this video I will show you how to Turn on Voice Control on iPhone, iPad and iPod Touch. Voice Control allows you to control your iOS devices using just your voice. This is helpful if you have your hand full or have limited mobility.

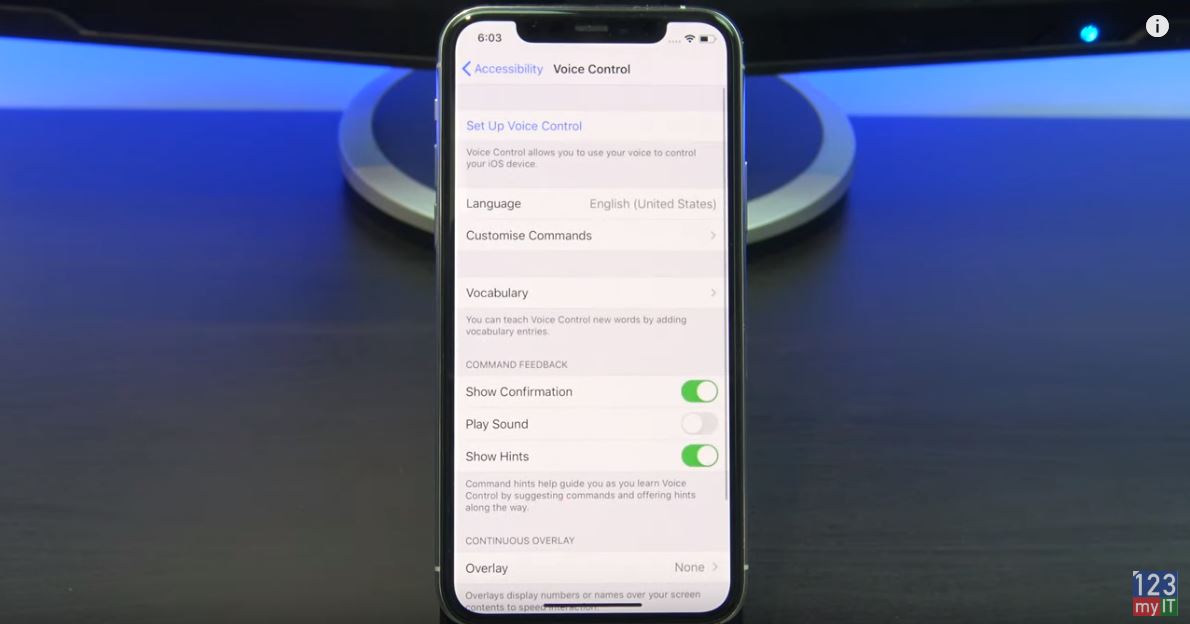
To turn on voice control go into Settings > Accessibility and Voice control.

Voice Control iPhone
Set Up Voice Control

Next, Tap on Set Up Voice Control. Voice control might need a small download when setting up, but after that, It doesn’t need an internet connection. Tap continue. In addition, it gives you a short list of commands. So we will go through these in a second. First, I want to show you how you can turn Voice Commands off and on using Siri.

Try some Commands

Ok let try some commands. When Voice Control is turned on you will see a blue microphone in the top left of the screen.

If you want to go to the home screen, say Go Home. Swipe Left to swipe left. If you get stuck for commands simply say. If you want to check out control centre, say Open Control Centre.

Awesome if you want to see other commands you can use just say, Show Commands.  Ok lets take some pictures.  Open camera. If you want to know, the names of the settings to use say Show names. In addition, to take a picture just say, Tap Take Picture.

Moreover, if you want to Zoom in just say Show Names to find the Name. Then Tap Zoom. If you want to lock your screen just say Lock Screen.

Some other commands are, Take screen shot.  Turn on Smart invert colours.

Also guys don’t forget to check out my other video such as 10 iPhone settings you need to turn off straight away. And do me a favour hit the subscribe button and smash the bell icon.
Forgotten Passcode on iPad, iPhone, or iPod Touch 2019

Gaming PC Setup – Turn Off Turbo Boost to Fix Lag

Transfer Data Old iPhone to New iPhone

10 iPhone settings that you should turn off straight away

10 iPhone settings that you don’t need. Time to turn them off.

Hi guys and welcome to 123, this video I will show you ten iPhone settings that you should turn off straight away. Ok guys these settings I am about to show you will do two things save battery life and save you mobile data. So let us get started.

iPhone Analytics

  1. The first one you should turn off is iPhone analytics. IPhone Analytics sends data to Apple and could be a privacy issue as well. They use these analytics to see how you use your phone so they can improve their services. It also drains your battery life. So to turn it off go into Settings > Privacy > Analytics. Just toggle the button at the top. If you have an Apple watch, it will also turn off the analytics for your Apple watch. Again, this will give you more battery life on your Apple watch as well.

iCloud Analytics

  1. In addition, while you are in there turn off iCloud analytics, which is the same thing as iPhone Analytics accept for iCloud.
  2. Turn off Improve Siri & Dictation. This setting allows Apple to store and review the Audio from your Siri interactions. For me no thanks I want to keep that private.

Significant Locations

  • Next up turn off Significant Locations. Significant location tracks everywhere you go this also means it uses your GPS everywhere you go. This allows Apple to deliver targeted advertising to your phone.  To turn this off go to Settings > Privacy> Location services > you can toggle it off at the top. Otherwise if you want to see where you have been go to System Services > Significant Locations. You can turn it off in here plus see where you have been and clear history.
iPhone settings
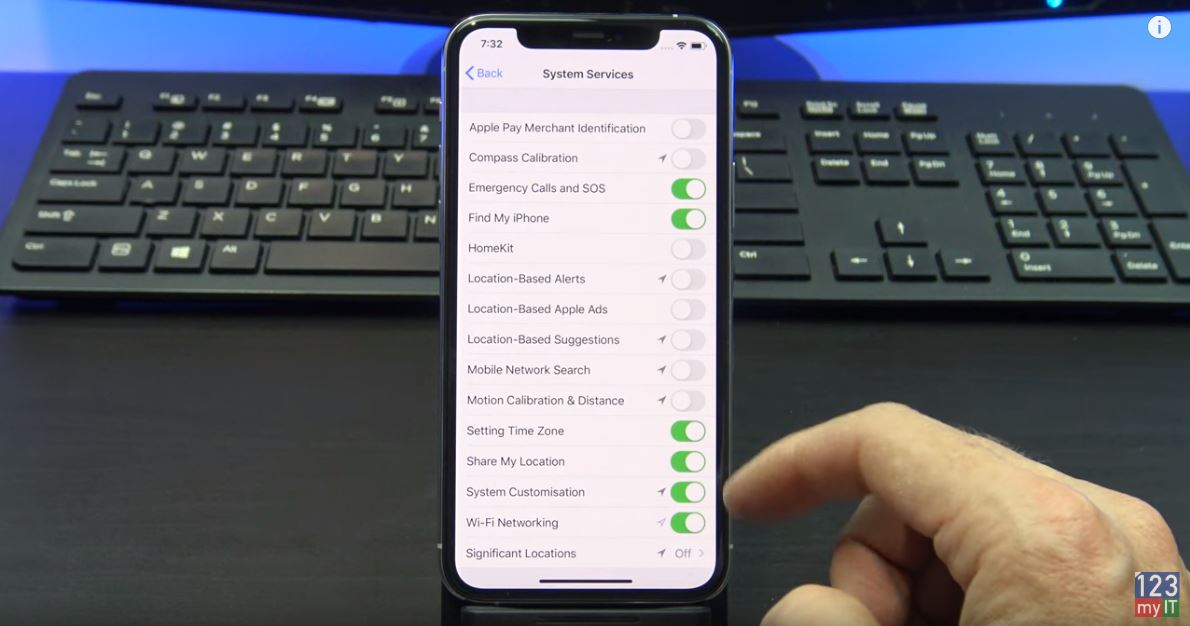
System Services – Turn off services that you are not using.

System Services

  • Turn off everything in System services that are unnecessary. Turn off everything apart from Emergency calls and SOS, find my iPhone and share my location if you use that feature. If suddenly, something does not work come back in here and double check. Otherwise, turn them off. It will save you battery life and data.
  • While you are in there turn off everything in Product improvement. This allows Apple to use your location to improve maps. Just turn it off.

Limit Ad Tracking

  • Next, up you want turn on Limit Ad Tracking. This is one where the naming might be confusing. If you do not have this on then you are being tracked when you go to websites so that advertisers can advertise to you.  Turn this on under Privacy and Advertising. If you want to see information that is being used by Apple, tap the View Ad Information menu. Hit the Reset Advertising Identifier button and then toggle Limit Ad Tracking on.

Email accounts

  • Set your email accounts to fetch instead of Push. What this does is it only goes and gets your email when you open your email to look. Rather than wasting battery, life constantly checking for new email. You can also select how often you want to fetch your mail. Every 15 minutes might be suitable. Just remember the longer you leave this the better your battery life will be.
  • Turn off background app refresh. You can find this under iPhone Settings, General. This allows apps to download data in the background even where you are not using them. Turn these off for anything you are not using.
  • Raise to wake. Turn off save battery life. What this does is when your iPhone screen is blank it turns on when you raise it.

Also guys don’t forget to check out my other video such as Forgotten Passcode on iPad, iPhone and iPod. And do me a favour hit the subscribe button and smash the bell icon.
Gaming PC Setup – Turn Off Turbo Boost to Fix Lag

Transfer Data Old iPhone to New iPhone

Apple Watch Series 5 Unboxing First Look

Forgotten Passcode on iPad, iPhone, or iPod Touch 2019

Forgotten your passcode on your iOS device? This video will help.

Forgotten Passcode on iPad?

Hi guys and welcome to 123, in this video I will show you how to remove the passcode from iPad, iPhone and iPod touch. This is helpful if you have Forgotten Passcode on iPad, iPhone or iPod.

Ok guys so have completely forgotten your passcode and you need to remove it from your device. How painful it can be to have Forgotten Passcode on iPad, iPhone or iPod? Apple recommends two ways to remove your passcode. However, this will erase any data on your iPad, iPhone or iPod so I recommend trying to remember you passcode first. Because If you have backed up your device via iCloud or iTunes then you will be able to restore your data and settings after restoring your device.

Check iCloud first

Alright the first way to remove the passcode is if you have added your iPad, iPhone or iPod to iCloud backup and find my iPhone. Once you are on the iCloud.com page login with your Apple ID.

And then click on find iPhone. Click on All devices at the top and you should see your iPad, iPhone or iPod that you want to restore. If you don’t see your device there then you will have to fast forward the video to the second option of restoring your device.

Forgotten Passcode on iPad
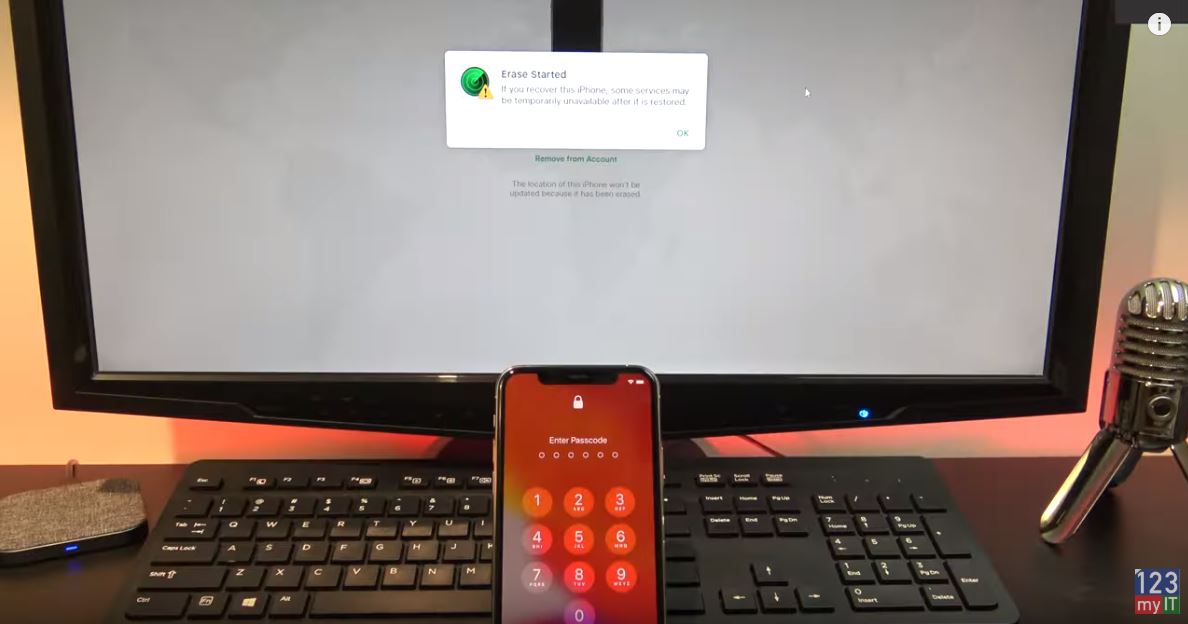
Erase your device with iCloud if you have it added to iCloud.

Here I have my iPhone 11 Pro and I will click Erase iPhone. This will restore your iPad, iPhone or IPod back to factory defaults. But remember that this will also erase any data on the device so be sure you want to do this. Next up enter your Apple ID and password and enter your secret questions. On the Erase iPhone menu click Next and then Done. And you will a message that states your erase has started.

Setup your device as new

Ok go a head now and start setting up your device again from scratch. Your passcode will be gone now. If your get activation lock you can enter your Apple ID or click the remove from account button in iCloud then go back on your device and the activation lock won’t come up once you have removed the account from iCloud. If you cant get past activation lock. You will need to take your device to Apple with proof of purchase. Follow the prompts to setup your iPad, iPhone or iPod. Your Passcode is now gone.

And there you have it you have removed you passcode.

If you haven’t Added your iPad, iPhone or iPod to iCloud then you will need to restore your device via iTunes. So you will need a computer with iTunes.

Recovery Mode

You will need to put your device into recovery mode and here’s how to do it for the different models. So for my iPhone 11 I just hold down the side button and plug it into my computer. Once done correctly you should see the restore screen.

But on your computer you iTunes should come up with a restore option. Click Restore and then Restore and update. Click next on software update.

In the top right hand corner of iTunes you should see the software start to download the new iOS for your iPad, iPhone or iPod. If you are using Mac OS Catalina the process is the same.  Click on Go and then computer.  Find your iPad, iPhone or iPod. Click ok and then hit restore. Again click restore and update. Click Next and Agree and your software will start to download.

Slow Internet?

If you are on a slow internet connection, your device might restart itself and you will have to put it back in Restore mode again. So once the download has finished it will extract and start to restore your iPad, iPhone or iPod.

You should now see a message that your device has been restored. However your device will restart itself and your passcode will be gone. Just go ahead and setup your device again. Congratulations you now have removed your passcode.

So guys don’t forget to check out my other videos such as Turn off Turbo Boost to Fix game lag. And do me a favour hit the subscribe button and smash the bell icon.
Transfer Data Old iPhone to New iPhone

Apple Watch Series 5 Unboxing First Look

Apple iPhone 11 Pro Silver Unboxing First Look