LG 27GL850-B Gaming Monitor Unboxing & Gaming Settings

Hi Guys Matt from123myit here, in this video I will show you how to an unboxing and first look at the LG UltraGear Gaming Monitor.

The Specs -LG 27GL850-B Gaming

The LG 27GL850-B is a 27-inch 1440p QHD Gaming monitor with a 1 ms response time. It has a refresh rate of 144Hz and its also Gsync and Free sync compatible by using Adaptive Sync. The 27GL850-B is a great buy at the moment retails for around $350 usd and $550 Aussie at the time of this video. If you are interested, I will put a link in the description below.

Other features include black stabilizer and HDR10 support. Let’s take a look what you get inside the box.

Inside the box

First up inside the box you have the base of the monitor stand. It has a black plastic cover with red highlights. Inside the LG UltraGear black box, you get a power plug. So, an Australian New Zealand power plug, but if you are in the US, you would get a US power plug. The power supply is not built into the monitor, and it comes as a separate power brick much like you see with laptop designs. I tested the power draw with HDR Effect turned on which is a bright setting, and the monitor uses about 26 watts of power. When I changed it to Reader it used 13 watts.

Power usage

The worst part when the monitor was turned off totally it still was using 1 to 2 watts while not in use.
Next in the box you have a little cable tidy, Display Port, USB 3.0 and HDMI cable. Also, in the box you have a driver CD, quick start guides and warranty information.

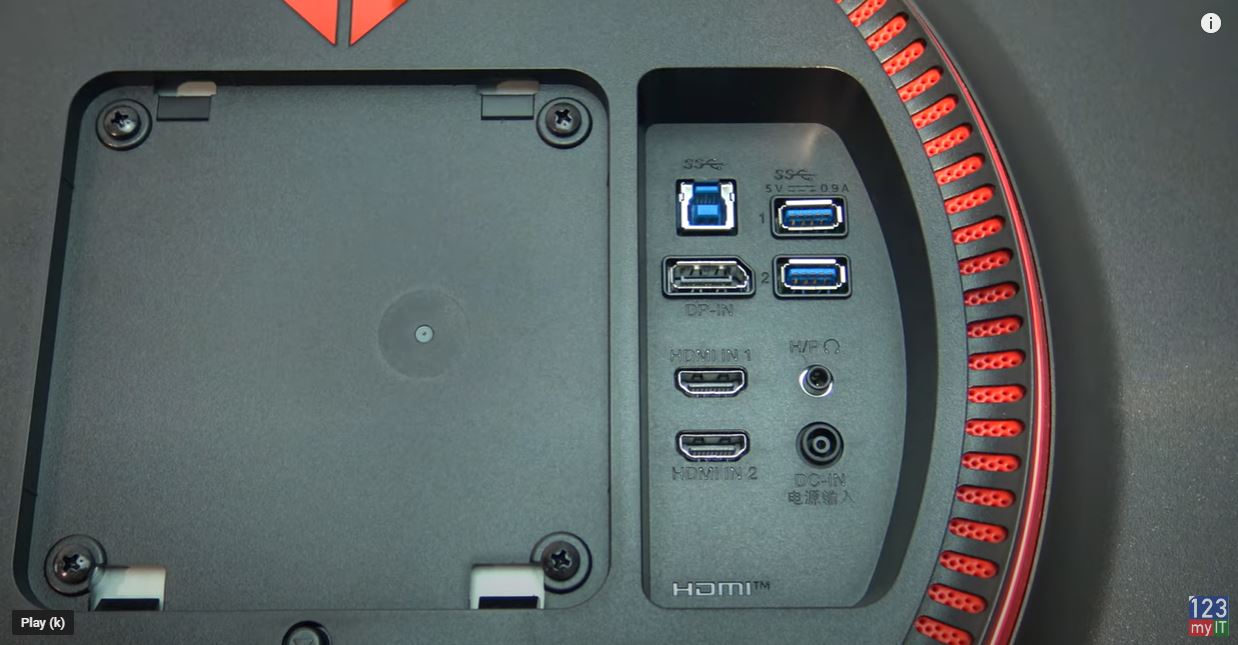
Next up is the arm that connects to the monitor to the base. Taking the monitor out of the box it’s an IPS display so blacks should look darker and colours will be brighter than a TN display. On the back you will see two HDMI and USB down ports. Along with one display and USB up ports. And if you have a VESA stand you can also attach your own.

The Stand

While the stand is solid there is some wobble, but it’s not a deal breaker. You can adjust the height and swivel as well as put it in portrait mode. Here it is beside the Aorus KD25F, which is a TN panel. Can you make out the deeper blacks and brighter colours?

Remembering that its a Nano IPS panel with a resolution of 2560 x 1440 and 350 nits of brightness.

FreeSync and G Sync

To start the OSD there is a little joystick under the logo. The thing I really like about this is it tells you the refresh rate straight away. Sweet so its running at 144Hz and you can see Adaptive Sync is on. In Game Mode it has some modes already to go which is nice. For best results in games, I set this to FPS with and went into the Game Adjust menu and turned Adaptive Sync off. The reason for this is when Adaptive Sync is turned on the Frame Rate in PUBG dropped making it terrible to play.

Adaptive Sync

If you can’t get Adaptive Sync to turn off, go into the NVidia control panel and take the tick out of Enable G-Sync. I am assuming it will be the same thing for AMD graphics cards. Once you have that turned off, go down to Response Time and make sure it is set to fast not faster. This is because the Faster setting only works with allot of errors and it looks bloody terrible.

Try it an test a game. Don’t take my word for it try it yourself. Next up to add a cross hair, go down to the Cross Hair menu and select the cross hair you want to use. I always go for the red one works best for me. Alright go in and check your display settings and make sure your 27GL850 is set to 144Hz.

On the Back

On the back the monitor has a USB hub which I really like as it allows you to plug in extra devices for your desktop. I use a desktop mic so when I turn my monitor off it also turns the mic off which is handy.

Testing how well games play

Alright let’s fire up PUBG and do some testing. So, with Adaptive Sync turned on I was getting around 71 to 74 frames per second. And with it turned off the frames improved all the way up to 110 frames per second. So, you can see why some BenQ monitors don’t even include Gsync FreeSync as it might not always be suitable.

Also, guys don’t forget to check out my other video such as How to Arrange your iPhone icons the Easy Way!. And do me a favour hit the subscribe button and smash the bell icon.

Turn On Background Sounds on iPhone to Help you Sleep

Dont Use Nicehash Optimized Settings

Aorus KD25F Gaming Monitor – Cheating Stream Snipers Paradise

Hi Guys and welcome to 123, in this video I will show you how to an unboxing and first look at the Aorus KD25F Gaming Monitor.

Check out the KD25F on Amazon here 👉 https://amzn.to/2Pd7K2F

The Aorus KD25F is a 24.5 inch 240hz Gaming monitor with a 0.5ms response time. Its also  Gsync and Free sync compatible. The KD25F retails for around $400 usd and $750 aussie at the time of this video. Other features include LED Fusion lighting, Aim Stablizer and what I consider the best feature of them all OSD SideKick. Lets take a look what you get inside the box.

You get three different power plugs. So it looks to be a Chinese power plug, an Australian New Zealand power plug and a US power plug. Next we have display port 1.2 and a HDMI 2.0 cable. Its nice that you get one of each. In some monitors you will only receive one cable. And last up we have a USB 3.0 cable which powers the USB hub and OSD SideKick software.

A monitor in this price range should come with a really good stand. And the Aorus KD25F monitor doesn’t disappoint with a really solid base to the stand. More about this later in the video. Its looks a bit like a boomerang.

Next up is the arm that connects to the monitor to the base. Taking the monitor out of the box you can see it has a Energy rating of 4 stars and while on the Gigabyte website it says it uses 60 watts on average it uses about 21 watts. Which is actually pretty good for a gaming monitor.

Also in the box you get the installation guide and warranty card.

The Stand

The stand is solid as and the arm and base just slot it together. After this just tighten the screw on the base. On the back of the monitor you have a power plug with an on off switch and a Kensington lock.  You also have a toggle switch to navigate the monitor OSD which is really helpful when navigating the menus. Above that Audio and Microphone jacks. Two HDMI posts, one Display Port port! USB 3 in port and two USB 3 out ports.

On the back of the monitor itself you will find 4 screws which means the monitor has VESA wall mounting support. Helpful if you want to change stands. The stand snaps into place nicely and there is a quality feel to it. There was talk on the internet about the stand being flimsy and wolling allot and it does move when I shake like this. However after testing the monitor for about a week I didn’t find it to be an issue at all.

Once setup the monitor take up about 21 cms of desk space. This means if you have a small desk it like I do. It will sit off the wall about 21 cms. Its not a deal breaker but just something to be aware of.

Rotate the Stand

The stand not only looks great but it allow you to ajust the height. Also the pivot the monitor 90 degrees. Tilts up and down. And it can swivel 20 degrees side to side.

Aorus KD25F Monitor
Wings of excellence design

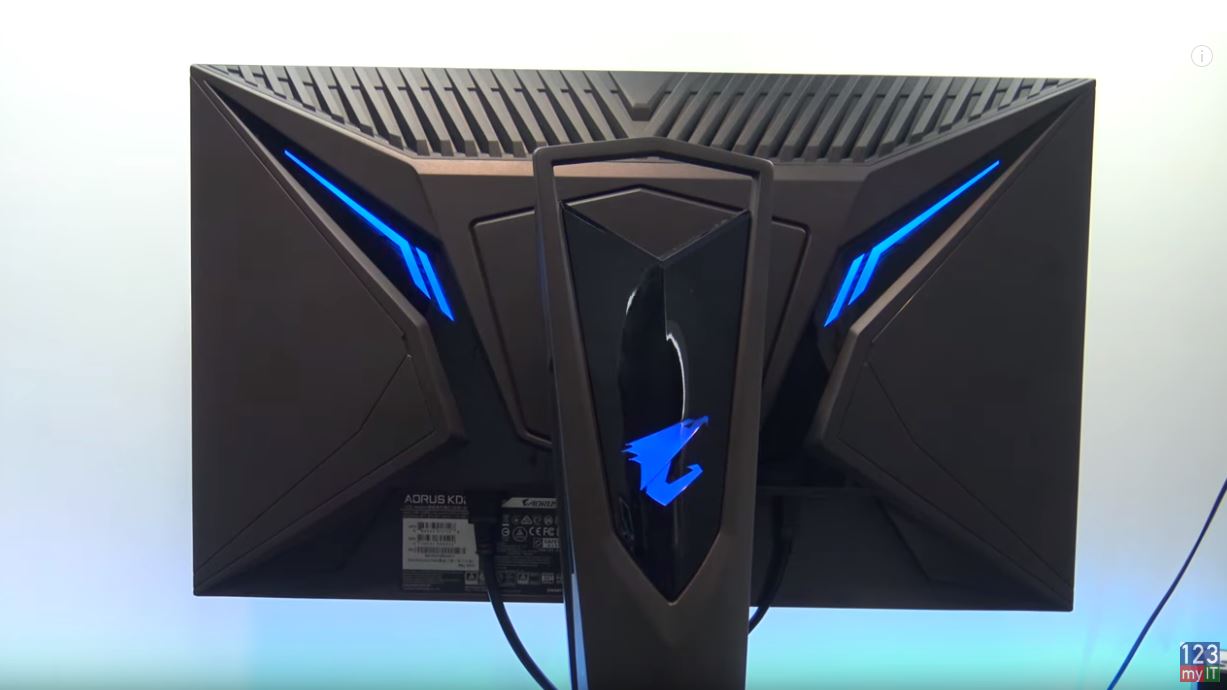
The stand has the Aorus Wings of Excellence design which looks cool. But in my opinion it lacks functionality. You can change the colour of the LEDS on the back of the Aorus KD25F monitor and the stand however they are very bright and most of the time you wont see them so they are a complete waste of time. If they were brighter you could shine them on a wall behind the monitor like I have done with my LEDs and it would make for an excellent gaming experience. The stand also has a nice built in handle, which is handy if you need to carry it.

Iam going to spend a bit of time going through the OSD SideKick because I think its really cool.

AORUS OSD Side Kick
OSD Side Kick Software – Allows greater control of Monitor settings.

OSD Side Kick – Best Feature !

The OSD sidekick software allows you to control the settings of you monitor with your mouse. You need to plug the USB into your computer for it to work but it has some great features.

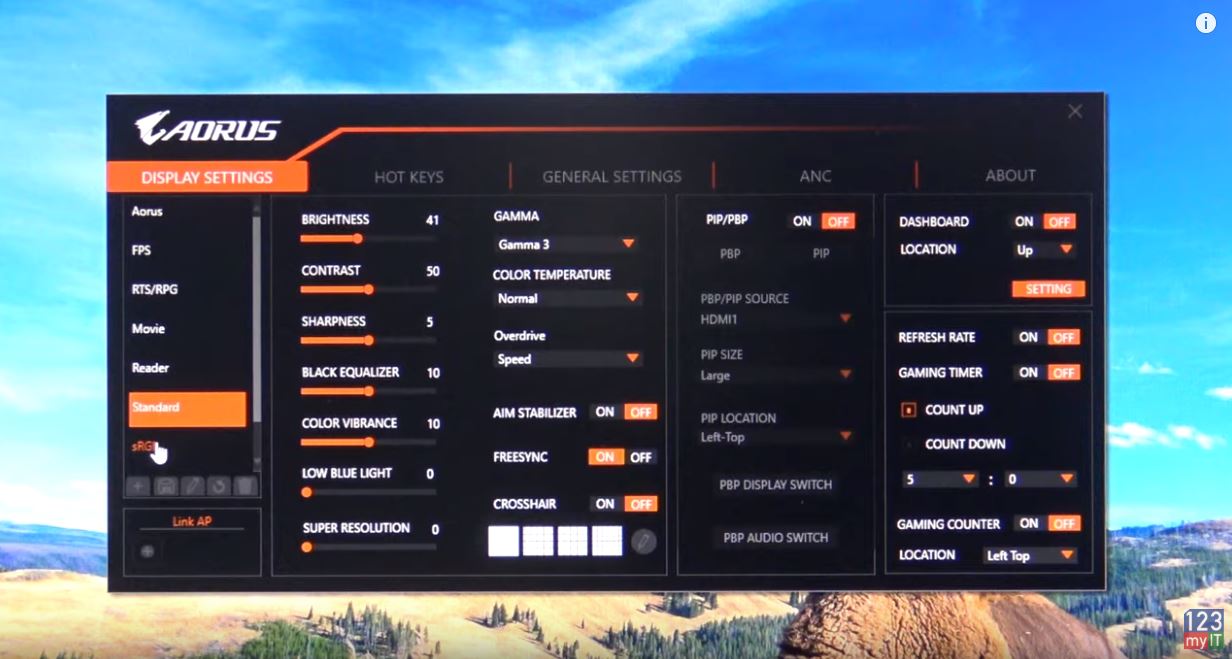
The first thing you will notice the Aorus KD25F monitor is really bright, to the point of where its hard to look at. So in the OSD there is a set of seven profiles. Each of these profiles give you different settings such as Brightness, Contrast, Sharpness, Black Equalizer, Colour Vibrance, Low Blue Light and super resolution. This means you can set a really bright profile for gaming and then another low light profile for browsing the internet or working. Then you can bind these profiles to a Hot Key so you can change them on the fly. Here you can see change a few settings within the Aorus profile.

Next up we have the Gamma setting which you can change as well as the colour temperature. However, the one I want to talk about most if the Overdrive setting. The Overdrive setting controls the response time of your monitor, which is very important for RTS and First Person shooter games. You have three settings Quality, Balanced and Speed. Quality is over drive turn off and it’s the slowest setting. It has an average Gray to Gray of 5.5 ms and no overshoot. The Balanced setting has a faster response time of 3.1 ms Gray to Gray and still no overshoot so this is a great setting to use for that balance between speed and quality. Speed mode is the fastest with an average of 1.5 ms gray to gray. However you will start to see some overshoot errors and ghosting with this mode.

Ok so the next setting is Aim Stabilizer, this reduced the motion blur in fast moving games. However you cant use this feature with the FreeSync function enabled. And to be honest I couldn’t see any difference with this on.

FreeSync and G Sync

Turning on the FreeSync option will turn FreeSync or G Sync on depending on if you have AMD or NVidia graphics card. When this option is turned on it eliminates screen lag and tearing whilc playing games.

The Cross Hair option is borderline cheating. Turning this on will allow you to paint anything in the middle of the screen. So if I click on the edit button and paint a crosshair or anything else this gives an advantage over other players for sure. I was surprised how easy it was to make good Crosshairs.

PIP and PBP. This setting allows you to create a picture inside your picture or make two pictures beside each other. Lets take a look. As you can see here I now have my laptop and monitor computer screen side by side. Now the settings is picture in picture and I can change the size and the location of the picture. You can also swap your pictures around and bring the small picture to the front and large picture to the back.

Cheating Possible with the Aorus KD25F Monitor

I racked my brain thinking how this technology could be used and then it hit me. If you are a stream sniper you could use this to follow someone’s stream at play your own game. Then I realised you could watch a team mates stream and you might be able to see what enemy players are. It would be delayed slightly but still helpful!!! Again great from cheating. J

Dashboard is pretty cool. Lets say you want to keep an eye on the temperature of your CPU or GPU you can do it through the dashboard. It makes a little display which you can make it see through so it doesn’t get in the way. It’s a nice feature. Just turn off what you don’t need. For me the CPU and GPU temps were pretty helpful.

Cancel Noise

You can turn the LED indicator on and off on the monitor. Not a big deal, but I also wanted to show you that there is a mic pin hole just above it which works with the noise cancelling feature.

There is also a noise cancelling feature which people on the internet said it would be good for when you take your computer to a lan party. But I was thinking it would probably be best for those of us who intend on getting on discord with loud clacky keys. Hopefully this feature would filter out allot of that background noise.

Here is some footage of the Crosshairs in action! I will be selling the 123 crosshair on my website. Just kidding J And here is the default crosshair. Its pretty good.

Also guys don’t forget to check out my other video such as The Witcher Media PC Build. And do me a favour hit the subscribe button and smash the bell icon.
Setup XBOX controller on Apple TV, iPad or iPhone + Games

Setup DUALSHOCK 4 controller on Apple TV, iPad or iPhone