Delete Gmail contacts from Android

This video will show you how to Delete Gmail contacts from Android phone.

Hi All,
Recently I was able to get my hands on Samsung’s latest model of Galaxy phone the Samsung Galaxy S6 Edge and after wanting to take some pictures with it to post up on 123myIT Instagram I went to the Google Play store to download the Instagram App. Sounds pretty straight forward right ?
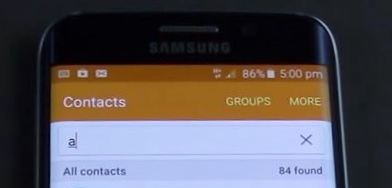
Well some where along the line I entered the 123myIT Google play login details and Gmail decided that I also needed that Gmail account setup on my phone. Maybe I clicked accept to something I shouldn’t have? However I found this very intrusive because not only did it install an unwanted Gmail account, it also installed also installed all my 123myIT Gmail contacts into my phone contacts. Very Annoying, because I have over 80 contacts who, I don’t need to contact via my mobile phone.

84 Gmail Contacts

The big question is, how do I delete Gmail contacts from Android? Well the easy option is to go into Settings > Accounts section on the phone and delete the Gmail account. This will remove both the Gmail email and contacts from your phone. But what if you want to keep the Gmail account but not be burdened with all the Gmail contacts?

Well you can turn off the contacts Sync, by going into the Settings > Accounts go into the Google account tap on your Google account and you will have the follow toggle switches below.
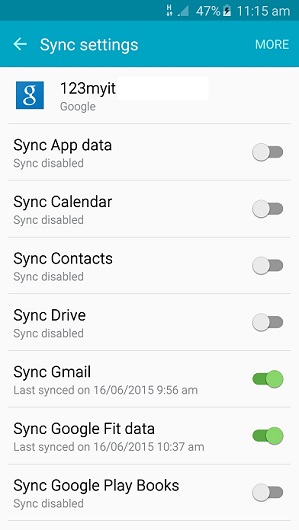
Gmail Settings Android
Once you turn off the contacts sync, you can then go back into your contact and delete the contacts one by one.

If you have 1000 contacts, then this is usually not an option for you. If this is the case you will need to remove the Gmail account altogether and start from the beginning. In the video above I will show you how to add the Gmail account without Syncing the Gmail contacts by making use of the fight mode setting.

I hope this delete Gmail contacts guide was helpful for some. I found this quite frustrating as I am sure there are others out there with the same issue.

Thanks for watching
Cheers
Matt

Samsung Galaxy Tab 3 8.0 Firstlook, Unboxing & Review

This video will show you the Samsung Galaxy Tab 3 8.0 Firstlook, Unboxing & Review.

Hi All, so its been a while since my last update and I have been working on trying to get the video quality better. So here is the latest video. Please feel free to leave some feedback if you thinks its an improvement 🙂

If you want to take a closer look at the Samsung Galaxy Tab 3 8.0 inch specs you can see the official link here.

Upgrade Android from 2.3.6 to 4.0.3 (Gingerbread to Ice Cream Sandwich) Samsung Galaxy S

This video will show you how to Upgrade Android from 2.3.6 to 4.0.3 (Gingerbread to Ice Cream Sandwich) Samsung Galaxy S.

Microsoft Store

Android Icecream Sandwich

This video will show you how to Root your Firmware
https://www.123myit.com/2013/05/how-to-root-a-samsung-galaxy-s-phone/
This firmware will show you to Upgrade Firmware on your Samsung device.
https://www.123myit.com/2013/05/how-to-upgrade-the-firmware-2-3-6-on-a-samsung-galaxy-s/

Step 1. Make sure your Samsung device is rooted. Link above.
Step 2. Download the Samsung Galaxy S Upgrade Ice Cream Sandwich Firmware from the downloads page here.
Step 3. Plug in your device and make sure that the device driver is working ok. You can do this in Device Manager.
Step 4. Open the Samsung device and view the files and go into the Android folder and copy the file you just downloaded into the Android folder.
Step 5. Power off your Samsung device and put the phone in recovery mode by holding down the UP volume button + Power button + Home button.
Step 6. In the menu select Wipe Data / factory reset, this will Wipe any data on your Samsung device so make sure you do a back up first.
Step 7. Wipe cache partition and go into the advance and Wipe Dalvik cache.
Step 8. Go back to the main menu then to go install zip from SD card. And choose zip from SD card.
Choose the Zip folder from the Android folder that copied to earlier and you are done.

The Android upgrade can take anywhere from 5 to 15 mins to complete. The Samsung Galaxy S model that I recorded the video on was a fair bit slower after the upgrade, but for some people they probably wont notice the difference and the upgrade Android has the benefit of the newer OS.

If you would like to see the Samsung Galaxy S specs you can find them here on the Samsung site.

Good luck.

Number Of Malicious Apps Attacking Smartphone Users Has Skyrocketed

Malicious Android Apps

A new report has revealed that the number of apps containing malware reached 718,000 just last month. This is an increase of 350,000 up from the end of last year.
Some of the most common malicious apps are attempting to sign users up to pricey premium services which charge outrageous amounts for simply sending and receiving text messages for example.
According to Jonathan Oliver, Trend Micro’s software architecture director for Australia and New Zealand, there’s been a recent increase in the number of ‘genuine malware’ out there.
This type of malware knows how to take advantage of the vulnerabilities of the Android and how to access and steal sensitive information.
FAKEBANK is one example. It imitates genuine banking apps and steals usernames and passwords.
Cybercriminals make these apps by taking genuine apps and then installing the malicious software in them. Then they offer them for sale on the app store either for free or at a large discount.
According to Oliver, Android phones are more susceptible to attacks over iPhones because the Android app store is more open.
Oliver continued on to say that Australia is still a major target for cybercriminals as more and more people are using their phones for mobile banking purposes.

How to Change Your Default Browser on an Android Device

This video will show you how to change the default browser on your Android Device.
If you don’t like the stock standard default Android browser, you can change if for Free in the Google Apps Store.
Once you download the free browser, make sure you set it to the default browser so that you can use it every time you use the internet.

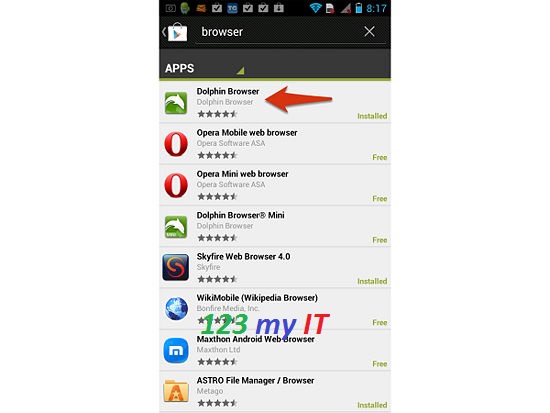
Step 1. Open up the Google Play Store and do a search for Browsers.

Android Browser Search on Google Play

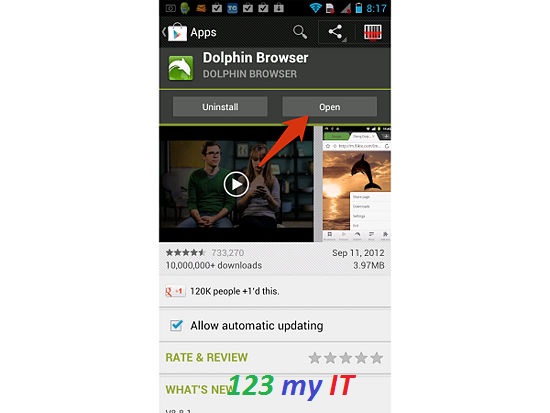
Step 2. Select the browser you want to install and press Install.

Install Android Browser

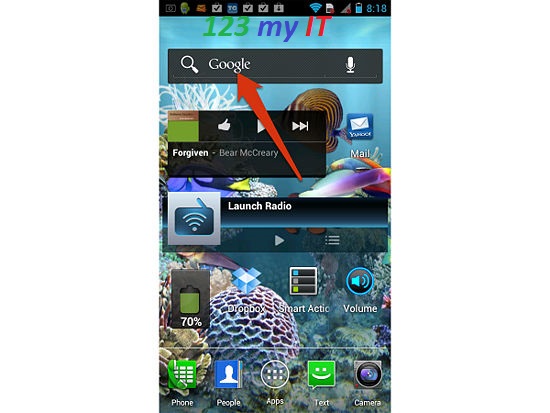
Step 3. Go back to your Home screen and tap into the Google search bar.

Android Browser Google Search

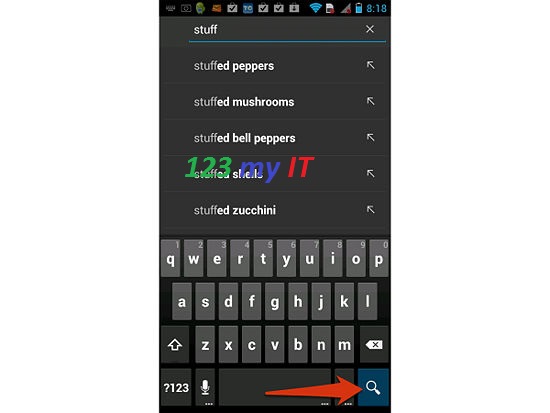
Step 4. Search for anything in the search bar and then press the Search Button in the bottom right hand corner of the screen.

Android Google Search Bar Results

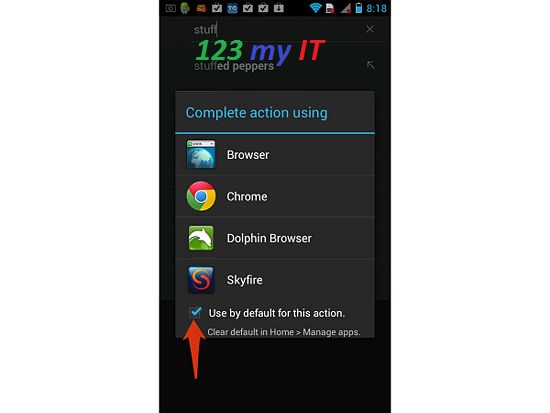
Step 5. Put a tick in the checkbox that says “Use by default for this action.” And then press the Browser that you want to be the Default Browser.

Android Browser Set Default Button

And that’s all you need to do. Changing the default web browser will give you greater functionality like being able to create new tabs more easily.

Related 123 my IT Videos
How to Save Battery Power on an Android Device
How to change the Screen Timeout on Android
How to unbrick Samsung Galaxy Nexus, GT-I9250, GT-I9100G, GT-I9300 and S3 GT-I9300
How to get a Samsung Galaxy S phone out of black screen of death