How to create a bootable Windows 7 8 USB on a Mac

This video will show you how to create a bootable Windows 7 8 USB on a Mac.
You can use the bootcamp assistant to create a bootable Windows 7 8 USB on a Mac. However the option may not be highlighted in your bootcamp assistant.
To make the option appear you can try the following steps.

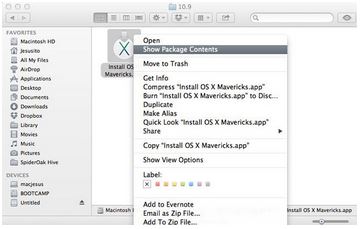
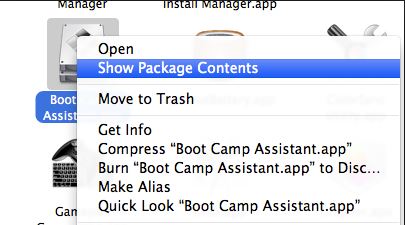
Step 1. Click on Go then Utilities. Find the Bootcamp assistant, right click on it and go to Show package contents and then go into the contents folder.

Bootcamp Assistant Show Package Contents

Step 2.Copy the info.plist file to the desktop and make a backup copy of it and open it.

Step 3. Find the line which says PreUSBbootsupportmodels and remove the Pre from the line. Try running the bootcamp assistant again and this time you should have the Create a Windows 7 or later install disc option.

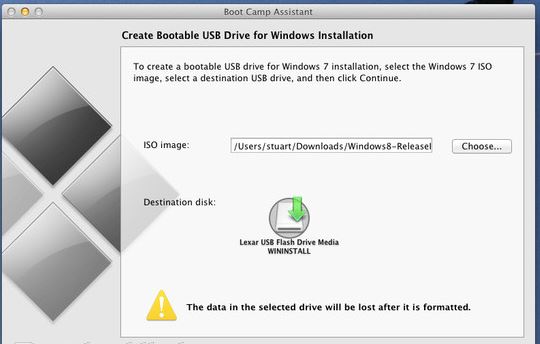
Step 4 Copy the info.plist back to the contents directory. And start the bootcamp assistant again and see if the Create Bootable USB Drive for Windows installation comes up. If not try this next step.

Bootcamp assistant create bootable usb drive

Step 5 Change the USBbootsupportedmodels in the info.plist file.
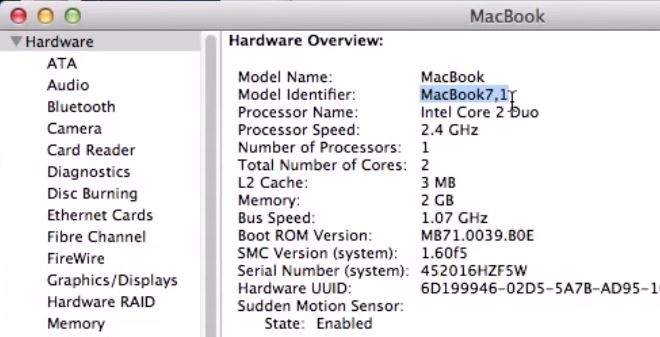
You can find the model on the Mac that you are using by going into the Apple menu then click on About This Mac and then click on More info. Next click on System report and under Hardware Overview look up Model Identifier.
In the example in the video my MacBook model was MacBook7,1.
In the info.plist file I had to change the USB supported models to my MacBook model so that I could create a Windows USB on a Mac.

Hardware Overview Mac

Hope this works guys. Feel free to leave some feedback.

Cheers
Matt

For more into you can check out Apples discussions page here.

How to create a bootable OS X Mavericks usb drive

This guide will show you how to create a USB installer of Apples OS X 10.9 Mavericks.

Have you ever wanted to do a clean install of OS X from but your new MacBook Air doesn’t come with a DVD drive?
Well this guide will step you through how to create a bootable OS X Mavericks 10.9 USB drive.

To complete the process you will need the following items:
* 8GB USB drive or SD Card
* OS X Mavericks.app (this can be downloaded from the App Store)
* An Apple computer with the Mac App Store
* A user account with administrator rights

OS X Mavericks USB drive

Step 1. Download Mavericks from the App store.
Apple direct link here.
Step 2. Insert your USB into the Mac and run the Disk Utility.
Step 3. Select the USB drive that appears in the left-hand menu and select the Partition tab across the top.
Step 4. Select the drop down menu and click on 1 partition.
Step 5. In the format type menu make sure you have Mac OS Extended (Journaled) selected.
Disc Utility

Step 6. Select the Options button and make sure the GUID Partition Table radio button is selected.
Disc Utility - GUID Partition Table

Step 7. Open up the Terminal.app you can find it under the Applications Utilities folder or search for it in Finder.
In the terminal window type the following command.

defaults write com.apple.Finder AppleShowAllFiles TRUE;\killall Finder;\say Files Revealed

Terminal Window

Step 8. When the USB completes the formatting, go into the Launchpad and copy the Install Mac OS X Mavericks.app to your desktop then Right-click and click on Show Package Contents.

Mavericks App
Step 9. Go into the Contents > Shared Support folder and double click the InstallESD.dmg file.

Install ESD

Step 10. Click on the mounted.dmg file and find the hidden BaseSystem.dmg file.

null

Step 11. Go into Disk Utility and open the newly formatted USB and click on the Restore tab.
Step 12.Drag and drop the BaseSystem.dmg into the Source field. And drag and drop the partition that you recently created on the USB drive, into the Destination field.

OS X Restore

Step 13. Click the restore button and click Erase. You might get prompted for the Administrator password.

Untitled Message

Step 14. It may take some time to copy all the data to the USB drive.

Copy Time OS X Mavericks

Step 15. When the files have finished copying, the USB drive should mount automatically. Go into the System > Installation folder and delete the Packages directory.

OS X Packages Directory

Step 16. Go back into the mounted Install ESD.dmg file and find the directory called Packages. Copy this to the Installation folder.

Installation Folder

And now you are done. You have just created a bootable copy of OS X Mavericks on a USB drive.

Good Luck.

How to Fix iTunes Error 3194 on a Mac – This device isn’t eligible for the requested build

This video will show you how to Fix iTunes Error 3194 on a Mac – This device isn’t eligible for the requested build.

Hi All
Earlier I created a video on how to Fix iTunes Error 3194 while using Windows. This video will show you how to fix the same error on a Mac.
You will need to open up Terminal in Finder and type the following command.
sudo nano /private/etc/hosts

Press Return and Enter your password.
Once you have typed your admin password you will see all the entry’s in the hosts file.

Mac Terminal Hosts file

Now Apple says, look for an entry containing “gs.apple.com”.
The next step I delete any entry back to the local file which essentially sets the hosts file back to defaults.
However Apple says, Add the # symbol and a space (“# “) to the beginning of the gs.apple.com entry.

You can save the file by pressing Control-O. Hit Enter when prompted for the filename and Control-X which will allow you to exit the editor.
Restart your Mac and you should be good to go.

Good luck guys.

How to install Whited00r 6 on an iPhone 3G using a Mac

This video will show you how to install Whited00r 6 on an iPhone 3G using a Mac.

Hi All
Better late than never I always say. Its about time I put up a video on how to install the iPhone 3G Whited00r 6 firmware while using a Mac. I have already made a video on how to install Whited00r 6 using Windows this video is how to do the same process with a Mac.
Hope it helps out.
Cheers
Matt

How to Reset the SMC System Management Controller on a Macbook Pro Macbook and Macbook Air

This video will show you how to Reset the SMC System Management Controller on a Macbook Pro Macbook and Macbook Air.

Apple have said

Note: It is possible that the SMC could encounter an issue that may cause unusual system behavior typically related to the symptoms described below. In some cases, resetting the SMC may be the only correct method to resolve the issue, however, an SMC reset should only be attempted after all other standard troubleshooting has been performed.

You should try the following steps before you reset the SMC on your Mac and test the issue after each troubleshooting step and see if the issue still occurs.

Step 1. Press the Command, Option and Escape to quit any application that might not be working properly.
Step 2. Put the Mac in sleep mode by selecting the Apple menu button in the upper-left menu bar and choose Sleep. Wake the Mac after it goes to sleep.
Step 3. Restart the Mac by going into the Apple menu and choose Shut Down.
Step 4. Shut down the computer by going into the Apple Menu and choose Shut Down.

Sometimes your Mac might appear to be running normally but it doesn’t seem to be responding, you can force the Mac to shut down by pressing and holding the power button for 10 seconds.
NOTE: Any unsaved work will be lost.

How to Install Windows Blue 8.1 on a Mac with Bootcamp Step by Step

If my video helps you please like it.

This video will show you how to Install Windows Blue 8.1 on a Mac with Bootcamp Step by Step.

To download Windows 8.1 Blue you can download them from the Downloads section here.