How to Resize an Image Picture on a Mac

Hi All
So I thought I would post up and easy guide on how to resize a picture on a Mac.
I want to try and spread out the Tutorials evenly so I will try and do one per day on each topic.
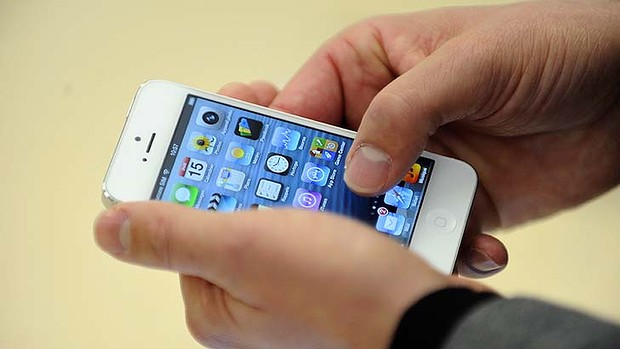
When sending emails with images via email, most free email servers like Yahoo or Google have a limit on how many images you can send at once. Usually it’s around 10 meg in size. To get around this you can resize your image to make them smaller so that you will be able to attach more images to the email.
Making the pictures smaller will also allow you to upload and download them faster and when adding images to a website will allow them to load faster in the viewers web browser.
Resizing a picture on a Mac is quick and painless when you know how to do it and it the software is already built into your Mac OS X. So you have no reason not to be able to this yourself.

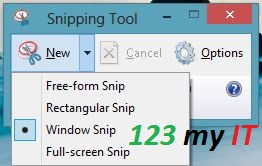
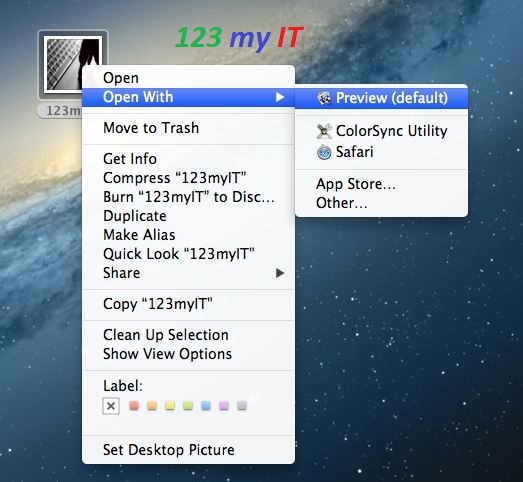
Step 1. Once you have the image you want to resize. Right click and select Open With. Then click Preview Default.
The image then should open up and you can then go to the next step.

Preview Image Mac

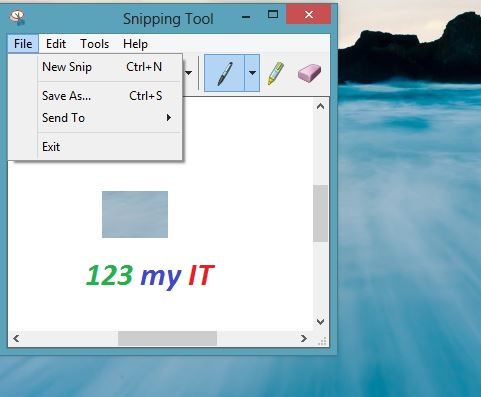
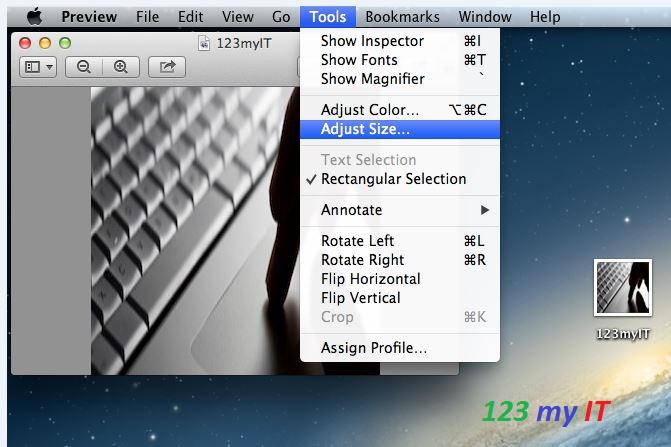
Step 2. Once you have the image previewed, the next step is to click on Tools in the Apple menu bar then click Adjust Size.

Preview Adjust Image

Step 3. You will then have a screen that you can change the details of the image. For example if you wanted to change the width and height of a picture your can select the number in the Width field and the results of the change you make will display below under Resulting Size.

Width Change Image

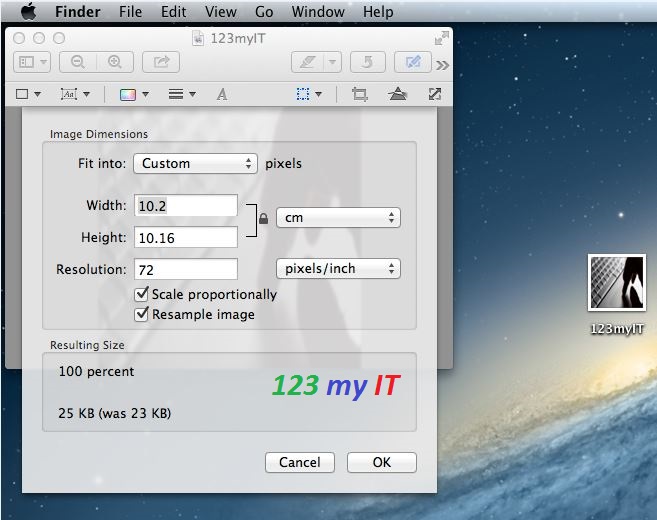
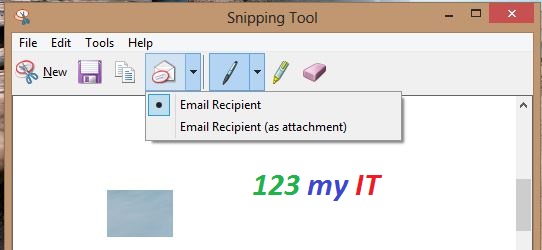
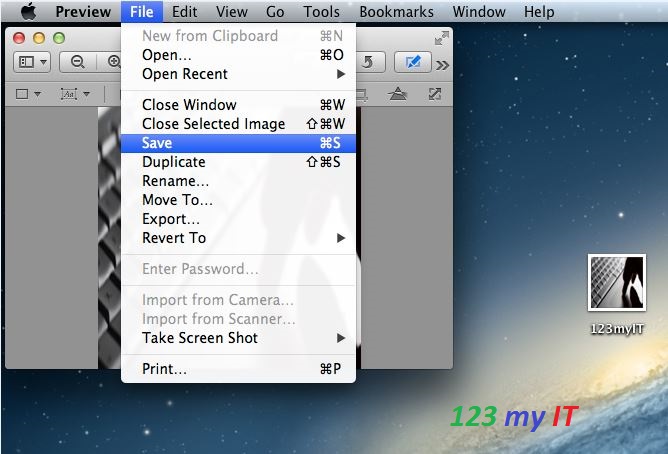
Step 4. Click ok to apply your changes to the image and then to save the changes go to File and then Save. Once you have made this change you’re done!

Save Image Resize

Step 5. Go to Preview and Quit Preview and you have now closed the Preview software.

Things to Note If you want to resize an image for webpages 100-200 KBs is usually the best size to use.
Warning if you select Save instead of save as it will save over the top of your current image.
Setup Yahoo mail on a Mac using Mac Mail
Clone OS X Lion and Mountain Lion to a USB drive

How to take a Screen Shot in Microsoft Windows using the Snipping Tool

This video will show you how to take a Screen Shot in Microsoft Windows using the Snipping Tool and Print Screen function.

Step 1. To open the snipping tool go to Start > All Programs > Accessories or Press the Windows Key on your keyboard and then type snip.

Snipping Tool

Step 2.Choose the kind of snip that you want to use. Click on the down arrow right beside the New button and you will have the following options.

Snipping tool menu

* Free-form snip. This allows you to cut out any shape you wish.

Free Form Snip

* Rectangular snip. As the name suggests it snips a rectangular box anywhere on the screen.

Rectangular Snip

* Window Snip. Allows you to take a screen shot of any Windows on your screen. Could be the task bar Internet Explorer screen.

Window Snip

* Full-screen snip. This screen shot allows you to capture everything on the screen.

Step 3. The image you have just captured will be automatically copied into the mark-up window. From this window you can Save, create, copy, email or edit the snip.

Save Snip

* Annotations within the Snipping tool allow you to draw and write with a pen and you can customise the colour width and it can all be removed by an eraser.

Snipping Tool Toolbar

* Share and Email The snipping tool also allows you to cut a screen shot and email it directly from the tool.

Snipping Tool Email

In windows you can also press > CTRL > ALT > DELETE on your keyboard and it will save a Screen shot to your clip board. Simply open MS paint or MS word and go right click paste and it will paste the screen capture for you.

I hope that helps out.
Good Luck 🙂

New iPhone 5S To Have Fingerprint Scanner

Apple’s upcoming iPhone offering is said to have a major security enhancement, utilising the latest fingerprint scanner technology.

The latest operating system, iOS7 beta 4 was released last week and there’s definitely more than a hint of the new fingerprint technology being an important feature in Apple’s upcoming iPhone 5S.

iPhone 5S Fingerprint Scanner

Recently Apple acquired AuthenTec which is a company that specialises in fingerprint-scanning technology. They bought the company for $A392 million last July, which started the rumors last year about the new security advancement being used in their latest smartphone offering.

To fuel speculation ever more, only a few weeks ago Apple also decided to file a patent for a fingerprint sensor embedded within the touchscreen display.

It’s likely that the new technology, embedded in the home button or inside the touch screen will allow for greater security when locking and unlocking the smartphone.

It’s not only security that could benefit from fingerprint sensoring either. There’s also the possibility that you could do different functions on your phone simply by using different fingers.

How to find a lost iPhone iPad or iPod 2013

This video will show you how to find a lost iPhone iPad or iPod 2013.

Losing your iPhone can be a real pain. First of all these lovely Apple devices are not cheap to replace. Second, you run the risk of losing your data and having someone else get access to your photos, music, contacts and not to mention your iTunes account.

Don’t worry all is not lost, you can actually minimise your losses especially if you are one of those types of people that loses 5 iPhones a year. Read on an we will show you how you can find that lost iPhone.

Setup the “Find My iPhone” App

Step 1. Download “Find My iPhone” app on your iOS device and setup your iCloud account. You can get the Find My iPhone app from the iTunes store.
See the video on how to setup an iCloud accounts here.

Find my iPhone

Step 2. On your iPhone turn on the Find my iPhone App within the iCloud menu. Settings, iCloud scroll to the bottom and tap the Find my iPhone button.

Find my iPhone iCloud Setting

Step 3. Now you can open the app on your iPhone or on a Mac or Windows PC you can open a web browser and browse to www.icloud.com

iCloud Login

Step 4. Once logged into the App or iCloud you will be sent to the location of the iPhone. If you tap devices you will get a list of iOS devices that you have added to your iCloud account. See the screen shot below the 123myIT iPhone has been added to the device list.

Fine My iPhone Menu

Step 5. Tapping the iOS device will show you the location of the iPhone on Google maps.

Find my iPhone Location

Step 6. Press the blue arrow on the iOS device and it will give you three options.
* Play Sound
* Lost Mode
* Erase iPhone

Find My iPhone Options

Play Sound
Now this is this important part, if you have lost your iPhone around the house or it has fallen down the back of the couch and you cant find it. Pressing the Play Sound button with make the iPhone ring so you will be able to track it quite easily. What’s the difference between doing that and ringing the iPhone I hear you ask? Good question the iPhone will actually ring even if you have it on silent and the sound turned down! neat huh ?

Lost Mode
Pressing the lost mode button allows you to enter a phone number that if the iPhone is found the person who finds the iPhone can make a call back to the number you specify and hopefully you will get your phone back. It also lock the device so that if a person has found the device they will not be able to access your data but they will be able to call the number you enter.

Lost iPhone

If you press next you will be able to put in a message to the person that has found your iPhone. The default message on the iPhone is. “This iPhone has been lost. Please call me.”
You can change this message to what ever you want and there are some great messages on Google especially when the iPhone has been stolen.:)

LostMode Message

Pressing Done will send the message and the number you suggested to the missing iPhone and with any luck you will get a phone call and have your iPhone handed back to you.

Missing iPhone Message

Erase iPhone
The last option is Erase iPhone. ONLY do this if your iPhone has been stolen or lost and you want to delete your data on the device. Only use this option as a last resort.

If you do end up getting your iPhone back you can simply restore your data through iTunes backup. See my video here.

More to come 🙂

Unboxing the 3rd Generation Apple TV

This video will show you the Unboxing the 3rd Generation Apple TV.

Apple TV allows you to stream movies and TV shows that are available online in the iTunes Store to your HDTV. All the movies in iTunes are on a rental or purchase basis, and all your purchases are then stored in the iCloud. Apple TV also streams a few other online media services such as Netflix, Hulu Plus, MLB.TV.

Apple TV Top Movies

You can stream Music, videos and photos from iOS devices using AirPlay.

Apple TV Streams Video and Pictures from your iDevice

The Apple TV box has not changed since the second generation, the hardware inside has been upgraded from A4 chipset to the A5 Chipset. This upgrade allows streaming video at a higher resolution 1080p as apposed to 720p.

Apple TV Box

The Apple TV’s design is seen as the best around. Its a simple small black box and has a small white light at the front when the device is turned on. On the back of the box it has the following ports.

* Power cord
* HDMI
* Optical Audio
* Network
* Wifi 802.11n – There is not port for it have ever it is built in.

The unit doesn’t come with an HDMI cable so make sure you buy one other wise you will be in for a rude shock when you go to plug this unit in.

The Apple TV also comes with a small brushed aluminium remote that has only 4 buttons. A navigation circle at the top, which you can press to move up and down and left to right, a Menu button which works as a Back button, and a Play Pause button.

Apple TV Remote

If you download the Apple remote control app you can control the Apple TV with your iPhone or iPad.
Over all the Apple TV seems to be a solid streaming device and if you have other iDevices like iPhone and iPod its probably worth looking into it. However the lack of a USB port for me is disappointing as it means you cannot plug an external USB hard drive directly into the device.

How to Change Your Default Browser on an Android Device

This video will show you how to change the default browser on your Android Device.
If you don’t like the stock standard default Android browser, you can change if for Free in the Google Apps Store.
Once you download the free browser, make sure you set it to the default browser so that you can use it every time you use the internet.

Step 1. Open up the Google Play Store and do a search for Browsers.

Android Browser Search on Google Play

Step 2. Select the browser you want to install and press Install.

Install Android Browser

Step 3. Go back to your Home screen and tap into the Google search bar.

Android Browser Google Search

Step 4. Search for anything in the search bar and then press the Search Button in the bottom right hand corner of the screen.

Android Google Search Bar Results

Step 5. Put a tick in the checkbox that says “Use by default for this action.” And then press the Browser that you want to be the Default Browser.

Android Browser Set Default Button

And that’s all you need to do. Changing the default web browser will give you greater functionality like being able to create new tabs more easily.

Related 123 my IT Videos
How to Save Battery Power on an Android Device
How to change the Screen Timeout on Android
How to unbrick Samsung Galaxy Nexus, GT-I9250, GT-I9100G, GT-I9300 and S3 GT-I9300
How to get a Samsung Galaxy S phone out of black screen of death

How to Save Battery Power on an Android Device

If you have been using your Android device for a while you might have noticed that it started out with really good battery life but over time, the battery life doesn’t seem to be as good as it was. It could be that the battery is slowly dying and all of them do that, however it could be that you have loads of apps running in the back ground and all of your services on.

This guide will give you some helpful tips on how to save your battery life. A few small tips will have your Android device lasting for day!! Well maybe not that long. 😉

Step 1. Have your phone tell you what is using up the most power.
Go into Settings, About Phone, Battery Use. On my phone the app Whatsapp was using 66% of the battery. So turning off Whatsapp would help me get more battery life out of the phone.

Android Battery Use

Step 2. Tell your Android device to use 2G only or use GSM over WCDMA.
Only do this if you don’t need access to 3G or 4G high speed data.
Go into Settings, Wireless and Network, Mobile networks and select your network mode.

Android Network Mode

Step 3. Reduce your display brightness.
Settings, Display, Brightness.
Slide brightness slider all the way to the left and it will help you save power when you are reading the phone. Most of the time people can still read the phone without needing the brightness up high.

Android Screen Brightness

Step 4. Always try to use a black background or wallpaper. Settings, Display, Wallpaper.
Here is a sample below but you can find loads of black backgrounds on Google images.

Android Black Background Wallpaper

You can also set bGoog.com as your default home page. bGoog.com is a black background search engine webpage by Google and its built especially for mobile devices it allows you to search the web without using so much power on your phone. Awesome idea.

Google Black

Step 5. Adjust your screen timeout to the shortest time Possible. Settings, Display and then Screen Timeout.

Android Screen Timeout

Step 6. Turn off your WIFI when you are not using it. Settings, Wireless and network, WIFI settings.

Android WIFI Settings

Step 7. Turn off your Bluetooth when you are not using it. Settings,Wireless and network, Bluetooth settings.

Android Bluetooth Settings

Step 8. Turn off your GPS. If your GPS is turns on it is constantly looking for satellites which takes up battery power. Settings, Location and Security, Use GPS Satellites.

Android GPS Settings

Step 9. Use Power apps and widgets. There are loads of free and paid apps that control all sorts of stuff.
The two that you should take a look at are:
* Power control Widget
* Power management
* Null BLack Wallpaper

Android Power Apps

Step 10. Turn off phone vibration. Settings, Sound, Vibrate. And set vibrate to never. You have the following options Always, Never, Only in Silent mode and Only when not in Silent mode.

Android Vibrate

Step 11. Turn off all your applications when you don’t need them. Settings, Applications, Manage Applications. Press Running and then press and Stop any applications that you don’t need.

Android Applications

Step 12. Put your phone in standby mode when you are no longer using it.
Press the Power button on your device when you are finished using it as it will use less power if you get into this habit.

Android Power Button

Step 13. Take your USB charger with your where ever you go as there are Free USB ports everywhere! Allot of Airlines these days have free USB ports so that you can charge your Android device while flying.
Free USB Ports

Step 14. A spare battery can be a lifesaver if you just so happen to run out of Power. Spare ones can be picked up from websites like ebay.

Hope that helps guys.
Good Luck 🙂

Related 123 my IT Videos.
How to change the Screen Timeout on Android
WIFI speed test comparison between iPhone3G, iPhone4S and Samsung Galaxy S
3G Speed Comparison iPhone3G, iPhone4S and Samsung Galaxy S
How to unbrick Samsung Galaxy Nexus, GT-I9250, GT-I9100G, GT-I9300 and S3 GT-I9300
How to get a Samsung Galaxy S phone out of black screen of death