Hi Guys and welcome to 123myit. In this video, we will show you how to Transfer data from Android to Android in 2021. Ok Guys If you are transferring data from any Android device to Samsung then you will be able to transfer Calls, Contacts, Messages, Calendar, Apps, Photos, Videos, Music and Documents. If you are transferring from Samsung to other devices, you will be able to transfer Contacts, Calendar, Photos and Videos.
Getting Started – Android to Android 2021
Let’s get started.
First, up we are going to transfer data from Samsung S20+ to a Samsung S21 phone and we are going to use an app called Smart Switch. Smart switch will work with most Android phones. However, if it does not fast forward to the 2:36 mins mark and I will show a different app to use if Smart switch does not work for you.
Most Samsung phones will have the smart switch app already installed under Settings > Accounts and backup. But if you can’t find it on your device you can download it from the Google play store.
Update if you get prompted – Android to Android 2021
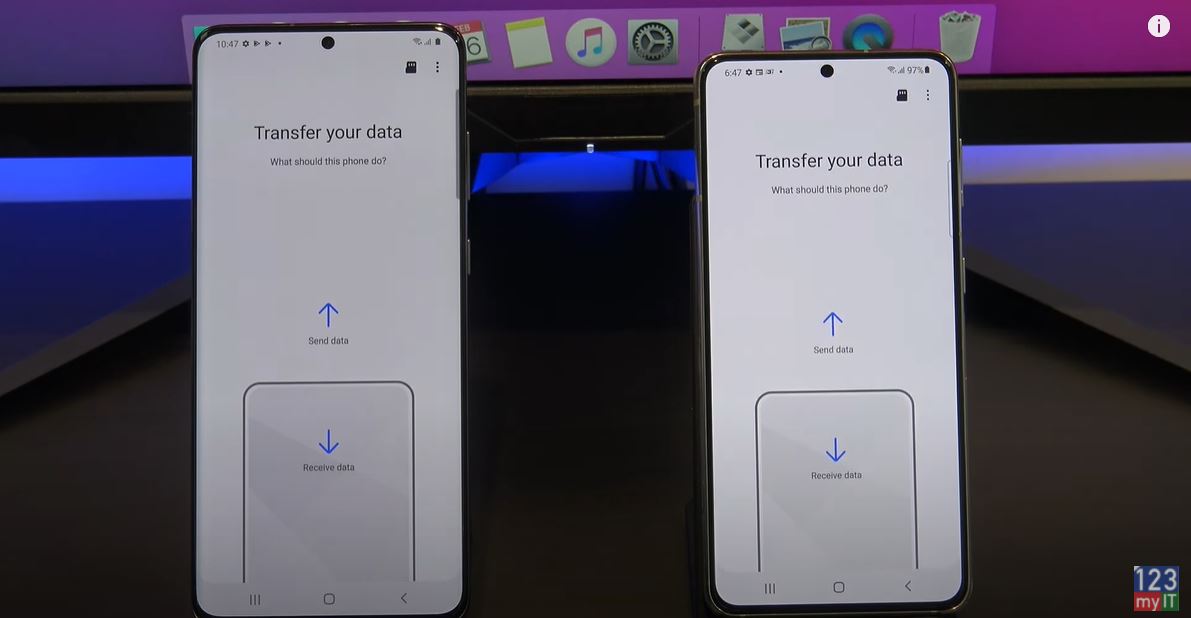
I already have it installed so I am going to tap update then open and do the same on your other Android device. Tap continue and then allow. Tap on send data from the phone you want to Transfer the data from. Make sure both phones are on the same Wi-Fi and tap wireless. Both phones have found each other tap Allow if you are prompted.
Using the Smart Switch software in 2021
Your Android phones should then work out what data it can copy across. Go ahead and choose what you want to transfer across and deselect anything you do not want to copy across. If you scroll down you should also get an SD card option.
Select your data you want to Transfer over
I am going to deselect everything and transfer across my Calls, Contacts, and images. When you are done tap transfer.
Awesome all your stuff is copied across now. Let us transfer back the other way now. We are going to use an app called Copy my Data. You can download it from the Google play Store. I have already downloaded it so I will just open the app. Make sure you have it downloaded on both Android phones. Tap next on both devices. Tap to or from another device over WIFI. Select your device then select copy data to selected devices. Add in the pin number. Then tap next. Deselect any of your data you do not want to copy across. IF you get prompted tap allow on your other device. Congratulation you have just copied your data between two Android devices.
Tap finish on both phones and check if you data transferred across ok. If you have a sim card, you can also move it now.
Guys don’t forget to check out my other videos such Transfer data Android to iPhone in 2021. And do me a favour if you know anyone who might need this video please share it will them, hit the subscribe button and smash the bell icon.
Hi Guys and welcome to 123myit. In this video, we will show you two free ways to transfer your data from Android to iPhone 2021. There are two ways to transfer your data from Android to iPhone. The first way I will show you is recommended by Apple and way requires you to reset your iPhone. If you don’t want to reset your iPhone then fast forward to the 4:46 min mark and I will show you how to Transfer your data without resetting your iPhone.
What can your Transfer? Android to iPhone 2021
This video will help you transfer your contacts, message history, camera photos and videos. Web bookmarks, mail accounts, calendars and free apps.
Go into settings > General and scroll down to reset. Once you are there tap on Erase Content and settings. Next Tap Erase iPhone. This will delete all media and data so do a backup first if you need too.
Once your iPhone has reset itself. Just follow the prompts and start setting it up again.
Next up connect to your WIFI and make sure your Android device is connected to the same WIFI.
Continue setting up your iPhone until you get to the Apps and data screen. Once you’re on the Apps and data screen. Go to your Android phone and download the move to iOS app from the Google play store. Play.google.com
Go ahead and tap install and when that’s done tap open. On your iPhone tap Move data from Android. Then tap continue, agree and then allow on your Android phone.
Could not connect error?
If you are getting the could not connect error message make sure you turn on location services on your Android phone. You will find it under settings and location. Its important to turn that on. Here it is under Settings and location. Just toggle the button on and go back to the move to iOS app.
Tap continue on your Android device and then type in the code that you see on your iPhone. It now shows you the iPhone wifi. Tap continue. If it comes up again with the wifi to connect to just tap connect.
Select the data you want and Transfer.
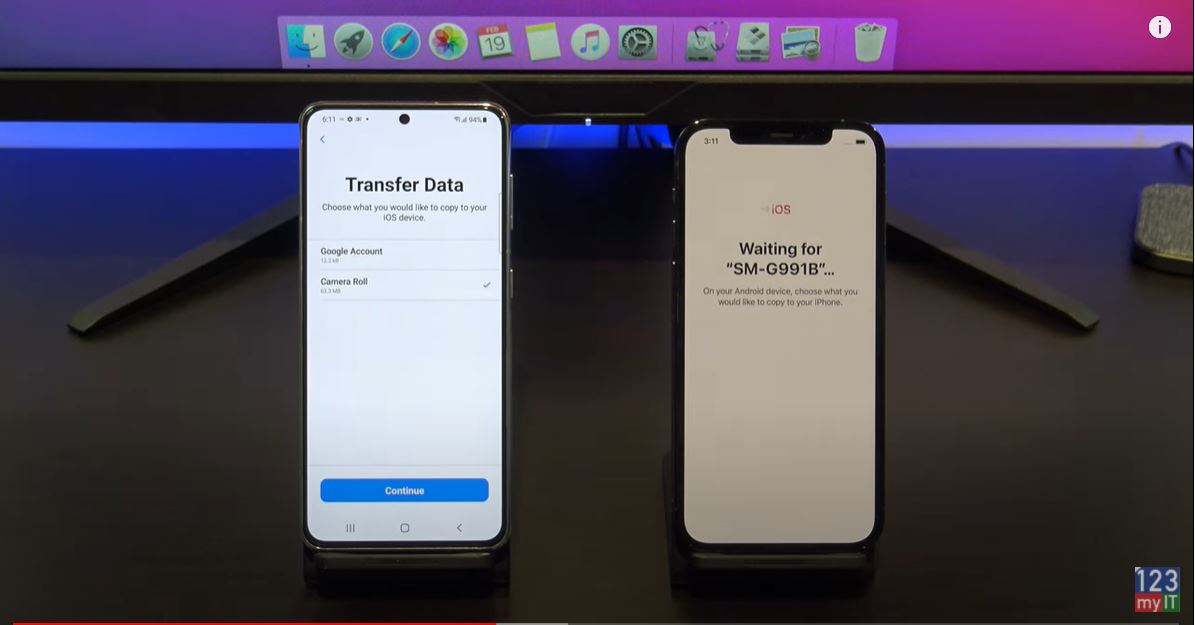
Ok great you are on the transfer data screen just deselect anything you don’t want to transfer and press Continue. Also here’s a Pro tip. If your transfer is taking to long stop the transfer and delete and photos and videos you don’t want from your Android phone. This will free up space and make the transfer faster.
Your Data is Transferred now!
Cool your data is transferred now. Tap done on your Android phone and you can close the app. On your iPhone tap, continue setting up iPhone. And then go ahead and set up your iPhone.
While you are doing that guys do me a favour and press the like button it shows everyone that this is a legit video. Thanks very much!
Awesome the last step here is to install your free apps. To do this you will need your Apple iD. Just tap add apps and then enter in your apple id. If you don’t have an apple id you can create one by going to the website applied.apple.com.
Download Free Apps
Your iPhone will start to download all your free apps for you. If you get the Apple iD Verification just tap settings and then enter in your Two Factor Authentication. This will pop up as a message on one of your other Apple devices if you have it or as an SMS on your phone.
If you swipe across you should see all your apps start to appear. If you didn’t get the prompt to Add Apps, then don’t worry, just go to the App store and download the Apps you need. You can also check if your if you photos messages and video copied across.
The second part of this video is if you don’t want to reset your iPhone. We will move the data with an App called, Copy my data. Open up the App store on you iPhone and download the copy my data app. Tap open and then tap OK to allow the app access to your data.
Download Google Play Store
Go to the google play store on Android phone and download Copy my data. I’ve already downloaded it so I will tap open. Go ahead and select what you want to copy. I don’t want contacts or calanders so I will deselect them. On your iPhone Tap next and on your Andriod phone tap next. Tap on to or From Another Device Over Wifi.
If you done everything right you should see the iPhone appear on your Android phone. Tap copy data to selected device. Enter the pin number from yoru android device onto your iPhone. On your Android phone deselect any data you don’t want to copy across. I don’t want contacts and calanders.
Awesome all your data is copied across now. If you have a SIM card you can move it across now too.
The last step is to tap finish and close your apps and then check if your photos and apps copied across. Cool there they are.
Also guys don’t forget to check out my other videos such Samsung Galaxy S21 and do me a favor If you know anyone that might need this video please share it with them hit the subscribe button and smash the bell icon.
Hi Guys and welcome to 123myit. In this video, we will show you everything you need to know about the Samsung Galaxy S21. The Galaxy S21 is $200 cheaper than last years model. Which is a pretty big drop! The S21 comes in three different models, the S21, S21+ and the S21 Ultra. Pricing for the S21 starts at $799 USD and it comes in four different colours, Gray, White, Violet and Pink.
First up in the box of the Samsung Galaxy S21 you have the phone itself. Next will find the documentation a quick start guide, Warranty information and Samsung Care info. The only other accessories are the USB C cable and the sim eject tool.
No more USB charger with the Samsung Galaxy S21
Samsung has followed Apple’s lead by removing a USB charger, Headphones and a see through case which was included in the box last year. In doing so they have minimised packaging. There has been some criticism from Youtubers about weather this I good move for the environment or not. In my opinion is that is still a step in the right direction, as those Youtubers focused mostly on the users would go out and buy these extras. But, didn’t focus on the fact that allot of users might not buy these extras. I usually charge my phone with a cable which is attached to my laptop. So no adapter in the box actually works for me.
The Galaxy S21 supports 15 watts wireless charging and is IP68 water and dust resistant up to 1.5 meters for 30 mins.
Display
The Galaxy S21 has a 6.2-inch Dynamic AMOLED 2X display. It has a 1080 by 2400 -pixel resolution at 421 ppi. If you compare it with last year’s model the S20+ on the right, you can see the S20+ has a bit more screen real estate on its 6.7-inch AMOLED display. If you are looking to update to the S21 this might help you get an idea of the screen size.
On the right side, you have then Volume up and down buttons and Sleep Wake power button. On the bottom, you have the USB C connector, microphone pin hole, sim card slot and 1 of the stereo speakers. Actually, the Stereo speakers are impressive. Take a listen.
On the left side of the iPhone, you have the Ring Silent and a SIM card slot.
Face Unlock
Face recognition and Face unlock are standard on the Galaxy S21 models. Along the front top of the S21 we have a 10 megapixel Camera which has a F2.2 aperture. While you can’t see them there is a whole bunch of sensors here. FingerPrint, Proximity, accelerometer, gyro and compass. The camera detects you face so you don’t have to enter a passcode to open the device.
Cameras
On the back of the S21 you have a Triple Camera setup which features a Ultra Wide, Wide and Telephoto cameras. The 12MP Ultra Wide camera has a 120-degree field of view with a F2.2 aperture. The 12 megapixel Wide camera has a f 1.8 aperture and the last camera features a 64 MP telephoto camera Which has a 3x Hybrid Zoom and F2.0 aperture. for stunning portrait shots.
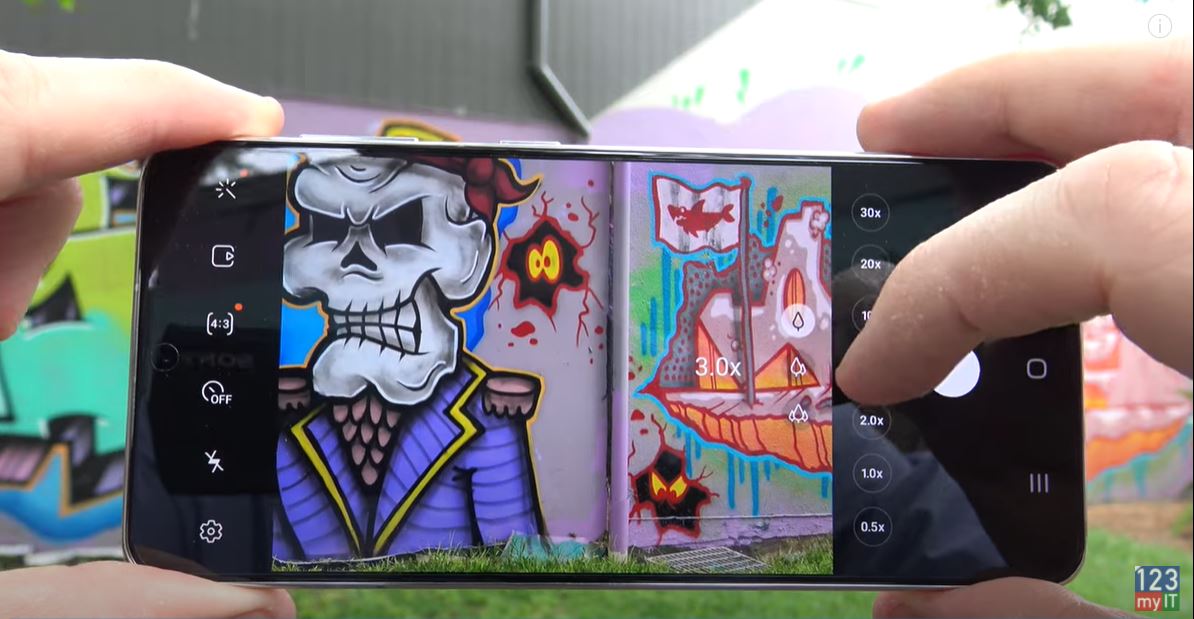
So out of the box the Samsung Galaxy S21 will take amazing photos. Here are some comparisons between the S21 and last years model the S20+. Can you spot the difference?
To use the Zoom go into the camera and you have the default Zooms marked with tree. The default is one times. You have a Three and a .5 times zoom as well. If you swipe up you will find the rest and here you can zoom all the way into 30 times and back out.
CPU Snapdragon or Exynos?
The Galaxy S21 can come with either the Exynos or Snapdragon CPU depending where you live. A fast processor is important when playing games and videos or when generally moving around the phone. Here’s the Geekbench scores for the Galaxy S21 and the Galaxy S20+.
The results of the Geekbench scores show that the S21 does out perform last years model the S21+. One other thing you might notice here is the S21 has adaptive 120Hz screen. This means there is less flicker because it uses AI to adjust the screen refresh rate. Its means that the screen is less likely to flicker as you see here.
After running the CPU benchmark if we take a look at where the S21 is heating up it seems to me mostly at the top of the device near the cameras.
So what’s my thoughts, it’s a pretty amazing phone its really grown on me. I like the smaller size is just right for your pocket and its $200 cheaper which is amazing.
Guys, don’t forget to check out my other videos such as 5 start-up modes for M1 Macs. Also do me a favour if you know anyone who might like this video please share it will them, hit the subscribe button and smash the bell icon.
Hi guys and welcome to 123myIT. In this video, we will show you all the Mac M1 Start-up Modes. These are helpful if you need to troubleshoot or work on your Mac for any reason.
This video will show you how to open Startup Options. Start the Mac with Diagnostics, Recovery and Safe Mode. Also show you how to set a default Startup Volume.
Lets get started. I am using a MacBook Pro M1 computer. First step is to shut down the Mac.
Start-up Modes
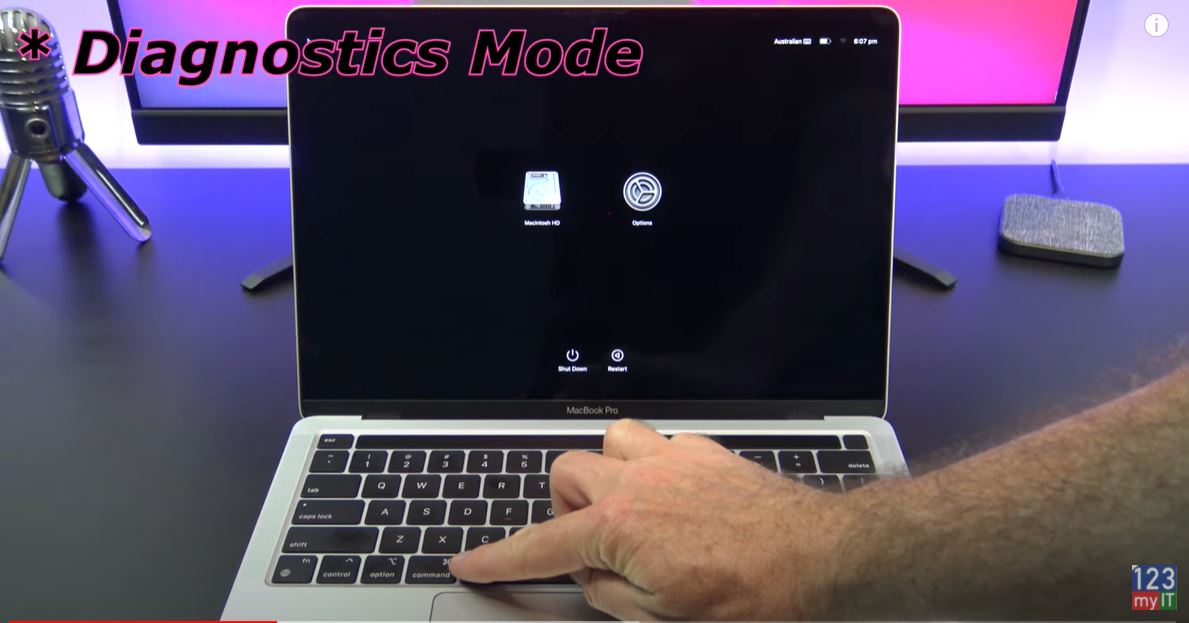
Once your Mac is shutdown to get into Startup Options press and hold the power button until you see the Apple logo with Continue holding for Startup Options menu. When you see the Options cog you can let go of the power button. This is the Startup Options menu and you can do things like select bootable disks.
Diagnostics modes and other modes
Diagnostics Mode
To get into Diagnostics Mode we want to press and hold Command and D keys until your Mac Restarts and you will see the Diagnostics Menu load. Now you might need to connect the Mac to your WIFI to start the diagnostics. Once you have connected to WIFI the Diagnostics will download and you can use the Diagnostics to see if you have a hardware problem with your Mac.
Just click Run Offline and the Mac will check all your hardware to see if its ok. I get an error with my power adapter because its not plugged in. If you click get started it will show you a list of error codes. So if you have faulty hardware you can contact Apple for help.
If I plug my cable back in and run the test again I don’t get any error codes. This means that the Mac hardware is fine and working correctly.
Start-up Disks
If you want to check startup disk, reinstall MacOS, restore from backup or change security settings go into Recovery mode by pressing the Options Cog. So in Recovery menu you have Restore from Time Machine. Reinstall Mac OS. Disk Utility and Browse Apple support.
Safe Mode allows you to Flush user cashes and disable third-party extensions. TO get into Safe Mode go back into Startup Menu and press and hold the Shift key. Then click continue in Safe Mode underneath it. You Mac will restart and then you should be able to see the top right hand menu. Simply logon and your Mac will be in safe mode.
If you want to set a default startup disk go back into the Startup Menu and press and hold the Option key. Under the Disks it will show Always Use option. This allows you to set the default Startup disk. Helpful if you have multiple disks.
Guys don’t forget to check out my other videos such as Fix Broken Bricked Mac with Restore Revive. This will show you how to put a M1 Mac into DFU mode. And do me a favour if you know anyone who might need this video please share it will them, hit the subscribe button and smash the bell icon.
Hi guys and welcome to 123myIT. In this video, we will show you how to fix a bricked mac or broken MacBook with revive or restore.
Guys if you are like me and you have bricked your new Mac M1 or other MacBook’s then you can try to do a restore or revive process to get it working again. You might be getting the black screen with exclamation mark and the restore URL on it. This video will show you how to fix it.
Fixing Bricked Macs with DFU mode, Like and iPhone.
Restore Revive Bricked Mac
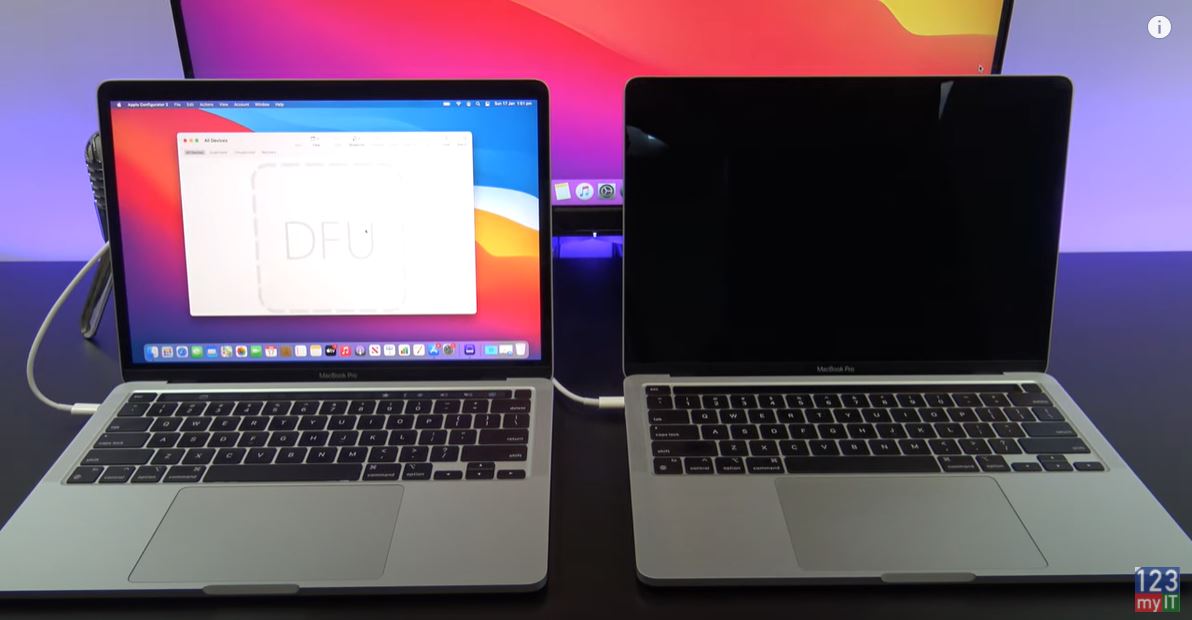
To do a restore or revive you will need another Mac or MacBook. This Mac will push the restore to software to the broken Mac. IF you are like me and did not have a second Mac try borrowing one from a friend or you might have to go to an Apple store.
Let us get started. I am using two MacBook Pro M1 computers. You need to plug the power cable into the working MacBook on the right USB C port. In addition, plug the second USB C cable from the second MacBook to the left port. Then plug the cable from the left port into the left port of the broken Mac. Here’s a picture you might find helpful for the different Macs.
Apple Configurator
Next up download and app called Apple Configurator 2 from the App Store. Go ahead and open Apple configurator 2. Once that is done, you will need to put the MacBook in DFU mode. This can be a bit tricky.
You need to:
1. Press the power button.
2. While holding down the power button, at the same time press all three of the following keys for about 10 seconds:
The right Shift key
The left Option key
The left Control key
Other things to know are revive will revive the firmware and reinstall the latest version of recoveryOS.
Restore Firmware
Restore will restore the firmware, erase all data, and reinstall the latest version of recoveryOS and MacOS. Bricked Mac.
Therefore, if you do it wrong it will come up like this. It has the padlock there and you cannot revive or restore this Mac. Ok so let try again. Press and hold the Power button then press and hold the Right shift, Left Option and Control keys.
3. After 10 seconds, immediately release the three keys but continue to hold down the power button until it appears in Apple Configurator 2.
Your Mac in DFU mode – Bricked Mac
Awesome, you have now just put your Mac in DFU mode. Just like an iPhone. Now depending on how you broke your Mac you will need the Revive option or the restore option. To find these menus right click on the DFU sign on the first Mac and go to Advanced. Under Advanced you will have the revive option otherwise I will use the restore option.
Ok the restore revive will start and may take some time so go ahead and hit the like button and subscribe guys!
Cool, if everything goes well then you should see the DFU replaced with a padlock. Moreover, your broken Mac should now be fixed. You can go ahead and setup your Mac again.
Guys don’t forget to check out my other videos such as Setup your own Google iPhone. And do me a favour if you know anyone who might need this video please share it will them, hit the subscribe button and smash the bell icon.
Hi guys and welcome to 123myIT. In this video, we will show you how to setup your iPhone as a Google iPhone. Ok Guys I’m an Android user and I wanted to see if I could convert myself to use an iPhone by creating a Google iPhone and replacing all the Apple Apps with Google ones.
Before and After – Google iPhone
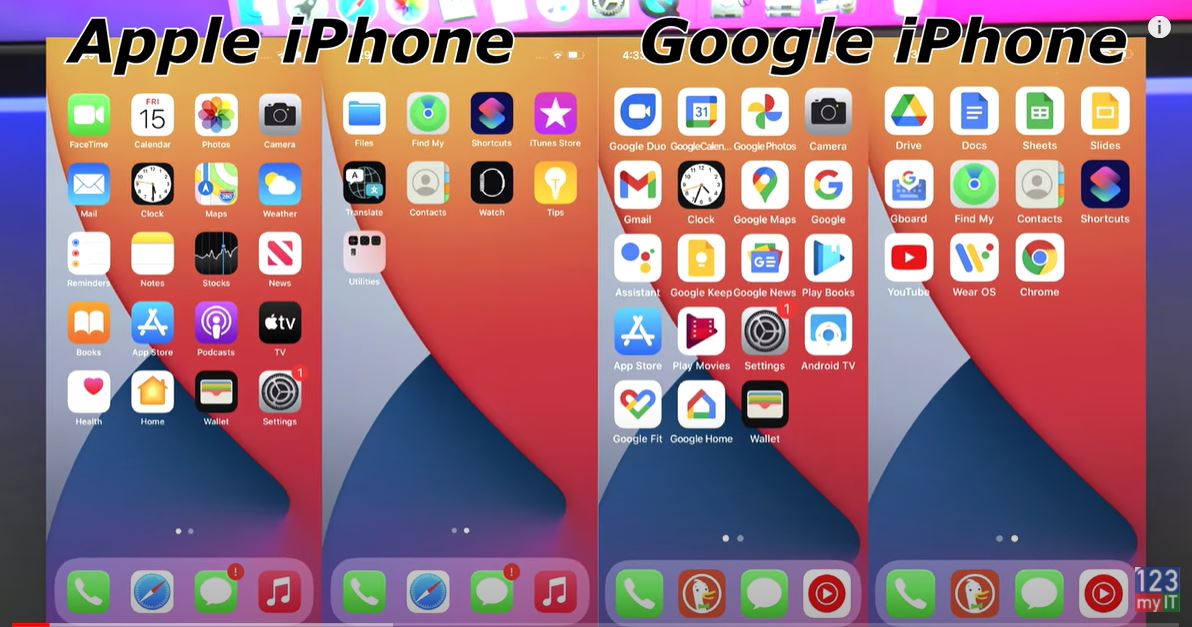
This is what you iPhone will look like before and after you change it to a Google iPhone. You don’t need to change all the Apps you could just change the Apps you want. For example, one of the reasons I have not changed to an iPhone is I really like the Google Assistant. Later in this video, I will show you how to setup the Google Assistant with the tap back function.
What your Google iPhone will look like before and after.
Let get started. First I would need to transfer the data from my old phone to my iPhone. I already have a video how to do this and if you are interested, I will put a link in the description.
Download the Apps – Google iPhone
Next, you will need to download the Apps that you use from the Apple Apps Store. Because I used the Transfer to iOS app, some of my free apps will download automatically. Once you have some apps downloaded, you can start organising them. You can replace the safari with Google Chrome or in my case, I prefer the DuckDuckGo browser and I will show you why later in the video. You can also replace Apple music with YouTube music. To edit the home screen tap, hold, and then drag the icons to where you want them. Alternatively, you can tap and hold the app and drag it.
I have not downloaded YouTube music yet so I will do that now. Just tap to download it and once its downloaded drag It to wherever you want it.
DuckDuckGo – Google iPhone
Cool, now you have you main bar down the bottom sorted. Open up your browser so Chrome or Duckduckgo and set it as the default browser. The reason I use Duckduckgo is that it is a private browser so it doesn’t track you which is nice. In the top of Duckduckgo tap the cog icon and then tap set as default browser. This will open any links in Duckduckgo rather than safari. I will show you how to do this for the Chrome browser as well.
In the Chrome browser, tap the three dots tap Settings. Tap Default browser, Tap open Chrome settings. Tap on default browser App and select Chrome. You can see Duckduckgo is selected I am going to leave it on that. However, if you want to use Chrome select Chrome.
Replace Facetime
You can replace FaceTime with Google Duo. So tap and hold the App to remove it. Then go ahead and download Google Duo from the App store. I already have it downloaded so I will move it to replace FaceTime.
You can replace Apple Calendar with Google Calendar. Photos with Google Photos. So just, download them and drag them into place.
Swap out Mail for Gmail – Gmail is better anyway.
Delete Apple maps for Google Maps – Google Maps is better anyway.
Download Google App and replace it with Weather and Download Google Assistant to replace it with Siri. You can still use Siri however; we will set up Google assistant with the Tap Back feature. Which is just awesome.
Ok while that is downloading lets change out the Weather app. Moreover, you can move the Google Assistant to the main screen.
Download Google Keep and replace notes.
Delete News and download Google News.
Replace Books with Play Books.
Delete unwanted apps
Go ahead and delete any Apps you are not using. Remember you can always download the App again if you need too.
All right swap Play Movies with Apple TV which we deleted earlier. Another good one is Android TV.
Moreover, you can replace the health app with Google Fit.
You can swap Apple Home with Google Home.
On the Second screen you can delete any apps you are going to use. You can replace files with Google drive. Delete ITunes store. Also remove Translate and delete Watch if you do not have an Appel Watch. Delete tips and Utilities. Keep the Shortcuts icon because we will use that for the Google Assistant.
You can move your Google drive to the top to make it neater, then go back to apps store, and download Google Docs, Sheets and Slides. Tap and hold and bring them to the top so its neater.
GBoard the Google Keyboard
Go back to the Apps store and download Gboard, which is the google Keyboard. In addition, download Wear OS which is an App for your Apple Watch. To Setup Google Keyboard to to Settings General Keyboards and tap add a new keyboard. Select Gboard and then tap on Gboard and toggle the Allow full access button. Cool you have just setup you’re Google Keyboard.
Setup Google Assistant
Let us setup Google Assistant. Open Google Assistant and login to it with your Google Account. Just tap no thanks and continue to get it started.
All right its working go back to the Home screen find the Shortcuts icon and tap to open it. Tap the plus icon and tap Add Action. You should see Hey Google down the bottom tap that and then tap the Next button at the top. Type in the name for the Action. I just type Google Assistant this will help you identify the shortcut when you add it to the tap back action.
Cool you have a short cut now for the Hey Google command. Let’s add it to the Tap back section. Go into settings accessibility Touch and scroll down to the bottom to where it says Back tap. If you double or triple tap the back of your iPhone it can do an extra command. Go into Double tap and scroll to the bottom. Under Shortcuts you will see the Google Assistant Shortcut we created earlier select that and watch the magic. If you double tap, the back of the iPhone the google assistant starts up.
Guys, don’t forget to check out my other videos such as setup your iPhone or iPad in 2021. Also do me a favour if you know anyone who might like this video please share it will them, hit the subscribe button and smash the bell icon.
Hi guys and welcome to 123myIT. Do you have a new iPhone or iPad? Lets go through the setup process. Swipe up on the iPhone 12 and press the Home button on the iPad to get started. Next select your language and region. Setup your iPhone, let get started.
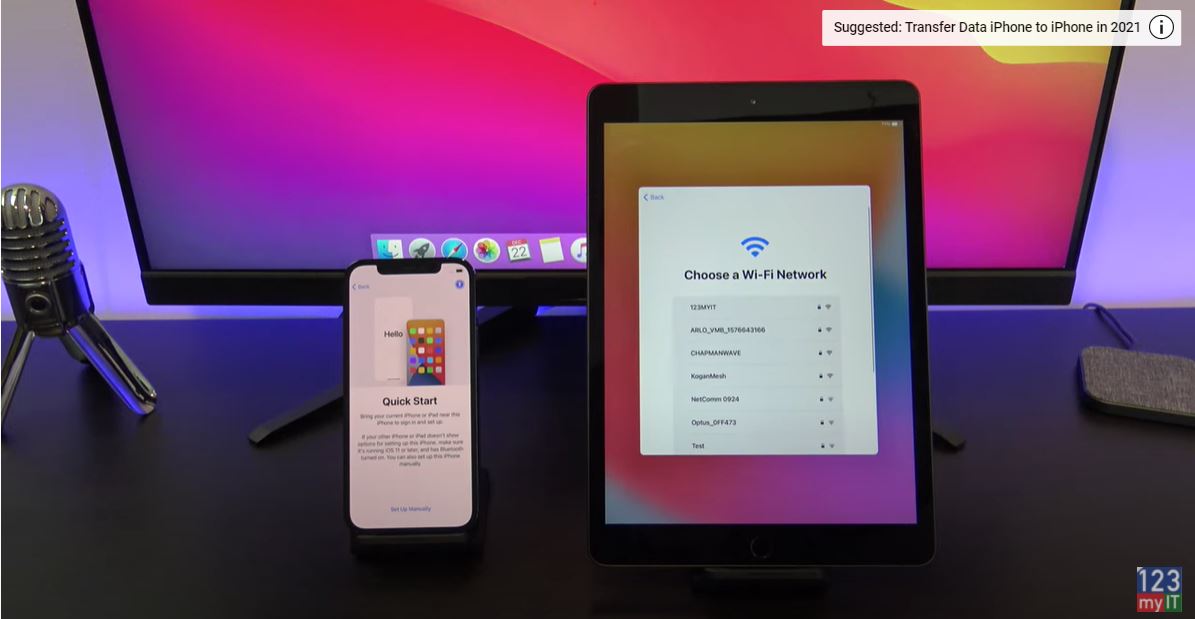
If you want to transfer your data from another iPhone or Android, you can use the quick start guide. I have already done a video on this I will put the link in the description. Otherwise tap setup manually and then connect to your WIFI. Go ahead and enter your WIFI password then tap next.
Setup your iPhone and iPad in 2021
Your iPhone and iPad will take a few mins to activate. If you have a sim card for your iPhone you can put it in now or you can fast forward to the 5:51 mark and I will show you how to add the sim card. Go ahead and tap continue on the Data & Privacy screen.
Different Models? – Setup your iPhone
Depending on which device model you have. You might have Face ID or Touch ID. Face ID unlocks your device with your face and Touch ID with your fingerprint. Tap continue and get started for the Face ID and move your head around in the circle. Cool that’s setup now. Let us setup Touch ID next. To setup Touch ID tap continue then press and hold your finger on the Home button.
Setup Touch ID – Setup your iPhone
Adjust your grip and setup a second fingerprint. Tap Continue.
Next, you will need to setup a six-digit passcode. This is used to unlock the Face ID or Touch ID settings. If you tap Passcode option, you can set a four-digit passcode or no passcode at all.
If you want to transfer data from another device, you can use the Apps and Data screen to do so. I have plenty of videos you can follow to do this I will put them in the description. For this video, we are just going to go to Don’t Transfer Apps & Data.
Apple ID
If you have an Apple ID go ahead and type it in now. If you do not have, an Apple ID now is a good time to set this up. You will need an Apple ID to download Apps to your iPhone or iPad. My Apple ID has Two Factor authentication, which means it will send a code to your email or another device. So check your other device or email for a code and type it in.
Almost there now, tap Continue on the updates screen. Then you can enable disable locations services. This turns on the GPS and it allows Apple to see where you are to recommend services to your device. Normally I turn this off and you can always turn it back on later.
Apple Pay
If you have Apple pay setup on your credit card, you can setup Apple Pay now. This allows you to pay with your iPhone or iPad instead of your credit card. I am going to tap setup later and continue to the SIRI screen. Ok I am going to setup SIRI on the iPhone you can also do this on the iPad if you want to. Ok So I finished setting up the iPad the steps will be the same on the iPhone. Tap continue and you can now use the side button to ask siri a question. You can share your Audio with Apple. I never do this always tap not now. If you want screen time reports on how you use your phone hit Continue and on iPhone Analytics tap Don’t Share.
True Tone
True tone display allows you to have a warmer display on your device. Press the see without True Tone Display to see if you like it or now. You can change this later if you want.
Select light or dark appearance which ever your prefer. IF you got big fingers or you want the text on your screen to be larger select Zoomed.
Awesome so you are all setup now. One last thing if you want to setup your SIM card you can get the little SIM card eject tool and on the iPhone 12 Pro the slot is on the left side. Push the pin into the hole to eject the slot out. Just add your SIM and replace the slot back inside the iPhone. If you do not have a sim contact your carrier. Your sim card might have a PIN on it enter your PIN. IF you do not have one contact your carrier..
Guys, don’t forget to check out my other videos such as Transfer Data iPhone to iPhone in 2021. Also do me a favour if you know anyone who might like this video please share it will them, hit the subscribe button and smash the bell icon.
Hi Guys and welcome to 123myit. In this video, we will show you how to Transfer your data from your older iPhone to your newer iPhone in 2021. Therefore, if you have the iPhone 12 Pro like this one or any other iPhone that’s new to you, then this video will help you move contacts, text messages, music, photos apps and app data. This also includes apps like WhatsApp for example.
Already Setup your iPhone
If you have already setup, your phone and you are on the Home screen. Unfortunately, you will have to reset the new phone. If you do not want to reset your iPhone then you can do a backup and restore from iCloud. Alternatively, backup and restore from iTunes.
To reset your phone Go into settings > General and scroll down to reset. Once you are there tap on Erase Content and settings. Then Erase iPhone.
After Reset
Once your iPhone has reset itself. Go ahead and select your country and language. You should see the quick start screen appear on your old Phone. Tap Continue. If you don’t see the quick start screen make sure Bluetooth is turned on and you can also press the sleep wake power button to put the device to sleep then tap it again to wake it up.
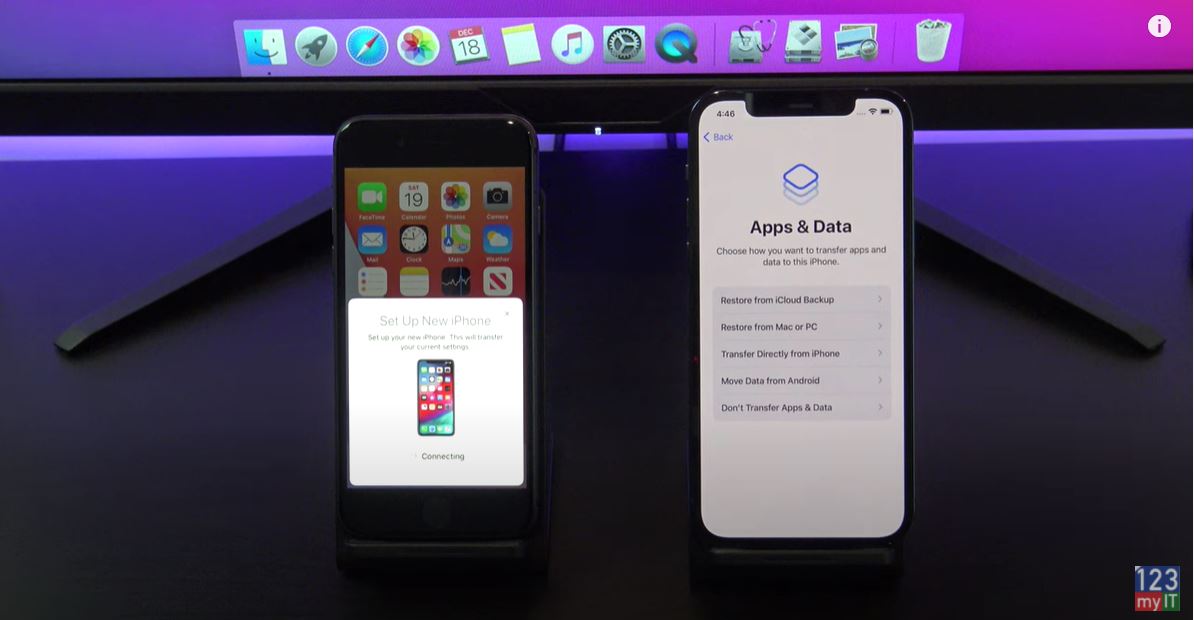
Apps & Data Screen- This is where the magic happens.
You should get a little blue animation now. However, if it does not come up continue setting up your Phone until you get to the Apps and data screen. Once you are on the Apps and data screen. Transfer directly from Phone. There you go now the little blue animation has come up. Scan it with the rear Camera on your old Phone. Now at this stage you might need to enter your old Phone passcode on your new Phone. It did not come up for me because I turned it off before starting the transfer process. Follow the prompts to setup touch id or face id on your new Phone.
Almost there!
Finally, tap continue and agree to start the Data Transfer from your old Phone to your new Phone. Almost there follow a few more prompts to setup your Phone until you get to the Transferring Data from Phone screen. There it is so all your data should be copying across now.
Keep the two devices close by and make sure they are plugged into power.
Your new iPhone will restart itself and when you log on you go and check that all your data has transferred across ok. I will check my pictures and see if that are the same. Cool looks like everything has copied across.
In addition, guys don’t forget to check out my other videos such as backup your iPhone or iPad to Google Drive. Do me a favor If you know anyone that might need this video please share it with them hit the subscribe button and smash the bell icon.