8 iPhone Settings You Need To Turn Off In 2021

Hi Guys and welcome to 123myit. In this video, we will show you how 8 iPhone settings that you should turn off in 2021. Guys, I am going to show you some iPhone settings that you should turn off straight away. These settings are designed to take the load off your phones CPU which will speed your phone up and save the battery life. Along with that, it will increase the privacy on your iPhone which you should consider doing if you are not doing this already.

I am using an iPhone 12 Pro, but depending on the iOS version, it might look a bit different but the settings will be the same. Let’s go into the settings of your iPhone.

Location Services – 8 iPhone Settings

And then scroll down to privacy and location services. If you have a purple arrow this might be a bad sign. It means that an app or service has been using your location. You can read more about it on the Purple arrow here. Lets go into System Services. Ok so you want to turn most of these off. So all of these services ajust your iPhone’s Antenna’s settings when you go to another country. So if you have no plans to go to other countrys. Just turn these things off. I will show you exactly what to turn off and what to leave on.

8 iPhone Settings
8 iPhone Settings

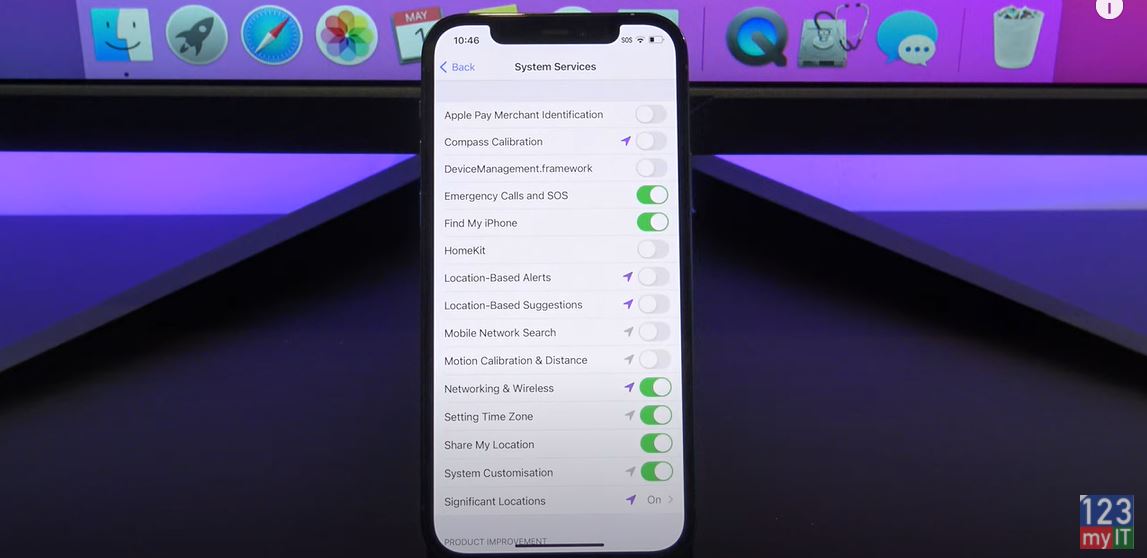
Ok so leave on emergency calls and find my iPhone. The networking and wireless works with iPhone 11 and 12. If you are using AirDrop it allows you to point your iPhone in the direction of another iPhone and that iPhone will be the first to appear in the AirDrop list. This might be handy in a crowded situation like an office. But for a regular home user turn it off.

Significant Locations

Next let’s talk about Significant locations. These are places that you have visited and Apple saves those locations, pretty weird. I don’t have any locations because I don’t take this iPhone anywhere but if you toggle this off and clear your history, you will save data and battery life.

Next Tap back and scroll down to Product Improvement and turn these all off. Unless Apple is paying you to help them improve their products, just turn it off.

If you tap back and on the main page of location services, just look for any App that is always using your location and just turn it off. So for example if I go into Apple Maps you can see I have the options. Never, Ask next time and while using the App. If you have an App that says Always. Just set it to while your using the App. If you have an App that says Always. Turn it off straight away. For me I will set it to ask next time I use the app and if I open it I will get a prompt to ask to use my location. So go through all your Apps and anything set to Always. Change it.

Apple Advertising

All right if we go back out of Locations services and scroll down to Apple Advertising. If you tap on View Ad Targeting Information. This will give you some info about yourself. But I don’t find it that useful. Just go ahead and turn off the Personalised Ads button. You will still get ads that meet your criteria. It just means your iPhone will be less snoopy to get these targeted ads.

If we tap back to Privacy and go into Analytics & Improvements. So if you have all these turned on, data is constantly being sent from your phone to Apple and other App developers. So again turn these off to save battery life and Data.

Turn Off Tracking on Apps – 8 iPhone Settings

The next one is to Turn Off allow Apps to Track and you can find this by going back to Privacy scrolling up to Tracking. What this does is it allows Apps like FaceBook to Track everywhere you go on the internet and then use this information to sell Ads about you to Advertisers. Its a creepy way to for Advertisers to make money off you, and if you are not getting a cut of that money, turn it off.

The next setting to turn off is In App Ratings and Reviews. To find it go back out of Privacy and Settings then scroll down to App Store. When you download an App for the first time, it will ask you do you want to write a review how many stars can you give us. So just go ahead and turn this off.

The next setting we should talk about it Push Mail. This is handy if you use your phone to get email. To find it tap back to Settings and scroll down to mail. Once your in Mail tap on Accounts and then Fetch New Data. This setting uses up heaps of Battery life on your iPhone. When you have push turned on, your iPhone is constantly looking for new email. When you turn push mail off your iPhone can choose how often it will check for email.

Toggle off Push

So what you want to do is toggle off Push and then you can go into each account and set it to Manual or fetch. Manual just means when you open the Mail account and refresh it. Otherwise go back to Fetch new Data and put a tick besides Every 30 mins or every 15 mins. This means it will check for email every 30 mins or 15 mins which ever you prefer. Obviously if you set it to every 30 mins you will save more battery life and data.

The last setting to turn of is Background App Refresh and you can find it by tapping Accounts, Mail and Settings. Scroll up to General and tap Background App Refresh. And at the top tap Background App Refresh. This settings Allows Apps to download content and data when running in the background. I would turn this off for Cellular data and set it to WIFI only. And then if you tap back you can go through and choose which apps you want to be able to download data in the background. So just go and turn off any Apps that you don’t use. And again this will save your battery life and data.

Also guys don’t forget to check out my other videos such as 8 Android setting you need to turn off in 2021. And do me a favour if you know anyone who might need this video please share it will them, hit the subscribe button and smash the bell icon.

8 Android Settings You Need To Turn Off In 2021

Hi Guys and welcome to 123myit. In this video, we will show you how 8 Android settings that you should turn off in 2021. Guys I’m going to show you some Android settings that you should turn off straight away. These settings are designed to take the load off your phones CPU which will speed your phone up or save the battery life. Or it will increase the privacy on your phone which you should really consider to start doing if you are not doing this already.

I am using a Samsung Phone, but if you are using a different phone, it might look a bit different the settings will be the same. Let us go into the settings of your phone. It you cannot find the settings button you can just do a search for it at the top.

Device Scanning – Android settings you need to turn off

The first thing to turn off is nearby device scanning. This sets your phone to scan for nearby devices. This is constantly running so if you turn it off it will save battery power. You can find it under Connections, More connection settings and nearby device setting just turn that switch off.

android settings you need to turn off
Device Scanning

Next, you can turn off usage and diagnostic’s settings. This is information that is being sent to Google or Developers when you not using your phone and it chews up battery life. To find it go to Settings, Google and Tap the 3 dots in the top right and tap Usage and Diagnostics. Then just toggle the button off. Saves your battery life and cellular data.

Ads Personalization – Android settings you need to turn off

Next setting is turning off Ads Personalization. This is a funny one, have you ever been talking about something and then all of a sudden and ad for that starts popping up on your phone? This data is collected and sent to ads networks so they can send you more relevant ads. Its too creepy in my opinion. To turn it off go into settings, Google, Ads and then you need to turn this one on to Opt out of Ads Personalization.

Next, we will talk about Turning off Improve accuracy with WIFI and Bluetooth scanning. If you turn these two settings off you will save a ton of battery life. You will find it under Settings, Location and tap Improve accuracy. And toggle the WIFI and Bluetooth buttons off. Great so now your phone will not be constantly scanning and your GPS will still work no problems there.

Location History

The next one if Google location history. This is a list of all the locations you have been. Its simular to iPhone significant locations where is saves a long list all the places you have been. It’s a bit too weird for me. You will find it under location and Google Location History, Tap on Location History, scroll to the bottom and press pause. Cool its been turned off now.

Now this next one I do not have on my phone but you should check if you do. It’s called Network Data Analytics. In addition, can be installed by your Carrier or Service Provider. You can find it under Settings, Location and it will be sitting down the bottom of location. Go into it and at the top of the screen, you should be able to turn it off.

Restricting Background Data

The next thing we want to talk about is Restricting Background Data for Specific apps. If apps are constantly sending data then it will chew up battery life. To find it go to Settings, Apps and then Tap on your app you want to change, for example Bixby routine. You should see Mobile Data go into that and then Turn off Allow background data usage.  DO this for any apps that you don’t think you need. It will save you battery life and cellular data.

The next setting is important and it is called Turn off install unknown Apps. Have you ever installed a game or another app and all of a sudden, you are getting nasty pop-ups? Then this setting might help. What it does is it blocks your apps from installing other apps from unknown sources. Which could ransomware or malware. So go into Apps menu and then tap the three dots and tap special access. If it is turned on, just go ahead and toggle it off. Allot of the time an app will ask for permission and you might not understand that it is turning this on. So now you do!

Background Apps

The last setting we will talk about is choosing which Apps will run in the background of you phone even when you’re not using it. To do this one we need to enable Developer mode by going to Settings, About Phone. Then tap on Software information and tap on build number seven times. You will see the Developer mode enabled message. Go back to the Settings page and on there you will see a new setting Developer options. Tap that and scroll down until you find Background Check.

Ok I do not have any apps in here because it’s a new phone. However if you do, go through and turn off any apps you don’t need.

Also guys don’t forget to check out my other videos such as how to make your phone number private on Android in 2021. And do me a favour if you know anyone who might need this video please share it will them, hit the subscribe button and smash the bell icon.

Make your Phone Number Private on Android in 2021

Hi Guys and welcome to 123myit. In this video we will show you how to make your phone number private on Android in 2021. Ok Guys if you want to call someone’s phone but you don’t want your number to display on their phone then this video will help. There is a few ways you can hide your number so let’s get started.

Hide your number – private on android in 2021

If you just want to hide your number on a single call. The you can dial a prefix before your dial then number. So for example my prefix in Australia is #31# and then the phone number I am calling. Remember this is for a single call so you would have to type your prefix every time. As always test this to another phone before you make that important call.

number private on android

If you want to make your phone private on all calls then tap on phone and then tap the three dots. If you don’t have the three dots. Just go into the Settings Then Call Settings on your Phone. On my Samsung I tap on Supplementary services and then show caller id and then hide number. Other Android phones might be different. You might have Operator’s Call Settings, Additional Settings, and Owner number. If you can’t find it there then try one of these other locations for different Android phones. Ok before we call that crazy person lets test it to another phone to make sure its hidden.

Awesome its working your number is coming up as No Caller ID or it will Show as private number.

Also guys don’t forget to check out my other videos such Turn On Private Browsing in Safari on your iPhone iPad. And do me a favour if you know anyone who might need this video please share it will them, hit the subscribe button and smash the bell icon.

Transfer Data iPhone to Android 2021

Mine Bitcoin on a Laptop

Turn On Private Browsing in Safari on your iPhone iPad

Hi Guys and welcome to 123myit. In this video, we will show you how to use private browsing in Safari on your iPhone or iPad. Private browsing allows you to visit websites without creating search history in Safari. When Private Browsing is turned on, your private information will be protected and it will block some websites from tracking your searches. Safari will not remember your Search History or Autofill information.

private browsing

Turning on Private Browser is super easy. When you open up Safari you will notice that the Navigation buttons are blue. This means Private Browser is turned off.

To turn it on tap the Tabs button and then tap Private. The Private button will then be highlighted in White. And when you open a new tab you will see an explanation of what private browsing is.

You will notice the Navigation buttons are no longer blue this will let you know that Private Browser is turned on. If you tap the Tabs button and Tap the Private button this will turn the Private Browsing off.

Here’s how to do it on an iPad. Also guys don’t forget to check out my other videos such as Transfer data iPhone to Android in 2021. And do me a favour if you know anyone who might need this video please share it will them, hit the subscribe button and smash the bell icon.

Mine Bitcoin on a Laptop

Lenovo Legion 5 with Intel

Transfer Data iPhone to Android 2021

Hi guys and welcome to 123myIT. In this video, we will show you how to Copy data from iPhone to Android 2021. Ok Guys so we are going to copy the data from your iPhone to iCloud and then download that data to your Android device. This will copy data such as Contacts, Messages, and Free apps, Photos, Videos and Documents. We will use WIFI so make sure both devices are on WIFI. In addition, this should with most Android phones, the process will be similar but you might have to work out which copy software to use. Ok let us start.

iphone to android 2021

Sign into iCloud – iPhone to Android 2021

On your iPhone go into settings scroll to the top and sing into iCloud with your Apple id.

Once you are signed into iCloud, the next step is to do a Backup to iCloud. To do this tap iCloud and then scroll to the bottom and tap on iCloud Backup. This is where you would tap backup now to start the backup. However before you do this lets go back and select what we want to backup remember you will be copying this to your Android device.

Ok I am going to go in and turn off anything that I do not want to backup. Ok once finished there is a few more options to turn off.

Turn off Two Factor Authentication – iPhone to Android 2021

You need to turn off Turn off two-factor authentication if you have that turned on. To do this go out of settings and into Safari and browse to appleid.apple.com. Once there sign in with your Apple ID and password. Log into your account tap on Security, then scroll to the bottom, and turn off two-factor authentication. As you can see, I do not have it turned on.

The next step is to turn off find my iPhone. This is helpful if you want to sell your iPhone afterwards. Go Back into settings, Tap Apple ID and then tap on Find my. Find my iPhone is turn on tap to turn it off. Enter your apple id and then turn it off.

Turn off iMessages

The last step is to turn off iMessages. This will stop your phone number from being linked to your Apple ID. Tap on find my, tap on Apple ID, tap on Settings. Scroll down and find messages. Then just toggle off iMessages. Go back into settings and back into iCloud again. Tap iCloud. Again, go down to iCloud backup. Tap backup now to start the iCloud backup. Depending on how much data you have this might take a while. Head over to your Android device and start up the restore software. This is a Samsung S20 so the software is called Smart switch.

You can find it in the menu or if you are on other Android devices look under Settings and then Accounts and Backup or the Backup area of your Android device. Always tap update.

Transfer Data

Tap on Receive data and then Tap iPhone since we want receive the Data from the iPhone. You want to connect wirelessly to iCloud. The backup has finished on the iPhone now so you can close out of it. Tap done to log into your iCloud on your Android device.

Awesome it should now show you a list of data that you can copy across to your Android device. Just deselect anything that you do not want. Great it will give you other options to copy data to your Android device. Tap next down the bottom. It’s give you a warning about turning off iMessage which we already did. Then tap go to the Home screen and check if you data copied across by going into your Android device.

Guys, don’t forget to check out my other videos such as How to mine Bitcoin on a Laptop. Also do me a favour if you know anyone who might like this video please share it will them, hit the subscribe button and smash the bell icon.

Lenovo Legion 5 with Intel

Clean GPU in 2021

Mine Bitcoin on a Laptop

Hi Guys and welcome to 123myit. In this video, we will show you how to mine Bitcoin on your laptop. Ok Guys recently I did a review on the Lenovo Legion 5 laptop I will put a link to the video in the description below. In addition, I wanted to see if I could mine bitcoin with the graphics card in the laptop.

NiceHash App – Mining Bitcoin on a Laptop

The app that I am going to use is Nicehash. We won’t be mining Bitcoin directly but we will be using our hashing power to get paid in Bitcoin.

To get the Nicehash app head over to www.nicehash.com and create an account if you do not have one already. Once you have created account click on Login and log into your account.

Click on the mining tab and then click on the Download Miner button. On the next page you will have two options the first Miner is for NVidia Graphics only and the second button if for both NVidia and AMD graphics. This Legion 5 has 1660 TI GPU, so I will click the first button Nicehash QuickMiner.

Disable AntiVirus – Do this at you own Risk

Before installing the Nicehash miner you need to disable your antivirus as the antivirus will pick up the Nicehash installer as a virus. Guys the next steps you will need to do at your own risk. Therefore, head over to Nicehash terms page and have a read. It is important if you are new to Crypto that you understand the risks involved. This video is for information only.

Cool once you read the Nicehash terms, go in Start > Settings and in Security find the Virus and Protection settings. In addition, Turn off real time protection. This is so you can download and install the Nicehash miner. Just use the toggle switch to turn off real time protection and go back to the Nicehash downloads page.

Click the, I understand I have to make an antivirus exception on my rig checkbox. And then click on Go to GitHub download button. Once that load click on the EXE or Zip file. If you do the Zip file, you will need to make a folder exception. Also, if you have another antivirus software like I do here with the McAfee antivirus click accept the risk.

Download NiceHash

Ok if you download the zip file to make a Folder exception go back into the security settings and scroll down to exclusions click on Add or remove exclusions. Click Add an exclusion and navigate to the folder on the screen now. Replace YourWinUser with your Windows username folder and you also need to type in the AppData folder as it is hidden on most computers.

Ok so you would normally have your Nicehash folder here. I do not have it, as I am not using the Zip file install. Cool you have made your exclusions, lets install Nicehash app. Run the miner exe file and click on Download and Install.  Click ok and the Miner will start. You can open the miner screen up to check if it started or not.

Make sure you add in your Bitcoin wallet address. If you go down the bottom right hand side and right click the Nicehash, go to settings and edit Config file.

Mining Bitcoin on a Laptop

Go back into your Nicehash webpage and find your Bitcoin wallet address. It is under the Wallets Tab> deposit > Show BTC address. Copy that and replace the address in the config file.

Start Mining

Awesome you can start mining now. Go back to the Nicehash icon, right click it, and click on Start to start mining.

You can check your dashboard to see if it is mining ok. How much will a 1660TI earn per day? This depends on allot of factors but the Hashing power is currently around 26 MH/s. On my Nicehash app, it says that will earn about $2.50 US per day. Remember that if the price of Bitcoin drops this will be less. And you have to take into account electricity cost.

Also, guys don’t forget to check out my other videos such as Lenovo Legion 5 Review. And do me a favour if you know anyone who might need this video please share it will them, hit the subscribe button and smash the bell icon.

Clean GPU in 2021

Transfer Data Android to Android 2021

Lenovo Legion 5 with Intel

Hi guys and welcome to 123myIT. In this video, we will show you everything you need to know about the Lenovo Legion 5 with Intel.

What is the Legion 5?

The Legion 5 has almost everything you need in mid-range gaming laptop. This includes a Intel i7 Hexa-Core CPU. NVIDIA GTX 1660 TI Graphics and 256GB SSD.  All for around the $1000 USD. Check for updated prices in the description below.

This 15-inch laptop is built with what Lenovo calls Phantom Black plastic. On the inside the plastic is rubberised which makes it comfortable to use. The build quality is good and there is not sharp corners or edges.

Dimensions – Lenovo Legion 5

Lenovo says the starting weight is 2.3 KGs or 5 pounds and mine was the same. When you add the brick and cables it was 3.2kgs or 7 Pounds. In term of size the its pretty average for a gaming laptop at this price point. So it not super thin but its not massive either.

The display is a 15.6 inch 1080p, however just be careful when you buy as my model didn’t include the 144 Hz display rather 60hz only display. Its not all bad as when I plug it into an external monitor I can get 144Hz, but its something to be aware of.

In the Legion Edge software you have the option of disabling Hybrid Mode which will give you a performance boost in games at the expense of battery life. Backlight bleed on my display was fine and I didn’t notice it at all.

Across the top you have a 720p camera with a privacy shutter. The camera itself is pretty blurry and you can see its slow to respond when I move my hand. My keyboard looks pretty cool and it came with a single zone of backlight, along with many other RGB colours over 4 zones.

Keyboard

Typing on the keyboard was fine. However I am use to a desktop keyboard and I found some of the keys in slightly different position to what I am use to. So it may take a bit to get use too.

The function and Q keys allow you to cycle through performance modes and the power button changes colour to reflect the performance mode you are in. A really cool feature.

Trackpad was fine sometimes I miss click and it does pick up fingerprint, but seems to clean ok. The lid is designed well and you can open it with one finger and it folds all the way back 180 degrees. The keyboard flex was great. I didn’t find my flex at all. There was more flex on the display, but it wasn’t annoyingly wobbly.

Lenovo legion 5

Lenovo Legion 5 Ports and Connectivity

On the left side you have an air vent along with a usb 3.1 gen one port and an audio jack.

On the right side you have a power light, novo button, USB 3.1 gen 1 port and another air vent.

The back you have a gigabit Ethernet port, USB 3.1 display port, two usb 3.1 ports a HDMI, power connector and a Kensington lock.

On the bottom you have two big air vents which push hot air away from the CPU and GPU. And on both sides you have 2 two watts speakers. Lets test how good they are.

So they are a little bit tinny, definitely not as good as the M1 MacBooks review I did link in the description.

Benchmarks

Let test it out with Heaven benchmark and the laptop is in performance mode. While that’s running I will try and give you an idea of how loud the fans gets. Heaven benchmark result was FPS: 147 with a score of 3718. Min FPS was 39 and max was 296. If I put pubg in Ultra settings I was getting about 88 to 101 fps. Doing the same thing with Fortnight and putting it into Epic settings I was able to get around 100 fps it did drop to 45 but that was temporary.

In terms of heat the keyboard does seem to heat up quite allot, but not around the WASD keys which is nice design. This means that your hand should get to uncomfortable when gaming. Viewing Angles on the display were very good take a look.

So would I recommend the Legion 5. Yeah I would I think it’s a great laptop the only concern you might need to have is to make sure you get the right screen with 144hz refresh rate. It makes a big difference.

Guys don’t forget to check out my other videos such as How to clean a GPU in 2021. And do me a favour if you know anyone who might need this video please share it will them, hit the subscribe button and smash the bell icon.

Transfer Data Android to Android 2021

Transfer Data Android to iPhone 2021

Clean GPU in 2021

Hi Guys and welcome to 123myit. In this video, we will show you how to clean GPU in 2021. Ok Guys If you are like me and you have a Crypto GPU or a Gaming GPU and you have been using it a while and it needs a clean then follow me and I will show you how to fix it up.

In this video, we will clean the GPU as well as replace the heatsink thermal paste and the thermal pads.

Dirty GPU to Clean GPU

The model I have here is the Radeon RX 570 and I was using it on a mining rig and as you can see its really dirty and clogged up with dust and to the point where its just over heating all the time. And even some of the heat sink is starting to corrode.

Take the GPU apart

Let us get started. The first thing you will need to do is take apart the card. You can do that by finding the screws that attached the fans to your heatsink. Once you have found them, just go ahead to and remove them. If you have, a different model and you are unsure. My best advice is to take it slow and gently. Moreover, do not get frustrated with it, as you will wreck your card.

When you have the screws loose gently, try to remove the Fans. With my card I have 3 fan cables which I need to remove. Be very gentle with these cables. Make sure you pull them out by the plug and not by the cables. If you pull it out by the cables, there is a chance the cable can break.

Go slowly

Just do your best to kind of slow massage them out. This top one was in awkward position so I just leave it and try doing the bottom one. Try not to force things.

Finally, I get the bottom cable off and wow check out all that dust and the corrosion. To clean the dust off the heat sink, some people use a can of compressed air and blow It everywhere. I just use a vacuum with brush attachment. In addition, do the same cleaning on the fans.

Remove Heatsink

Next step is to remove the heat sink screws. Generally, they will be the four screws on the back of the card. Gently try to remove the heatsink. If it does not move, do not force it. Go back and check there are no more screws to remove.

Cool, there it goes I had two more screws to remove. Therefore, we are going to replace the Thermal pads and Thermal paste. As you can see, the Thermal Pads are pretty much gone on the memory. Gently remove the Thermal Paste. I very slowly just peal it off where I can.

The harder dry pieces gently remove with a screwdriver. Make sure you do not scratch the memory.

How to Clean GPU

You can use a damp cloth or an alcohol wipe to remove any leftover thermal pads and thermal paste.

Clean GPU

Ok time to apply the new Thermal Pads and Paste. There is different thicknesses of thermal pads that go on the memory. On this RX570, .05 thickness goes on the memory and 1.0 goes on the VRMs. However, the VRM Thermal pads seemed ok on this card so I am not going to replace those. I will show you what they are in a second. Also, If you want an Amazon link the Thermal paste and Pads I will leave a link in the description. Cut the thermal pads to size and remove the two bit of plastic either side. Then place it carefully on the memory. If you need to know what thickness, Thermal pads go on your GPU then Google your GPU along with Thermal pad size.

Adding Thermal Paste

Do the same clean for the heatsink and then apply the Thermal Paste. I just put a little bit of Thermal Paste on the GPU. It will spread out when the heatsink and GPU are pushed together.

Both sides of the heatsink have guiding screws, which allows me to place the heatsink on in the right spot.

You can see there is more Thermal pads on the heatsink. It is in good condition so I did not change it.

Once the heatsink is back on flip the card over and replace the screws. Next up replace the fan power cables and screw the fans back on to the GPU.

Awesome you have now cleaned the GPU and replaced the Thermal Pads and Paste. Time to put it back to good use.

In addition, people do not forget to check out my other videos such Transfer Data Android to Android. And do me a favour if you know anyone who might need this video please share it will them, hit the subscribe button and smash the bell icon.

Transfer Data Android to iPhone 2021

Samsung Galaxy S21