Transfer Data iPhone to iPhone 13, 13 Mini, 13 Pro & 13 Pro Max

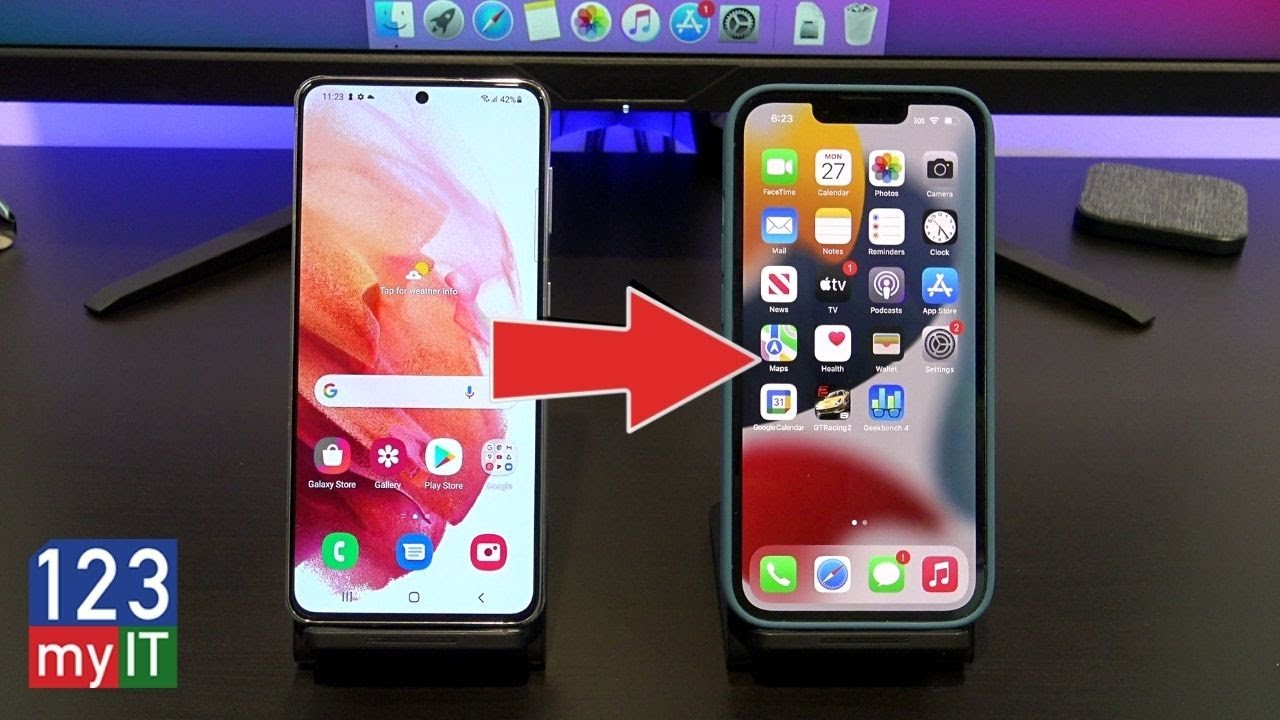
Hi Guys, Matt from 123myit here. If you have a new iPhone 13, 13 mini, 13 Pro or 13 Pro Max, this video will show you to transfer your data from any iPhone to any of the iPhone 13 models. So if you have the iPhone 13 Pro like this one on the right or any other iPhone that’s new to you, then this video will help you move contacts, text messages, music, photos, videos and app data. This also includes apps like Whatsapp but just remember you will need your Whatsapp password to transfer those apps.

The three ways to transfer your data

There is three ways to Transfer your iPhone data. You can backup and restore from iCloud. Sync and backup to iTunes on a Windows or Mac computer. You can Transfer wirelessly. I will show you how to Transfer wirelessly, because you do not need a computer and it is the easiest way.

If you have already setup, your phone and you are on the Home screen. Unfortunately, you will have to reset the new phone. If you do not want to reset your iPhone then you can do a backup and restore from iCloud. Alternatively, backup and restore from iTunes.

Reset your iPhone

To reset your phone Go into settings > General and scroll down to transfer or reset iPhone. Once you are there tap on Erase Content and settings. Then tap continue and then skip backup. If you get prompted for the Apple Id enter it now. If you have two factor authentication turned on it might send you a SMS or a code on one of your other devices. Swipe to the two factor authentication page an enter your code.

It should start the reset process, but if it does not go into settings and enter your password again and tap on sign out. Ok go back into general back into Transfer or Reset iPhone and tap on Erase all content and settings again. Then continue and Erase iPhone.

iphone to iphone 13

Once your iPhone has reset itself. Go ahead and select your country and language. You should see the quick start screen appear on your old iPhone. If you do not see the quick start screen on your old iphone, make sure Bluetooth is turned on and you can press the sleep wake power button to put the device to sleep then tap it again to wake it up.

Scan your Rear Camera

Tap continue and you should get a little blue animation now. There you go now the little blue animation has come up. Scan it with the rear Camera on your old iPhone. Now at this stage you might need to enter your old iPhone passcode on your new iPhone. It didn’t come up for me because I turned it off before starting the transfer process. Follow the prompts to setup touch id or face id on your new iPhone.

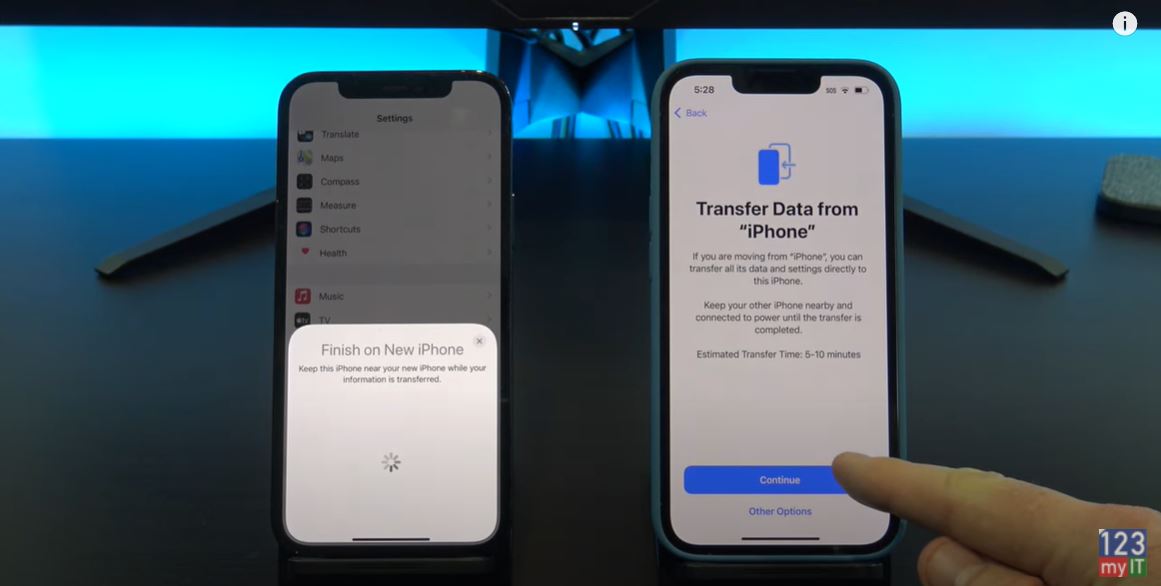
Finally, tap continue and agree to start the Data Transfer from your old iPhone to your new iPhone. Almost there follow a few more prompts to setup your iPhone until you get to the Transferring Data from iPhone screen. There it is so all your data should be copying across now.

Keep the two devices close by and make sure they are plugged into power.

Your new iPhone will restart itself and when you log on you go and check that all your data has transferred across ok. I will check my pictures and see if that are the same. Cool looks like everything has copied across.

Also guys don’t forget to check out my other videos such how to Transfer data from Android to iPhone 13. Do me a favor If you know anyone that might need this video please share it with them hit the subscribe button and smash the bell icon.

Apple iPhone 13 Pro First Look Sierra Blue & Blue Case

Clean Install Windows 11

Transfer Data Android to iPhone 13, 13 Mini, 13 Pro, 13 Pro Max

Hi Guys, Matt from 123myit here. If you have a new iPhone 13, 13 mini, 13 Pro or 13 Pro Max In this video, we will show you two free ways to transfer your data from any iPhone to the new iPhone 13. The first way is recommended by Apple but it requires you to reset your iPhone 13. If you don’t want to reset your iPhone then fast forward to the 5.24 min mark and I will show you how to Transfer your data without resetting your iPhone.

This video will help you transfer your contacts, message history, camera photos and videos. Web bookmarks, mail accounts, calendars and free apps.

What you can transfer.

Tips before you start.

  • Create a backup
  • Make sure both phones are on WIFI and plugged into Power
  • Make sure that you have enough storage space on your iPhone 13
  • If you have a sim card you can transfer that after the data is transferred

The phones that we are using today are Samsung S21 and the iPhone 13 Pro.

Android to iPhone 13

Reset your phone

To reset your iPhone.

Go into settings > General and scroll down to Transfer or reset. Once you are there tap on Erase Content and settings.  Tap continue. This will delete all media and data so do a backup first if you need too. Type in your passcode. And then tap Erase iPhone.

Once your iPhone has reset itself. Just follow the prompts and start setting it up again.

Next up connect to your WIFI and make sure your Android device is connected to the same WIFI.

Continue setting up your iPhone until you get to the Apps and data screen. Once you’re on the Apps and data screen. Go to your Android phone and download the move to iOS app from the Google play store. Play.google.com

Go ahead and when that’s done tap open. On your iPhone tap Move data from Android. Then tap continue, agree and then allow on your Android phone.

Error when transferring

If you are getting  the could not connect error message make sure you turn on location services on your Android phone. You will find it under settings and location. Its important to turn that on. Here it is under Settings and location. Just toggle the button on and go back to the move to iOS app.

Tap continue on your Android device and then type in the code that you see on your iPhone. It now shows you the iPhone wifi. Tap continue. If it comes up again with the wifi to connect to just tap connect.

Ok great you are on the transfer data screen just deselect anything you don’t want to transfer and press Continue. I am going to include messages contacts and camera roll. And I will have to tap allow to give the iOS app access.

Lots of Data to transfer

Depending on how much data you have it might take some time.

Cool your data is transferred now. Tap done on your Android phone and you can close the app. On your iPhone 13 tap, continue setting up iPhone. And then go ahead and set up your iPhone 13. Go ahead and add your apple id if you have one. If not just hit forgot or don’t have one.

If you have two factor on your apple account if will send a code to another apple device or email address type it in. This is something new it might also ask for you Mac password if you have one. Go ahead an enter the password you use for your mac.

Awesome your phone is ready now. Check that your data was copied across. I will check my photos first.

Free Apps

The last step here is to check your free apps. IF they didn’t copy across open up your app store and enter your apple id. Tap on the blue icon in the top right and tap on purchased. This will show you a list of all your previous purchased apps. Just tap to download them.

Don’t have an apple id you can create one by going to the website appleid.apple.com.

If you swipe across you should see all your apps start to appear. If you didn’t get the prompt to Add Apps, then don’t worry, just go to the App store and download the Apps you need.

Copy my data app

The second part of this video is if you don’t want to reset your iPhone. We will move the data with an App called, Copy my data.

Go to the google play store on Android phone and download Copy my data. On your iPhone you can download it through the App Store. Go ahead and deselect anything you don’t want to copy.

Tap next and then Tap to or from Anther Device over WIFI. Tap on the iPhone 13 Pro and Enter the pin number from your android device onto your iPhone. On your Android phone deselect any data you don’t want to copy across. I don’t want contacts and calanders.

Awesome all your data is copied across now. If you have a SIM card you can move it across now too.

Also guys don’t forget to check out my other videos such Apple iPhone 13 Pro and do me a favor If you know anyone that might need this video please share it with them hit the subscribe button and smash the bell icon.

Clean Install Windows 11

How to Create a Windows 11 Bootable USB

Apple iPhone 13 Pro First Look Sierra Blue & Blue Case

Hi Guys and welcome to 123myit. In this video, we will show you everything you need to know about the iPhone 13 Pro. The iPhone 13 Pro has the same A15 Bionic processor as its bigger brother the iPhone 13 Pro Max. Both models have the same price as last year’s 12 Pro and 12 Pro Max.  The cameras have been updated and the battery is larger.

Pricing

Pricing for the iPhone 13 Pro starts at $999 USD and it comes in four different colours Blue, Silver, Gold and Graphite. Storage capacity starts at 128GB and goes up the to 1TB which is impressive.

First up in the box you have the iPhone 13 Pro itself. Next will find the documentation a SIM card eject tool, quick start guide, Guarantee information and Apple sticker. The only other accessory is the Lighting USB cable, which does up to 50% charge in 30 mins with a 20-watt adapter. Not to forget that the 13 Pro supports 15 watts wireless charging and is IP68 water and dust resistant.

This video & article will show you everything you need to know about the Apple iPhone 13 Pro. Helpful if you are looking to upgrade your phone

Display

The iPhone 13 Pro has a 6.1-inch Super Retina XDR OLED display, which is the same size as the iPhone 12 pro. However, the display now includes ProMotion technology that automatically changes the screen refresh rate from 10Hz to 120Hz. It has a 2532 by 1170-pixel resolution at 460 ppi and a brightness boost starting at 1000 nits, which is brighter than the iPhone 12 Pro. If you compare the Pro 13 with the Pro 12 on the left, you can’t really see allot of difference side by side. Therefore, an upgrade from the Pro 12 to the Pro 13 might not be worth it. However, for those of your who are thinking about upgrading from the iPhone 8 it would be a big update.

Design

Apple has kept the smooth flat edge design from the 12 pro on the 13 Pro line up as well. This allows the iPhone to stand up on its end. I love this design we first saw it on the iPhone SE. However, if you buy a cover the phone might not stand on its side with the cover on the aluminium frame does show fingerprints.

The left side of the iPhone, you have the Ring Silent and Volume up and down buttons and a SIM card slot.

On the right side, you have the Sleep Wake power button. On the bottom, you have the lighting connector, microphone and one of the stereo speakers. Actually, the Stereo speakers are impressive. Take a listen.

Face Unlock

Face unlock is standard on the iPhone 13 models. Also along the top, we have a 12-megapixel True Depth Camera that has a F2.2 aperture. While you cannot see them, there is actually a whole bunch of sensors hidden here. Ambient light, Proximity, Flood illuminator, infrared camera and dot projector.

On the back of the 13 Pro, you have a Triple Camera setup which features a Ultra Wide, Wide and Telephoto cameras. The Telephoto camera has a 3x optical zoom. The Ultra Wide camera has a f 1.8 aperture and allows better photos in low light. In addition, the new Wide Camera has a F.15 aperture.

Therefore, out of the box the iPhone 13 Pro will take amazing photos. Here are some comparisons between the iPhone 13 Pro and iPhone 8. Can you spot the difference?

Processor

The iPhone 13 Pro has the A15 bionic processor, which has an updated 5 GPU cores. A fast processor is important when playing games and videos or when generally moving around the iPhone. Here is the Geekbench scores for the iPhone 12 Pro and the iPhone 13 Pro. As you can see the iPhone 13 Pro wins with a single core score of 7509 and multicore score of 19477

Battery

In terms of Battery life for the iPhone 13 Pro, it has a 3095 mAh battery and you can expect up to 22 hours video playback. This will get you about 20 hours of streamed video playback. Say from the web.

My thoughts pretty amazing phone. The cameras get better all the time so if you are looking for the best Instar worthy shots you can’t really go wrong. However I think the price could have dropped a bit since Apple no longer includes a charger and battery life could be also be improved in my mind. I would like to see it last longer.

Guys, don’t forget to check out my other videos such as How to record your screen on iPhone or iPad. Also do me a favour if you know anyone who might like this video please share it will them, hit the subscribe button and smash the bell icon.

Clean Install Windows 11

How to Create a Windows 11 Bootable USB

Clean Install Windows 11

Hi Guys Matt from 123myit. In this video, I will show you how to do a Clean Install of Windows 11. Guys on an earlier video I showed you how to create a Windows 11 Bootable USB drive and in this video we will use that USB to do a clean install of Windows 11. I will put a link in to top of the video now.

Using the USB to do a clean install Windows 11

Grab your Bootable Windows 11 USB and plug it into your computer that you want to install Windows 11 on. Go ahead and restart your computer and when your computer is restarting tap the key that will put you into the boot menu. On my HP computer, the key is F9. However, it might be different depending on what brand of computer you have. If you are not sure, try Googling boot key and the brand of computer.

Install Windows 11

Cool, so the boot menu will come up now and I will go ahead and select the USB I made which was the SanDisk Ultra. Great you made it this far select the country you are in. I am in Australia so I will select Australia. Nevertheless, if you are in the US just hit next. In addition, hit install now.

Upgrade or Clean Install?

Just accept the terms and click next. All right, you can do an upgrade, which will keep all the files and applications on your computer.  However, this video is a clean install of Windows 11 so we will select Custom. This next step will wipe data on your computer so make sure you do a backup first.

Go ahead, delete all the partitions, and click next. Cool, your USB is now doing a clean install of Windows 11 on your computer. This make take some time depending on your computer speed. So take a break make a cup of coffee or hit subscribe on my channel and leave a thumbs up so that people know this is a legit video.

Awesome if you made it this far you have done a clean install of Windows 11 from the USB installer drive. Now all you need to do is go through the setup prompts and you are done.

Guys don’t forget to check out my other videos such as how create a Windows 11 Bootable USB. And do me a favour if you know anyone who might need this video please share it will them, hit the subscribe button and smash the bell icon.

Fix The PC must Support TPM 2.0 Error HP

Fix The PC must Support TPM 2.0 Error ASUS

How to Create a Windows 11 Bootable USB

Hi Guys Matt from 123myit. In this video, I will show you how to create a Windows 11 bootable USB. Creating a Bootable Windows 11 USB will allow you to install Windows 11 on multiple computers. You will need a USB flash drive that is at least 8GB in size and you will need a copy of Windows 11. To download a copy of Windows 11 you can check out the how to download Windows 11 video I did earlier and I will put a link in the top of the video now.

Download Windows 11 – Windows 11 bootable usb

Once you have followed my other video and downloaded the Windows 11 iso file. Plug in your USB drive to your computer and double click the Windows 11 iso file. We will be formatting the USB so make sure you backup any files on the USB as this process will wipe any files on the USB.

Windows 11 bootable usb

Open up Disk Management by right clicking the Start button or in the search field type “partitions” and click the top result. The Disk Management screen should pop up. Find you USB drive in this case I know my USB drive was around 60 GB in size so this 57 GB drive is the correct one. Just make sure you have the correct drive because this next step will delete data on the USB.

Deleting Partitions – Windows 11 bootable usb

Delete all partitions on your removable USB drive by right clicking on each and selecting “Delete Volume.

Cool, once you have done that right click again and create New Simple Volume. Click next and type 1000 in the Simple volume field. Click next and next again. Then set your file System to FAT32 and rename your Volume label as BootPart. Then click next and finish. IF done right the drive will pop up in Windows. Do the same steps again, but in the Volume label type DATAPART. Click next and then finish.

DATAPART

The DATAPART window will also popup just close it.

Double click on the Windows 11 ISO file and Copy all the files and folders, except the “sources” folder, from the Windows 11 ISO to the FAT32 BootPart partition on the USB drive.

To do this select all your files then hold down CTRL and click on the sources folder. This will exclude the folder from the copy. Once you have done that just drag the files across to the BOOTPART partition on the USB.

Once they are, all copied go ahead and create a new empty sources folder. Make sure it is the same name as the source folder you did not copy across.

Sources Folder

Next, go into the sources folder and find a file called boot.wim and copy to the new sources folder on the USB drive. Cool, now go to the Disk Part partition on the USB and copy the all the files from the Windows 11 ISO to the DISKPART partition.

Awesome, once the files have copied across you have finished creating a Windows 11 bootable USB. You can now use this USB to install Windows 11 on any computer. In my next video, I will show you how to use this USB to do a clean install of Windows 11.

Guys don’t forget to check out my other videos such as how to fix The PC must support TPM 2.0 error on HP. In addition, do me a favour if you know anyone who might need this video please share it will them, hit the subscribe button and smash the bell icon.

Fix The PC must Support TPM 2.0 Error ASUS

Fix The PC must Support TPM 2.0 Error Gigabyte

Fix The PC must Support TPM 2.0 Error HP

Hi Guys Matt from 123myit. In this video, we will show you how to enable TPM PTT on your HP computer. Guys if you are trying to install Windows 11 and you are getting the error The PC must support TPM 2.0 then this video will help. TPM stands for Trusted Platform Module and it can prevent malicious attacks on your hardware. And is required to be turned on to run Windows 11. TPM 2.0 Error HP can be annoying. Lets fix it.

TPM 2.0 Error HP

Find the TPM setting – TPM 2.0 Error HP

Go ahead and restart your computer and you need to log into your computer bios. To do this when your computer starts up you need tap the delete button on your keyboard. For my Asus motherboard the button is Delete, however if can be different on different motherboard. If its HP it could be F10. Other models it could be Esc, F1 or F2 keys.

Bios Settings

Once you are logged into, your Bios go to the Security and down to TPM embedded security. On the TPM device in the drop down change it from Hidden to Available.  Press  F10 to save. The computer will restart and then it might ask you to press F1 to accept the change. Press F1 and that is that all you need to do. To fix the TPM 2.0 Error HP.

Awesome, this time when you go to install Windows 11, you should get past that error and get the ready to install screen.

Guys don’t forget to check out my other videos such as how to fix The PC must support TPM 2.0 error on Asus. And do me a favour if you know anyone who might need this video please share it will them, hit the subscribe button and smash the bell icon.

Fix The PC must Support TPM 2.0 Error Gigabyte

Download Windows 11 ISO File

Fix The PC must Support TPM 2.0 Error ASUS

Hi Guys Matt from 123myit. In this video, we will show you how to fix the TPM 2.0 Error ASUS on your Asus motherboard. Guys if you are trying to install Windows 11 and you are getting the error The PC must support TPM 2.0 then this video will help. TPM stands for Trusted Platform Module and it can prevent malicious attacks on your hardware. And is required to be turned on to run Windows 11.

Heres where you can find the setting on Asus motherboard – tpm 2.0 error gigabyte

TPM 2.0 Error ASUS

Go ahead and restart your computer and you need to log into your computer bios. To do this when your computer starts up you need tap the delete button on your keyboard. For my Asus motherboard the button is Delete, however if can be different on different motherboard. If its HP it could be F10. Other models it could be Esc, F1 or F2 keys.

Once you are logged into your Bios go to the advanced mode down the bottom, you can also press F7. Then click on the Advances Tab up the top and click to highlight the TPM Device Selection menu. Change the discreet TPM to Firmware TPM, click ok. Then go to the Exit Tab and click Save Changed & Reset. That is that all you need to do.

Awesome, this time when you go to install Windows 11, you should get past that error and get the ready to install screen.

Guys don’t forget to check out my other videos such as how to fix The PC must support TPM 2.0 error on Gigabyte. And do me a favour if you know anyone who might need this video please share it will them, hit the subscribe button and smash the bell icon.

Download Windows 11 ISO File

Record Your Screen on iPhone or iPad

Fix The PC must Support TPM 2.0 Error Gigabyte

Hi Guys Matt from 123myit. In this video, we will show you how to enable TPM PTT on your Gigabyte motherboard. Guys if you are trying to install Windows 11 and you are getting the error The PC must support TPM 2.0 then this video will help. TPM stands for Trusted Platform Module and it can prevent malicious attacks on your hardware. And is required to be turned on to run Windows 11.

Heres the error to look out for – tpm 2.0 error gigabyte

tpm 2.0 error gigabyte

Go ahead and restart your computer and you need to log into your computer bios. To do this when your computer starts up you need tap the delete button on your keyboard. For my Gigabyte motherboard the button is Delete, however if can be different on different motherboard. If its HP it could be F10. Other models it could be Esc, F1 or F2 keys.

Once you are logged into your Bios go to the Peripherals tab up the top. Then to Intel Platform Trust Technology PTT. And then set it to Enabled. That is that all you need to just make sure you save it by going to Save & Exit. tpm 2.0 error gigabyte.

Awesome, this time when you go to install Windows 11, you should get past that error and get the ready to install screen.

Guys don’t forget to check out my other videos such as how to download Windows 11. And do me a favour if you know anyone who might need this video please share it will them, hit the subscribe button and smash the bell icon.

Record Your Screen on iPhone or iPad

Turn on Speak Screen on your iPhone or iPad