How can I tell what version of Windows I am running, 32bit or 64-bit?

When installing Windows on your PC, you can install it as a 32-bit operating system or a 64-bit operating system. For most people it doesn’t make a difference which version you are using, however if you add a new piece of hardware or decide to upgrade an existing driver you will be asked which version of Windows you are running. For example a 64-bit driver wont install on a 32-bit operating system. Read on and I will explain how determine which operating system of Windows you are using.

No matter what OS you are using Windows XP, Vista, 7 or 8 if you want to check what version you are using you can simply go to Start button, Right click on Computer than properties. Windows 8 is a little bit different, you will need to go into your charms menu and type Computer in the search field and right click on Computer when the search finds computer. Click on properties.

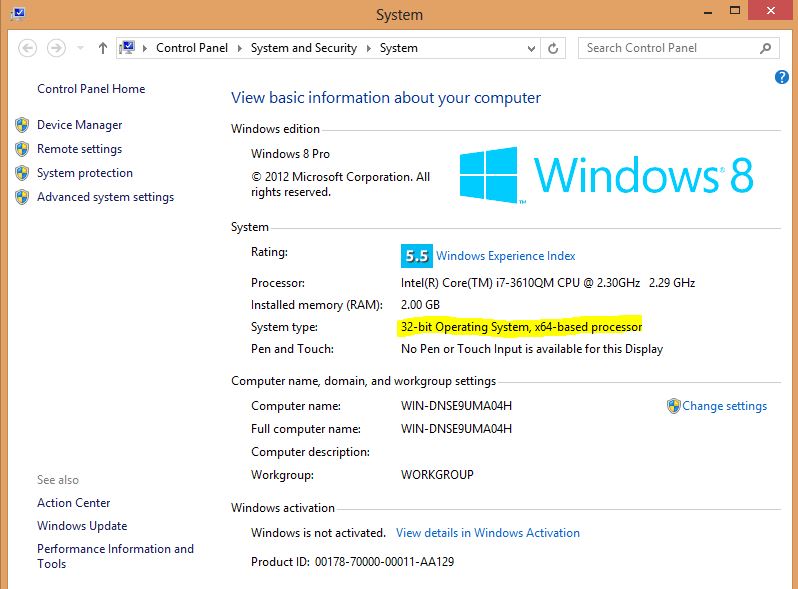
You should now see the System Control Panel. This screen will show you information about your PC and Windows OS. If you have a look under System Type you will see information regarding whether or not you are using a 32-bit or 64-bit version of Windows. In Windows XP it won’t show up at all, instead it will only show 64-bit.

Windows 8 System Control Panel

In the screen shot above you can see the System Type is a 32-bit operating system, however its running on a 64-bit CPU.

How To Jailbreak your iPhone 4S running 6.1 Firmware with Windows 7 and evasi0n.

A step by step guide on how to jailbreak your iPhone 4S with Windows 7 and evasi0n. If you are looking for the apps that I used in this guide you can download from the downloads section here.

Whats the difference between Jailbreak and Unlocking an iPhone?

People always talk about jalibreaking and unlocking, but what does it actually do? Isn’t it the same thing ? While they might be related in that they give you more control over your iPhone, iPod or iPad they are in fact not the same.

So just what is jailbreaking and unlocking ? And what’s the difference between them?
The basic differences between jailbreak and unlock is, jailbreak allows you to control what software you install on your iPhone or iOS device and unlocking allows you to change the carrier that the device works with.

You see Apple likes to control what software can be install on your iOS device. Only Apple approved apps can be installed from the Apple Apps Store. But there is loads of other apps available through other stores than Apple’s App Store. These apps aren’t available through Apple’s App Store because Apple rejects them as they violate Apples terms of service or they compete with Apple’s own apps or they are just really poorly coded apps that don’t work as they should.

Jailbreak is not just an Awesome ACDC song, you can jailbreak your iPhone using various tools. There is a whole tutorial on how to jailbreak your iPhone with Redsn0w here. If you want to jailbreak your iPhone 4 you can use an app called evasi0n,you can download the apps under the downloads section of this website here. If you want to see our guide on how to jailbreak and iPhone 4 click here.

Redsnow allows you to remove Apple’s restrictions on your iOS device which allows you not only to access the Apple’s Apps Store, but also allows you to access all the other available apps. Most of these can be accessed or purchased through Cydia which is the leading alternate apps store.

A locked iPhone means that you will only get service on that carrier that your sim card is with. If you try to put in a different sim card from a different carrier into your iPhone you won’t get any service. Unlocked iPhones don’t get all the features that a locked iPhone will get.

So that’s all there is pretty simple 🙂

How to install Facebook App on your old iPhone 3G iOS 4.2.1

This video will show you how install Facebook App on your old iPhone 3G.

So I after I did the tutorial on how to jailbreak your iPhone 3G running iOS 4.2.1 see the video here.
I had a few people ask me how to add Facebook to the old version of the iOS and this is how you do it.

NOTE: You must first Jailbreak your iPhone see the link above for more detail.

Step 1. Open Cydia on your freshly jailbroken iPhone 3G.
Step 2. Press Manage > Sources,
Step 3. Press the Edit than Add button.
Step 4. Type cydia.iphonecake.com and press Add Source.
You should then have iPhone under your Sources.
Step 5. Press iPhoneCake
Now here is the important part. You need to select the AppSync version for your iOS.
Since my version is iOS 4.2.1 I will need to select AppSync for OS 4.2.
Step 6. Select AppSync for OS 4.2.
Once you select it properly it should have a green tick beside it.

Ok, you are halfway through stay the coarse and you will be rewarded 🙂

Step 7. Download iTools2012.zip file from the 123myIT downloads webpage here.
iTools is an application which allows you to place apps directly on your iPhone. This is the tool that we will use to get the old version of the Facebook app on to your iPhone.
Step 8. Extract the iTools2012.zip file to your desktop.
Step 9. Run the iTools 2012.exe file.
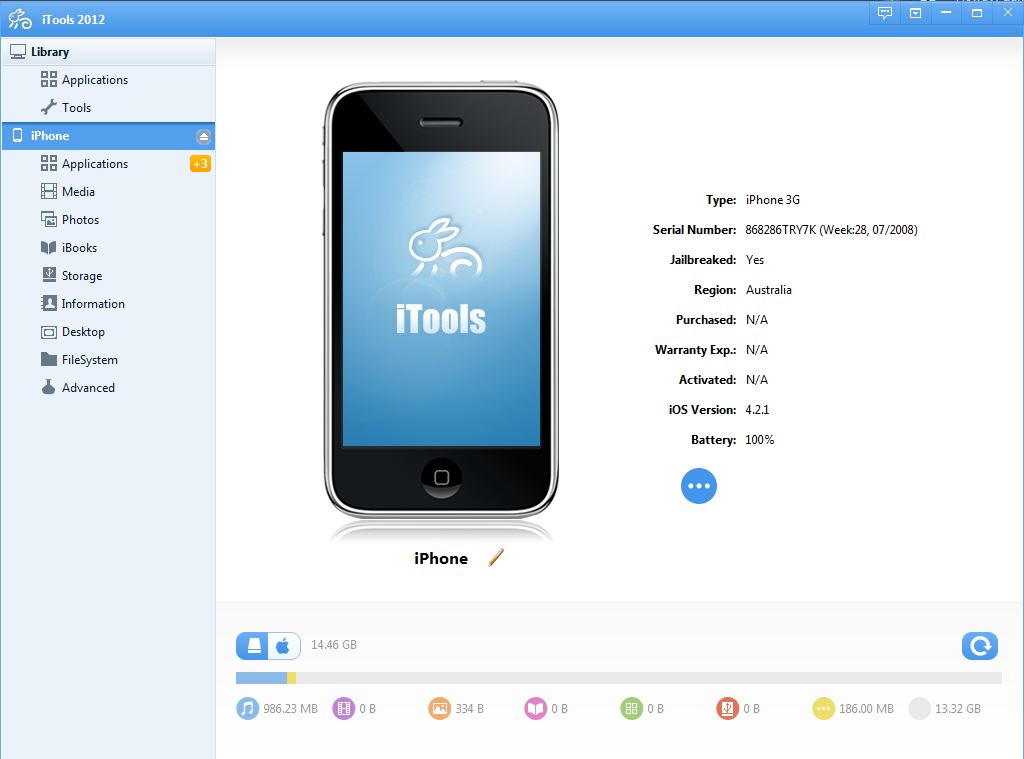
Step 10. Connect your iPhone to your PC and give the PC time to install the iPhone driver. Once its installed it should look like the screen shot below.
iTools 2012
Step 11. Download the Facebook App from 123myIT Downloads page here.
Step 12. Extract the Facebook App file to your desktop.
Step 13. Go back into your iTools 2012 application click on application inside the iTools then simply drag and drop your Facebook App file that you extracted to your desktop.

This should load your older Facebook app back on to your iPhone. Simply click on it login with your Facebook user name and password and you are ready to go. 🙂

I hope this helps you out. Please leave some feedback and thumbs and share this page with your friends if it helped you out.
Newer versions of the Facebook apps can be found on Google Play and iTunes app store.

Good Luck 😉

How To Jailbreak your iPhone 3G running 4.2.1 Firmware with Windows 7 and Redsn0w.

A step by step guide on how to Jailbreak your iPhone 3G using Windows 7 and Redsn0w. If you you dont have any luck doing the jailbreak you can always restore your iPhone from iTunes.
Download Redsn0w from our downloads page. https://www.123myit.com/downloads/

So I made this video to help others Jailbreak their iPhones. Because about one year ago I tried to jailbreak my iPhone unsuccessfully.
What is this jailbreak I speak of? Well if you think of the term jailbreak you imagine a prisoner escaping from jail. Well that is essentially what you are doing with your iPhone you are breaking it out of jail and relaxing all the restrictions that Apple has placed on the iPhone. If you want to learn more about what is the difference between jailbreak and unlock you can read my article on it here. Jail breaking allows you to install Apps and configure your iPhone that would otherwise be locked down by Apple’s default settings. A good example of a great Apo that will install on a jail broken iPhone is Veency and you can see my video here.

Before attempting any funny business with your iPhone or iOS device, you should always do a backup in iTunes and you can find the video on how to here. Once you have backed up your iPhone and you are happy that all your data is safe you are ready to Jailbreak it.

Step 1. Go into your setting menu, general and turn off Auto-lock and Passcode Lock. Make sure both these settings are off as they may interfere with the jailbreak.
Step 2. Scroll up and go into About, and make a note of the firmware version.
Step 3. Download redsn0w from our downloads section here. There is a Windows and Mac version that you can download.
Step 4. Install redsn0w and run the application. Plug in your iPhone to the USB port and make sure the driver for the iPhone installs correctly. If it doesn’t try restarting your PC or Mac with your iPhone plugged into the USB port. This will normally resolve driver issues, because the driver detects the iPhone and installs the driver on start up.
Step 5. Make sure you iPhone is turned off and still plugged in.
Step 6. Ok you need to now put your iPhone in DFU mode. To do this you need to Hold down the power button for 3 seconds. Without releasing the Power button, also hold down the Home (bottom center)button for 10 seconds. Without releasing the Home button, release the Power button, BUT KEEP holding the Home button for 15 seconds.
Step 7. In the redsn0w program it should say waiting for reboot. And on your iPhone will say downloading jailbreak data. Once redsn0w says done you can actually disconnect the USB cable from your iPhone and it will continue to install.
Step 8. The iPhone should reboot and once it does this you can login and scroll across to your Apps and you should see a brown Cydia App. If you have this then you have been successful in jail breaking your iPhone.

One last thing I should mention, the jailbreak process does not always go smoothly. The most annoying error is USB communication error. You can see my video on how to fix this error here.

Good luck guys and have fun.

Matt

How to turn off work offline mode in Microsoft Outlook 2010 2013.

This video will show you how to turn off work offline mode in Microsoft Outlook 2010 2013.

Microsoft Outlook, what a great email client. But with all its features and functions some of them can be down right annoying!!!
Yes, we all know what I am talking about the dreaded Work Offline message. Well first of all lets talk about what is Work Offline and what does it do?
Work Offline, is a feature within Microsoft Outlook that allows you to continue working and writing emails even if your connection has dropped out. Now when I say connect I mean this could be your LAN connection or your internet connection if you are using a internet service. Or if you work on Wifi it could be you have walked into an area with limited signal and your connection has dropped out. When this happens Outlook will start using a local copy of your email which is stored in an Offline Folder File (.ost)

There are actually quite allot more reasons why Offline Mode starts. However Microsoft says these are the most common ones.

* The Exchange server is offline for maintenance.
* You are traveling and can’t connect to your Exchange server.
* You find performance unacceptable when using a slow connection to the server, such as dial-up connections with a 56 Kbps modem.

The idea with Work Offline is that you can keep working even though your internet or email server is unavailable. Once the internet or email server comes back online. Outlook should detect this and it will sync the work you have done up until that point.

How do I turn Work Offline on and off?
You will find the button to turn Work Offline on and off in the Send/Receive tab in the top of Outlook.

Work Offline Menu Bar

The image below will show you when you are in Offline Mode. You can tell this by the Orange box around work offline.

Currently in Work Offline Mode

And also there will be a Red X and Working Offline in the bottom of your Outlook as well as a red X on your Outlook icon in your task bar.

Working offline Task Bar

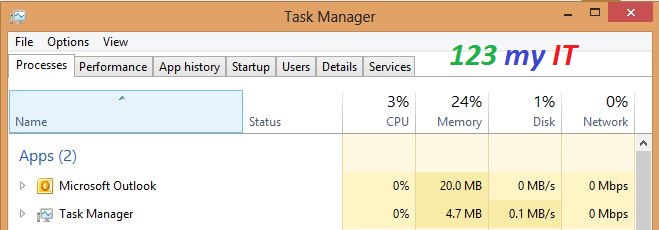
To get yourself out of Work Offline, try restarting your Outlook. Make sure you do not have multiple Outlook.exe processes running in Task manager, check your internet connection. Check the Send/Receive tab and make sure that is it turned off.

Outlook Task Manager

I hope that helps solve some of the mystery. Good Luck.

Related 123 my IT Videos.
Work Offline error in Microsoft Outlook 2010
Setup a Yahoo mail account in Microsoft Outlook 2013
Setup a Gmail account in Outlook 2013

General Boot Camp questions about installing Windows 8 on a Mac

To download Boot Camp 4 or 5 go to our downloads section.
Click here.

What is Boot Camp 5?
Boot camp 5 is an Apple release of Windows Support Software which is drivers for Windows OS. This allows you to run Windows 8 or Windows 7 and Vista on your Mac.

For more information on how to install boot camp 5 on your Mac see the 123myIT tutorial on how to install Windows 8 on your Mac.

The following Macs support Windows 8.
 MacBook Air (Mid 2011 or newer)
 Mac Book Pro (15-inch and 17-inch, Mid 2010) and MacBook Pro (Early 2011 or newer)
 Mac Pro (Early 2009 or newer)
 Mac Mini (Mid 2011 or newer)
 iMac (27-inch, Mid 2010 or Mid 2011 or newer)

How can I install Windows 8 on my Mac?
To install Windows 8 on your Mac you need to run the Boot Camp Assistant. The Boot Camp Assistant will help you partition your internal hard drive and install Windows 8.

Can I upgrade my Windows 7 installation to Windows 8?
Yes. However you need to download and install the latest version of Boot Camp support software, which is currently Boot Camp 5. Do this before attempting to upgrade the version of Windows 7 to Windows 8.

When doing an upgrade from Windows 7 to Windows 8, I get an “Uninstall USB 3.0 eXtensible Host Controller Driver” message, What does this mean?
Do not click Uninstall. Click on the back button and do not proceed with the upgrade. Download the most recent Boot Camp Assistant in OS X Mountain Lion and then try the upgrade again.

My Thunderbolt devices are not recognized after I upgraded Windows 7 to Windows 8. Is there a way to fix this?
You need to disable the Windows 8 Fast Boot feature, this will allow the Thunderbolt devices to be recognized.

What OS X version do I need to run to use the Boot Camp 5 support software?
To run Boot Camp 5 you will need OS X Mountain Lion v10.8.3 or later installed on your Mac to download boot camp 5 support software.

Can I download a copy of the Boot Camp 5 Support Software if I don’t have a Mac running OS X Mountain Lion v10.8.3?
You can download the Boot Camp 5 Support Software from the Apple website. The link is here.

After downloading the Boot Camp 5 Support Software, what do I do next?
Once you download the Boot Camp 5 Support Software you will need to unzip it to extract it.

1. Double click the zip file to extract it.
2. Click on the Boot Camp disk image.
3. Copy the Boot Camp and “$WinPEDriver$” folders to the USB flash drive or any hard drive that is formatted with the FAT file system (you will need to format the drive with FAT to allow the files to be read in both OS X and Windows).
4. Start the install of Windows and leave the USB flash or hard drive attached to your Mac.
5. Let the installation run until it completes.
6. Let your system restart and your Windows 8 installation is complete.

NOTE: If you didn’t have the USB or Hard drive attached when you were doing the install of Windows 8 you can install the Windows Support Software by going into the USB drive into the Boot Camp folder and then double click the “setup.exe” file. This will install all the drivers and software to make you sound Wifi and other devices work.

How do I format a USB or Hard drive with FAT file system?
Want to know how to format a disk to be used on a Windows computer? Read more below.
Important: Be careful when formatting your USB drive as formatting the drive will delete all the data on the drive.

1. Login to OS X
2. Open Disk Utility.
3. Click on the disk you want to format with FAT.
4. Click Erase, and depending on the size of the drive you will have two options.
 If the size is less than 32 GB, you will need to choose MS-DOS (FAT).
 If the size is greater than 32 GB, you will need to choose ExFAT.
5. Next you will need to type a name for the disk.
6. Click on the Erase button and then click on Erase again.

Which versions of Windows are supported with Boot Camp 5?
Important details about Boot Camp 5.
Windows 8 and Windows 7 64-bit versions are supports by Boot Camp 5 Support Software. If you want to use a 32-bit version of Windows 7 you will need to use the Boot Camp 4 Support Software. Currently Windows 8 32-bit version is not supported via Boot Camp.