This video will show you How to replace a faulty power supply on a Cisco 3560G switch.
Step 1. Remove Side Screws.
Step 2. Remove bracket screws.
Step 3. Remove the screws at the back of the switch.
Step 4. Slide the top of the switch off from the back.
Step 5. Unplug all the power cables from the power supply of the switch.
Step 6. Unscrew the 4 screws either side of the power supply.
Step 7. Slide the power supply out of the switch and replace the power supply as needed.
Monthly Archives: April 2013
How to remote control an iPhone with Veency and Java on a Mac.
This video will show you How to remote control an iPhone with Veency and Java on a Mac.
Step 1.Download the TightVNC Java appfor Macfrom the link below.
Step 2. Run the download and go into nossh folder and right click the TightVNC Java viewer. Click open.
Step 3. Connect your iPhone to your local wireless network.
Step 4. Go to settings then wifi and get your iPhones IP address.
Step 5. Enter in the IP address of your iPhone into the Tight VNC screen.
And you should be able to connect from your Mac to your iPhone.
How to customize win+X menu in Windows 8 Tip 3.
This video will show you how to add a Windows 8 Start Menu.
Step 1.Press the Windows key on your keyboard + the X key.
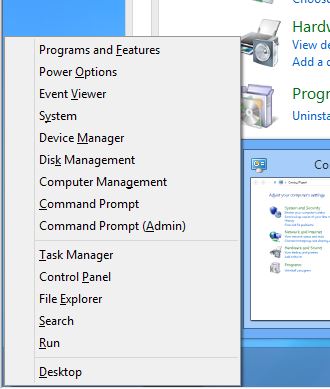
In Windows 8, Microsoft it took away the Start menu, however it also provided a very useful new tool the Power User menu. You can bring up the Power User menu by Right-clicking the lower-left hand corner of the Desktop or by pressing the Windows key + X. When you do this a text-based menu pops up that gives you access to 16 tools, including a Run box, a command prompt, an administrative command prompt, the Device Manager and many other useful power tools.
The Power Users menus has the following sub-menus.
Programs and Features.
Mobility Center
Power Options
Event Viewer
System
Device manager
Disk Manager
Computer Manager
Task Manager
Control Panel
File Explorer
Search
Run
You can actually hack the Power User menu. You can remove and change the menu items that are displayed. You might want to add in programs you use frequently or even individual files that you use all the time.
To start hacking the menu with the items you want to use make sure that you can view hidden files in the Windows File Explorer. Then browse to
C:\Users\username\AppData\Local\Microsoft\Windows\WinX
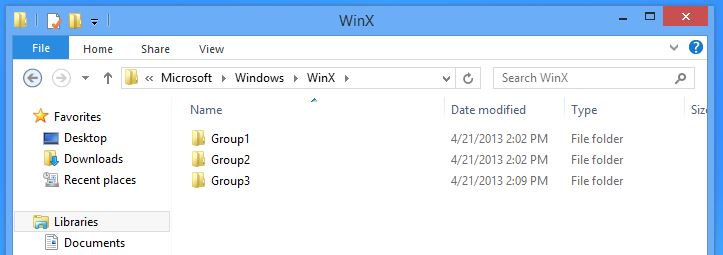
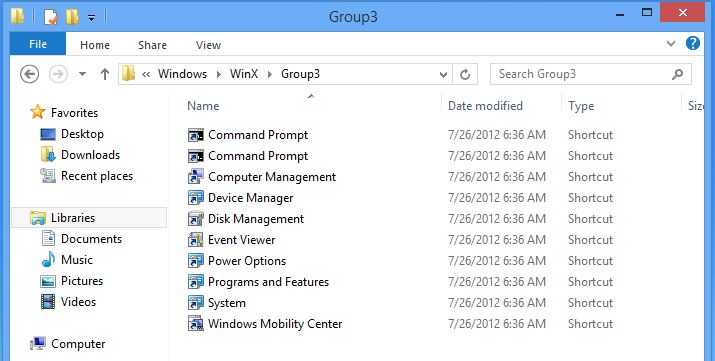
Change the username to the account name of the user you are logged on as. Once you do this you should see three folders there: Group1, Group2 and Group3. Each group has shortcuts to the apps that appear on the Power Menu.
The three Group folders represent the three menus on the Power User menu. You can add and delete the shortcuts within folders Group1, Group2 and Group3 and they will be added or removed from the Power User menu.
If you want to add a shortcut, open the group folder where you want to add the shortcut and right-click, select New then Shortcut.
Once you’ve finished making the changes the Groups folders, you will need to log out or restart your machine to apply the changes to the menu.
How to add a Windows 8 Start Menu Tip 2.
This video will show you how to add a Windows 8 Start Menu.
One of the things that annoys people about Windows 8 is the missing Desktop’s Start menu. Microsoft tried very hard to remove the Start menu but fell short as you can use free or paid add-on programs to get the Start menu back.
If your cheap like me and don’t want to spend the money to get an app to put the Start menu back then you can add a Start menu on the taskbar by doing the following steps.
Step 1. Right click the Desktop.
Step 2. Go to New then Folder.
Step 3. Paste the following string.
C:\Users\username\AppData\Roaming\Microsoft\Windows\Start Menu
You need to replace username with the name of the user you are logged in as.
Paste the url above into the Folder bar and you are good to go.
You should then see the new menu bar in the bottom right hand corner of the screen.
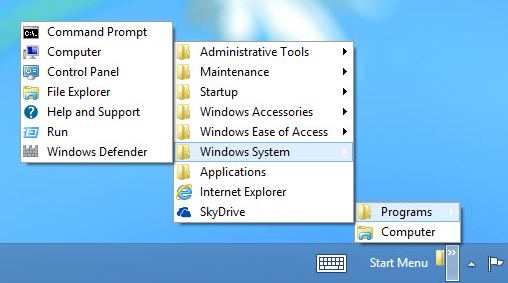
To remove the Start menu you can just right-click and select Toolbars, then untick the Start Menu Toolbar.
When you right click the taskbar and go into Toolbars you will see a whole heap of other pre-built toolbars which you can add to the taskbar.
Here is a list and description of what each one does:
Address: This adds a box on your Taskbar, which allows you to type URLs. Simply type a URL, press Enter and you will go to that website.
Links: This shows your Explorer favorites on the Taskbar.
Touch Keyboard: This shows a keyboard icon on the Taskbar. When you Click on it, it will display an onscreen keyboard.
Desktop: The Desktop toolbar displays every icon on your Desktop. It even displays items such as Homegroup.
How to setup GodMode on Windows 8 tip 1.
This video will show you how to setup GodMode on Windows 8 computer.
The step by step guide on how to setup “God Mode” on Windows 8.
If you have just purchased a new pc you might notice that there is loads of hidden settings where by you can customise Windows 8. However the settings are scattered throughout Windows 8 and it can take time to find them.
This is where “God Mode” comes in. While the term “God Mode” sounds like something from a Doom game, “God Mode” in Windows 8 is really a hidden folder that allows you to get access to all the settings in Windows 8 that are spread out through the Microsoft operating system.
Make sure you have turned hidden files and folders off. To do so go into Explorer, click the View tab and tick “Hidden items” and “File name extensions”. Then follow the steps below.
Step 1. Right click the Desktop.
Step 2. Go to New > Folder.
Step 3. Paste the following string.
GodMode.{ED7BA470-8E54-465E-825C-99712043E01C}
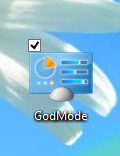
If you have followed the steps correctly you should see the folder icon change to the icon in the picture above.
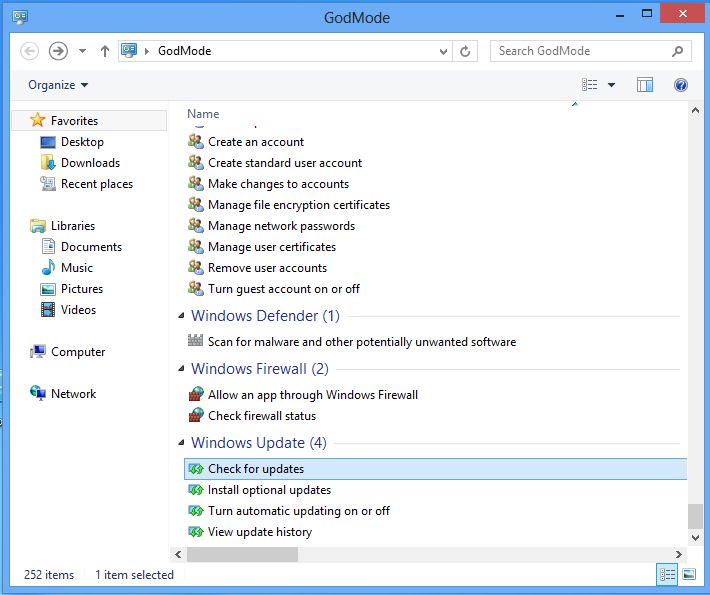
When you double click the GodMode icon you will see a folder full of settings and tools, from “Change User Account Control settings” to “Check for updates.” These settings are organized by category. You can open or close each category by click on the triangle next to it. The category’s have a number in brackets beside them which represents how many settings there are in it.
Double click any of the settings and it will take you directly to the setting with in Windows 8. In some cases you will get a wizard screen where you need to follow the prompts. In other cases you will be sent to the control panel or other Windows 8 settings screens.
How to setup Yahoo mail on a Mac using Mac Mail.
Step 1:Choose Apple menu, System Preferences, and then click Mail, Contacts & Calendars.
Step 2: If you have already added an account, click the Add Account button.
Step 3: Select an account type, In this example we are choosing Yahoo.
Step 4: Enter your account information, and then follow the onscreen instructions.
Step 5: Choose the apps you would like to use with your mail account.
Do you want Chat? Do you want Calendars?
How to add a Gmail account to a Mac and Mac Mail.
This video is a guide on how to add a Gmail account to a Mac and Mac Mail. The following steps are:
Step 1:Choose Apple menu, System Preferences, and then click Mail, Contacts & Calendars.
Step 2: If you have already added an account, click the Add Account button.
Step 3: Select an account type, In this example we are choosing Gmail.
Step 4: Enter your account information, and then follow the onscreen instructions.
Step 5: Choose the apps you would like to use with your mail account.
Do you want Chat? Do you want Calendars?
How to connect to file servers, computer shares or Windows shares on a Mac.
This video is a step by step guide on how to connect to file servers or Windows server shares on a Mac.
Step 1: Click on go.
Step 2: Connect to a server.
Step 3: Type in the Ip address of the server or PC you want to connect to.
If you are connecting to another Mac use this format.
afp://IPaddress
If you are trying to connect to a Windows PC or Windows server use this format.
smb://DNSname/sharename
smb://IPaddress/sharename
To browse available shares that are on the same network as you. Do the following steps.
Step 1: Click on go.
Step 2: Go to Connect to a server.
Step 3: Click Browse
This will allow you to browse other PCs on the network that have enabled file sharing.

